User:AlexandraSM Creating a 2D Interface in a 3D Application (FireMonkey 3D Tutorial)
Go Up to Tutorial: Creating a FireMonkey 3D Application
A 3D application cannot directly use 2D components such as buttons or lists. However, there is a simple way to deal with this problem, by creating a bridge between the 3D and 2D scenes. FireMonkey provides the FMX.Layers3D.TLayer3D component for this purpose.
Contents
Adding and Adjusting a 2D Surface (TLayer3D) and a TButton
- With the Form from the previous tutorial selected in either the Object Inspector or the Structure View, double-click TLayer3D in the Tool Palette.
- Now you can use the TLayer3D component as the surface for FireMonkey 2D components.
- With TLayer3D selected in either the Structure View or Object Inspector, add a TButton. In the Structure View, make sure the button is the child of the layer, not a child of the Form (if you need to correct the hierarchy, drag the TButton and drop it on the Layer).
- To simulate a 2D surface, change the Projection type of the TLayer3D component. In the Object Inspector, set the following property of the layer:
- Projection = pjScreen
- A screen projection is a screen plane pixel-to-pixel projection with a fixed (invisible) camera, and the front plane of the 3d-frustum is now a screen plane. Every object is still 3D, but can be manipulated as if 2D.
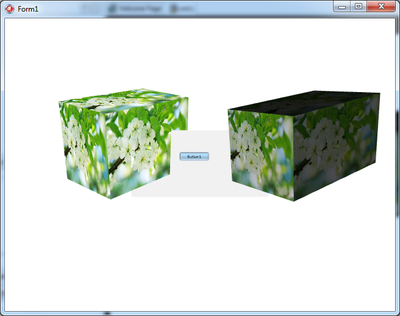
- Your 3D application should now look similar to the following figure:
- As you can see, the TLayer3D component has overshadowed the scene, to say the least. In Object Inspector, with TLayer3D in focus set the following properties:
- Align to
alMostRight(or any other alignment you choose) - Width to
150(or any other width you choose, specified in pixels)
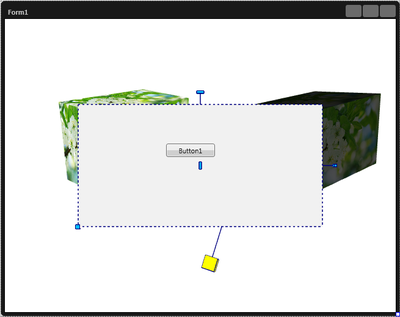
- For example:

- Align to


Adding and arrange 2D Components
Now delete the added button, to add other components through witch the 3D objects on the form are rotated, moved or resized.
- With TLayer3D selected in focus add five TGroupBox
- Select all group boxes in Structure View by pressing Ctrl and click, and set in in Object Inspector, Align property to
alTop - Select the first three group boxes from top, and set in in Object Inspector, Height to
70(or other value that you consider its fits better for you final layout). - Select each TGroupBox and set:
- Add to the first three TGroupBox pairs of two buttons to increase and decrease the width, height and depth.
- Change the names of buttons pairs as following:
- IncreaseWidthButton and DecreaseWidthButton
- IncreaseHeightButton and DecreaseHeightButton
- IncreaseDepthButton and DecreaseDepthButton
- Change Text in concordance with the button name.
- To the Move group box add three set of pairs of two buttons
- Change the names of buttons pairs as following:
- MoveRightButton and MoveLeftButton
- MoveDownButton and MoveUpButton
- MoveBackButton and MoveFrontButton
- Change Text in concordance with the button name.
- To the Rotate group box add three TTrackBar components to rotate the 3D object on each axis.
- Change the names of the TTrackBar to RotateXTrackBar, RotateYTrackBar and RotateZTrackBar
- In Object Inspector set, for each track bar, the Min property to
-360and Max to360.
- Select all group boxes in Structure View by pressing Ctrl and click, and set in in Object Inspector, Align property to
- Add to the form an other TLayer3D
- With the new TLayer3D in focus, set in Object Inspector the Projection property
pjScreenand Align property toalTop. - Add to the new TLayer3D two TGroupBox components.
- Select each TGroupBox and set:
- Add to the ManipulateItemGroupBox three TRadioButton, one for each 3D object in scene.
- Select each TRadioButton and set:
- Add to the LightGroupBox a TButton.
- Select the button and set:
- With the new TLayer3D in focus, set in Object Inspector the Projection property
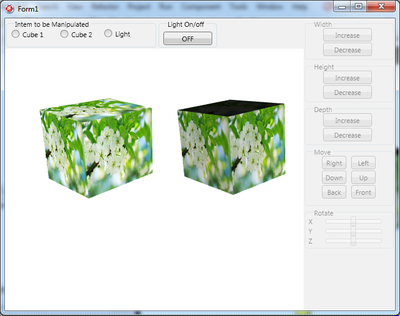
The final layout should look like this:

Adding Events, and Event Handlers
You now have a simple 3D scene in which you can easily assign events to objects.
- 1. To get what 3D object is to be manipulated declare a global string variable to keep the name of the object.
The track bars offers the possibility to rated the object in focus on the OnChange event. To avoid updating the rotations angles for the anterior object when a other object is selected, add a Boolean variable RotateFlag. If the set to False, the code in OnChange event handler will not occur.
//Delphi declaration
var
  Form1: TForm1;
  ManipulatedItem: String;
  RotateFlag: boolean;
  // C++ declaration
TForm3D1 *Form3D1;
System::UnicodeString ManipulatedItem;
bool RotateFlag;
- 2. Add OnChange event handlers to the radio buttons by double-clicking on each one. Below is the Delphi and C++ code for Cube1RadioButton. The code for Cube2RadioButton is the same, only that in stead of Cube1 is used Cube2.
  // The Delphi implementation for radio button OnChange event
  procedure TForm1.Cube1RadioButtonChange(Sender: TObject);
  begin
  //enables the group boxes to manipulate Cube1
    WidthGroupBox.Enabled := True;
    HeightGroupBox.Enabled := True;
    DepthGroupBox.Enabled := True;
    MoveGroupBox.Enabled := True;
    RotateGroupBox.Enabled := True;
  //updates the values for the track bars to display the current value of the Cube1.RotationAngle
    RotateFlag:=false;
    RotateXTrackBar.Value := Cube1.RotationAngle.X;
    RotateYTrackBar.Value := Cube1.RotationAngle.Y;
    RotateZTrackBar.Value := Cube1.RotationAngle.Z;
    RotateFlag:=True;
  //Saves the name of the 3D object to be manipulated
    ManipulatedItem:=Cube1.Name;
end;
  // The C++ implementation for radio button OnChange event
 void __fastcall TForm3D1::Cube1RadioButtonChange(TObject *Sender)
{
  //enables the group boxes to manipulate Cube1
  WidthGroupBox->Enabled = true;
  HeightGroupBox->Enabled = true;
  DepthGroupBox->Enabled = true;

  MoveGroupBox->Enabled = true;
  RotateGroupBox->Enabled = true;
  //updates the values for the track bars to display the current value of the Cube1.RotationAngle
  RotateFlag = false;
  RotateXTrackBar->Value = Cube1->RotationAngle->X;
  RotateYTrackBar->Value = Cube1->RotationAngle->Y;
  RotateZTrackBar->Value = Cube1->RotationAngle->Z;
  RotateFlag = true;
  //Saves the name of the 3D object to be manipulated
  ManipulatedItem = Cube1->Name;
}
For LigthRadioButton the code does not enable all the manipulation group boxes. Moving and resizing the TLight has now visual effects over the scene. The implementation for LigthRadioButton is:
  // The Delphi implementation for radio button OnChange event
  procedure TForm1.LightRadioButtonChange(Sender: TObject);
  begin
  //disable the group boxes that moves and resize the light
    WidthGroupBox.Enabled := False;
    HeightGroupBox.Enabled := False;
    DepthGroupBox.Enabled := False;
    MoveGroupBox.Enabled := False;
  // the light is manipulated only if is on
    if(Light1.Enabled=True) then
    begin
      RotateGroupBox.Enabled := True;
      //updates the values for the track bars to display the current value of the Light1.RotationAngle
      RotateFlag:=false;
      RotateXTrackBar.Value := Light1.RotationAngle.X;
      RotateYTrackBar.Value := Light1.RotationAngle.Y;
      RotateZTrackBar.Value := Light1.RotationAngle.Z;
      RotateFlag:=True;
      //Saves the name of the 3D object to be manipulated
      ManipulatedItem:=Cube1.Name;
   end
   else
      RotateGroupBox.Enabled := false;
   end;
end;
  // The C++ implementation for radio button OnChange event
 void __fastcall TForm3D1::LightRadioButtonChange(TObject *Sender)
{
//disable the group boxes that moves and resize the light
    WidthGroupBox->Enabled = false;
    HeightGroupBox->Enabled = false;
    DepthGroupBox->Enabled = false;
    MoveGroupBox->Enabled = false;
  // the light is manipulated only if is on
    if(Light1->Enabled==true)
    {
      RotateGroupBox->Enabled = true;
      //updates the values for the track bars to display the current value of the Light1.RotationAngle
      RotateFlag = false;
      RotateXTrackBar->Value = Light1->RotationAngle->X;
      RotateYTrackBar->Value = Light1->RotationAngle->Y;
      RotateZTrackBar->Value = Light1->RotationAngle->Z;
      RotateFlag = true;
      //Saves the name of the 3D object to be manipulated
      ManipulatedItem=Cube1->Name;
   }
   else
      RotateGroupBox->Enabled = false;
}
- 3. Implementation for LightOnOffButton button:
  procedure TForm1.LightOnOffButtonClick(Sender: TObject);
  begin
    if Light1.Enabled = True then
    begin
      Light1.Enabled := False;
      LightOnOffButton.Text := 'ON';
      if(LightRadioButton.IsChecked) then
        RotateGroupBox.Enabled:=False;
    end
    else
    begin
      Light1.Enabled := True;
      LightOnOffButton.Text := 'OFF';
      if(LightRadioButton.IsChecked) then
      RotateGroupBox.Enabled:=True;
   end;
end;
void __fastcall TForm3D1::LightOnOffButtonClick(TObject *Sender)
{
  if Light1->Enabled == true then
  {
    Light1->Enabled = false;
    LightOnOffButton->Text = "ON";
    if(LightRadioButton->IsChecked)
      RotateGroupBox->Enabled = false;
  }
  else
  {
    Light1->Enabled = true;
    LightOnOffButton->Text = "OFF";
    if(LightRadioButton->IsChecked)
      RotateGroupBox->Enabled = true;
  }
}
Difference between light on and off:


- 4. Resizing buttons have similar implementation. Bellow is the implementation for increasing and decreasing the Width of the 3D object.
//Increasing and decreasing the Width of the 3D object
  procedure TForm1.IncreaseWidthButtonClick(Sender: TObject);
  begin
    TControl3D(FindComponent(ManipulatedItem)).Width:=TControl3D(FindComponent(ManipulatedItem)).Width+1;
  end;

  procedure TForm1.DecreaseWidthButtonClick(Sender: TObject);
  begin
    TControl3D(FindComponent(ManipulatedItem)).Width:=TControl3D(FindComponent(ManipulatedItem)).Width-1;
  end;
void __fastcall TForm3D1::IncreaseWidthButtonClick(TObject *Sender)
{
 ((TControl3D*)(FindComponent(ManipulatedItem)))->Width=((TControl3D*)(FindComponent(ManipulatedItem)))->Width+1;
}
void __fastcall TForm3D1::DecreaseWidthButtonClick(TObject *Sender)
{
 ((TControl3D*)(FindComponent(ManipulatedItem)))->Width=((TControl3D*)(FindComponent(ManipulatedItem)))->Width-1;
}
- 5. Moving buttons have similar implementation. Bellow is the implementation for moving right and left the 3D object.
  procedure TForm1.MoveRightButtonClick(Sender: TObject);
  begin
    TControl3D(FindComponent(ManipulatedItem)).Position.X:=TControl3D(FindComponent(ManipulatedItem)).Position.X+1;
  end;

  procedure TForm1.MoveLeftButtonClick(Sender: TObject);
  begin
    TControl3D(FindComponent(ManipulatedItem)).Position.X:=TControl3D(FindComponent(ManipulatedItem)).Position.X-1;
  end;
void __fastcall TForm3D1::MoveRightButtonClick(TObject *Sender)
{
 ((TControl3D*)(FindComponent(ManipulatedItem)))->Position->X=((TControl3D*)(FindComponent(ManipulatedItem)))->Position->X+1;
}
void __fastcall TForm3D1::MoveLeftButtonClick(TObject *Sender)
{
 ((TControl3D*)(FindComponent(ManipulatedItem)))->Position->X=((TControl3D*)(FindComponent(ManipulatedItem)))->Position->X-1;
}
- 6. Rotation trak bars have similar implementation. Bellow is the implementation for rotating around X axis the 3D object.
  procedure TForm1.RotateXTrackBarChange(Sender: TObject);
  begin
    if (ManipulatedItem<>'') and (RotateFlag=True) then
     TControl3D(FindComponent(ManipulatedItem)).RotationAngle.X:= RotateXTrackBar.Value;
  end;
void __fastcall TForm3D1::RotateXTrackBarChange(TObject *Sender)
{
  if (ManipulatedItem!="") && (RotateFlag==true)
     ((TControl3D*)(FindComponent(ManipulatedItem)))->RotationAngle->X=RotateXTrackBar->Value;
}
- 7. Run the project by pressing F9.
- Check the Cub1Radiobutton. When you click the increase/decrease buttons, the cube's size changes.
- Check Cub1Radiobutton. When you click the Left / Right buttons, the cube's position changes.
- Check Cub1Radiobutton. When you increase the value of the track bars, the cub is clockwise rotated, and if the value is decreased the cube is rotated counter clockwise.
- Check LightRadiobutton. When you increase the value of the track bars, the light is rotated and its effect can be seen over the Cub2
- Check the Cub1Radiobutton. When you click the increase/decrease buttons, the cube's size changes.


