Running the Platform Assistant on a Mac
Go Up to PAServer, the Platform Assistant Server Application
Contents
You can start the Platform Assistant on the Mac in either of the following ways (full instructions follow):
- Double-click PAServer-18.0.app in the Finder (graphically)
- Run the paserver executable using the Terminal window (command line)
- Note:
- If you use the Finder, you can specify options by using a .config file.
- If you use the Terminal window, you can start the Platform Assistant with customized options.
- For information about setting options for PAServer, see Setting Options for the Platform Assistant.
Using the Finder to Run the Platform Assistant
In the Finder on the Mac, activate the .app file (PAServer-18.0.app) as follows:
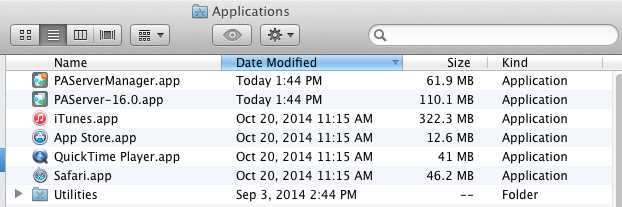
- Navigate to the top-level Applications folder.
- Tips:
- If you used another installation destination, select the appropriate disk before you go to the top-level Application folder.
- For an example, see Example: Navigating to the Installed Location of paserver (MacOS Folder)
- Tips:
- Double-click PAServer-18.0.app to start the Platform Assistant.
- Note: For information about PAServer Manager, see Running the PAServer Manager on a Mac.
- The Terminal window appears, displaying the Platform Assistant banner and the password prompt:
Connection Profile password <press Enter for no password>:
- Responding to the password prompt is described in Signing On to the Platform Assistant.
- Next you are asked for your password in order to allow debugging apps on the Mac.
After you acquire permission to debug on the Mac, the Terminal window should look like this:

 MyMac:~ myname$ /Applications/PAServer-16.0.app/Contents/MacOS/paserver ; exit;
 Platform Assistant Server  Version 7.0.1.40
 Copyright (c) 2009-2015 Embarcadero Technologies, Inc.

 Connection Profile password <press Enter for no password>:

 Acquiring permission to support debugging...succeeded

 Starting Platform Assistant Server on port 64211

 Type ? for available commands
 >
- Tip: To see the paserver executable in the Finder, right-click the PAServer 18.0.app file and select Show Package Contents. This displays the Contents and MacOS directories in the Finder. In the Terminal window, these directories are always shown. The paserver executable resides in the MacOS directory:
Applications/PAServer-18.0.app/Contents/MacOS/paserver
Running paserver in a Terminal Window
The file named paserver is the command-line executable for the Platform Assistant, and the path to paserver is:
Applications yourname $ /Applications/PAServer-18.0.app/Contents/MacOS/paserver
That is, the paserver executable resides in the Contents/MacOS folder inside the package PAServer-18.0.app. You can directly run the paserver executable in the Terminal window.
The following procedures illustrate two basic ways to start paserver on the command line: by entering a single command line from the Applications folder, or by navigating to the MacOS folder. This method gives you the opportunity to review the file properties in the PAServer-18.0.app/Contents/MacOS directory, including paserver.
Example: Entering a Single Command Line from the Applications Folder
On the Mac Terminal window, you can use a single command to drill down into the contents of the PAServer-18.0.app file and start paserver:
- Open a Terminal window on the Mac, and
cdto the top-level Applications folder.- For example, enter the initial letter or letters of the Applications folder, and then press the Tab key. If there is one and only one directory whose name begins with the letters you type, the directory name appears:
yourname $ cd /A<Tab>yourname $ cd /Applications<Return>Applications yourname $
- Enter a cd command containing the initial letters of successive portions of the path, and press the Tab key after each entry to complete that portion.
- When you complete the path, your command line should look like this:
Applications yourname $ /Applications/PAServer\ &18.0.app/Contents/MacOS/paserver
- Press Return.
You need to navigate to the PAServer directory, as follows:
 mymac:~ myname$ cd Applications
 mymac:Applications myname$ cd PAServer 16.0
 mymac:PAServer 16.0 myname$
On the Mac Terminal window, you can use a series of cd commands to drill down into the contents of the PAServer-18.0.app file, and start paserver:
- Use
cdcommands and the Tab key. For example, to open the Applications folder (starting at the user home location on the Mac), enter:yourname $ cd /A<Tab> <Return>
- Display the contents of the Applications folder by entering:
Applications yourname $ ls- You should see PAServer-18.0.app in the Applications directory.
- Navigate into the PAServer 18.0 package by entering the initial letters of each folder and pressing the Tab key, as follows:
Applications yourname $ cd PAS<Tab>Con<Tab>Mac<Tab>pas<Tab>
- You should see the command line as follows:
Applications yourname $ /Applications/PAServer\ <version>.app/Contents/MacOS/paserver
- Press Return to execute the command.
- In the MacOS directory, you should see paserver. Enter:
MacOS yourname $ ./paserver.- Note: On the Mac, you must always prefix a run command with the characters
./.
- Press Return.
Example: Setting the Port Number When You Start PAServer from the Command Line
You can run multiple instances of PAServer as long as each server uses a unique port number.
Add the -port command-line option when you run paserver, such as:
MacOS yourname $ ./paserver -port=64444
For more information, see Setting Options for the Platform Assistant.
Signing On to the Platform Assistant
After you start paserver, the Platform Assistant displays its banner, followed by its password prompt:
Connection Profile password <press Enter for no password>:
- At the password prompt, choose one of the following:
- To require a password for connecting to this Platform Assistant, enter a password of your choice, and press Enter.
- If you do not want to require a password for connecting to this Platform Assistant, press Enter.
- If this is the first time you start the Platform Assistant during a session on the Mac, the Mac displays the Developer Tools Access dialog box:
- Enter the password for your Mac and click Take Control to allow debugging with the Platform Assistant. The password here is the password you enter when you log on to the system; administrator access is required.
- You can either continue to sign in with the user name displayed in this dialog or you can enter a different user name.
- Retrying: If you fail to provide the correct password or if you cancel, the Platform Assistant starts normally, but the next time that you try to debug an application from RAD Studio using the Platform Assistant, you are prompted again for the administrator password.

After you follow these steps, you see the following two lines in the Terminal window:
Starting Platform Assistant Server on port 64211
>
The > command prompt indicates that the Platform Assistant is in "listening" mode on the specified port (64211 by default). You can enter the h command (type "h" and press Enter) to see the list of available commands along with a description. To quit the Platform Assistant, enter the q command.
Connection Issues
Running PAServer if the Mac Firewall is Enabled
If the firewall on your Mac is enabled, you see the following message after "Acquiring permission for debugging" when you start PAServer on the Mac:
Do you want the application "paserver" to accept incoming network connections?"
Even if you click "Allow" here, PAServer cannot connect from your development system to the Mac. You need to specifically permit PAServer using one of the following solutions:
Solution 1: Disable the firewall on the Mac. Use the following steps:
- On the Mac, open System Preferences in the Apple menu.
- Select Security & Privacy and then the Firewall tab.
- Click the Lock icon in the lower left corner.
- Click the Turn Off firewall button.
- Click the Lock icon and close the Security & Privacy window.
Solution 2: Specifically allow PAServer access through the firewall on the Mac. Use the following steps:
- On the Mac, open System Preferences in the Apple menu.
- Select Security & Privacy and then the Firewall tab.
- Click Firewall Options. (If this button is disabled, click the Lock icon in the lower left corner.)
- Click the + sign and navigate to the Applications folder.
- Select PAServer-18.0.app and then click Add. This adds the PAServer <version>.app bundle to the apps listed in FireWall Options.
- To add the paserver binary:
- Click the + sign.
- Type
Command-Shift-G. - In Go to the folder:, enter the full path to paserver. For example:
/Applications/PAServer <version>.app/Contents/MacOS
- The contents of the MacOS directory is displayed. Locate and double-click paserver. This adds the paserver binary to the apps listed in FireWall Options.
- Click the Lock icon and close the Security & Privacy window.
See also Running the Platform Assistant on a Mac.
Connecting to a PAServer When the Port Is in Use
You might see this error if you try to run PAServer on the Mac and the socket is in use (perhaps by an instance of PAServer that is already running or has becoming inaccessible):
Message: Could not bind socket. Address and port are already in use.
The solution is to do any one of the following:
- Use the existing instance of PAServer.
- Stop the existing instance of PAServer.
- Kill the existing instance of PAServer, as follows:
- In terminal window, enter:
ps -a. - Find the instance of PAServer and its PID number.
- Enter:
kill <pid>.
- In terminal window, enter:
See Also
- Mobile Tutorial: Set Up Your Development Environment on the Mac (iOS)
- Installing the Platform Assistant on a Mac
- Running the Platform Assistant on Windows
- Running Your iOS Application on an iOS Device
- Creating and Testing a Connection Profile on the Development PC
- Running the PAServer Manager on a Mac