Mobile Tutorial: Using BaaS for Backend Storage (iOS and Android)
Go Up to Mobile Tutorials: Mobile Application Development (iOS and Android)
This tutorial gives the basic steps to use backend storage using Kinvey and Parse as BaaS providers.
This tutorial creates a Shopping List where the items added are stored in the cloud by the BaaS provider, so these items can be shared and updated among different devices if needed.
| iOS | Android |
|---|---|
|
|
|


With backend storage you can store files and data in the cloud. This information can later be retrieved, updated, and deleted.
In this tutorial you are going to:
- Create new items and store them in the cloud.
- Retrieve items from the cloud.
- Delete items from the cloud.
Contents
Getting Your App Ready in Kinvey and Parse
Before you start doing this tutorial, ensure you already have an account with Kinvey or Parse and that you already have an app created in the backend provider.
Design and Set Up of the User Interface
This tutorial uses a TListView as UI component to display the information retrieved from the cloud.
To set up the UI for this sample tutorial follow these steps:
- Create a blank Multi-Device Application, by selecting:
- For Delphi: File > New > Multi-Device Application - Delphi > Blank Application
- For C++: File > New > Multi-Device Application - C++Builder > Blank Application
- Drop a TLabel on the form and set the following properties in the Object Inspector:
- Set the Text property to Shopping List.
- Set the Align property to Top.
- Set the HorzAlign property in TextSettings to Center.
- Drop a TButton on the TLabel and set the following properties in the Object Inspector:
- Set the Align property to Right.
- Set the StyleLookup property to refreshtoolbutton.
- Set the Name property to RefreshButton.
- Drop a TEdit on the form and set the following properties in the Object Inspector:
- Set the Align property to Top.
- Drop a TButton on the TEdit and set the following properties in the Object Inspector:
- Drop a TListView on the form and set the following properties in the Object Inspector:
- Set the Align property to Client.
Adding the Backend Components
This tutorial uses the TBackendStorage service component to manage the backend storage in order to create, retrieve, update, and delete objects. This app also uses one of the BaaS provider components:
- TKinveyProvider is the Kinvey BaaS provider component that contains the information about the Kinvey could service connection.
- TParseProvider is the Parse BaaS provider component that contains the information about the Parse could service connection.
Continue with the following steps:
- Drop one of the two BaaS provider components on the form TKinveyProvider or TParseProvider depending on the backend provider you use in your app.
- Drop a TBackendStorage on the form, and in the Object Inspector set the Provider property to the BaaS provider component you are using.
- Depending on the BaaS provider you are using:
- Select the KinveyProvider1 component and in the Object Inspector set the AppKey, AppSecret and MasterSecret to the values provided by Kinvey.
- Select the ParseProvider1 component and in the Object Inspector set the ApplicationID, MasterKey and RestApiKey to the values provided by Parse.

Creating and Storing Objects
In the app, when you type something in the TEdit and click Add Item, the content typed in the TEdit gets stored in the cloud, in the Kinvey or Parse BaaS provider. To create the object, use the CreateObject method.
- Double-click the AddItemButton and type the following code:
Delphi:
procedure TForm1.AddItemButtonClick(Sender: TObject);
var
    LJSONObject: TJSONObject;
    LEntity: TBackendEntityValue;
begin
    if Edit1.Text = '' then
      ShowMessage('Please, enter an item.')
    else
      begin
        LJSONObject := TJSONObject.Create;
        LJSONObject.AddPair('item', Edit1.Text);
        BackendStorage1.Storage.CreateObject('ShoppingList', LJSONObject, LEntity);
        ShowMessage('New item created: ' +Edit1.Text);
        LJSONObject.Free;
        Edit1.Text := '';
      end
end;
C++:
void __fastcall TForm1::AddItemButtonClick(TObject *Sender)
{
	TJSONObject *LJSONObject;
	TBackendEntityValue LEntity;

	if (Edit1->Text == "") {
		ShowMessage("Please, enter an item.");
	}
	else  {
		LJSONObject = new TJSONObject;
		LJSONObject->AddPair("item", Edit1->Text);
		BackendStorage1->Storage->CreateObject("ShoppingList", LJSONObject, LEntity);
		ShowMessage("New item created: "+ Edit1->Text);
		LJSONObject->Free();
		delete LJSONObject;
		Edit1->Text="";
	 }
}
Deleting Objects
To allow users to delete any item from the list. In the TListView component, if you swipe your finger left or right over one of the items of the TListView, a Delete button displays on the right-hand side. To delete the item when the Delete button of such item is clicked, do the following:
- Select the TListView and in the Events tab of the Object Inspector, double-click the OnDeletingItem event. This event occurs before the item is deleted. Add the following code:
Delphi:
procedure TForm1.ListView1DeletingItem(Sender: TObject; AIndex: Integer; var ACanDelete: Boolean);
var
  LQuery: string;
  LJSONArray : TJSONArray;
  LEntities: TArray<TBackendEntityValue>;
begin
  ACanDelete := False;
  LJSONArray := TJSONArray.Create;
  try
    LQuery := Format('query={"item":"%s"}', [(Sender as TListView).Items[AIndex].Text]); // 'query={"item":"%s"}' in Kinvey and 'where={"item":"%s"}' in Parse
    BackendStorage1.Storage.QueryObjects('ShoppingList', [LQuery], LJSONArray, LEntities);
    if (Length(LEntities) > 0) and BackendStorage1.Storage.DeleteObject('ShoppingList', LEntities[0].ObjectID) then
      ACanDelete := True
    else
      ShowMessage ('Item could not be deleted.');
  finally
    LJSONArray.Free;
  end;
end;
- Note: The line
LQuery := Format('query={"item":"%s"}', [(Sender as TListView).Items[AIndex].Text]);is for Kinvey. In Parse, the word query must change to where so if you are using Parse as BaaS provider, this line must beLQuery := Format('where={"item":"%s"}', [(Sender as TListView).Items[AIndex].Text]);.
C++:
void __fastcall TForm1::ListView1DeletingItem(TObject *Sender, int AIndex, bool &ACanDelete)
{
	System::UnicodeString LQuery[1];
	DynamicArray<TBackendEntityValue> LEntities;
	ACanDelete = False;
	TJSONArray *LJSONArray;
	LJSONArray = new TJSONArray;
	try {
		TListView* list = reinterpret_cast<TListView*>(Sender);
		LQuery[0] = ("query={\"item\":\""+(listView1->Items->operator[](AIndex)->Text)+"\"}"); // "query={\"item\":\"" in Kinvey and "where={\"item\":\"" in Parse
		BackendStorage1->Storage->QueryObjects("ShoppingList", LQuery, 0, LJSONArray, LEntities);
		if (((LEntities.Length)>0) & BackendStorage1->Storage->DeleteObject("ShoppingList", LEntities[0].ObjectID)) {
		   ACanDelete = True;
		} else {
			ShowMessage("Item could not be deleted.");
		}
	}
	__finally {
		LJSONArray->Free();
	}
}
- Note: The line
LQuery[0] = ("query={\"item\":\""+(list->Items->Item[AIndex]->Text)+"\"}");is for Kinvey. In Parse, the word query must change to where so if you are using Parse as BaaS provider, this line must beLQuery[0] = ("where={\"item\":\""+(list->Items->Item[AIndex]->Text)+"\"}");.
Retrieving Objects
To update all content in the TListView to reflect any possible change, you can retrieve the objects with QueryObjects, clear the list view and add all items you have retrieved from the backend storage.
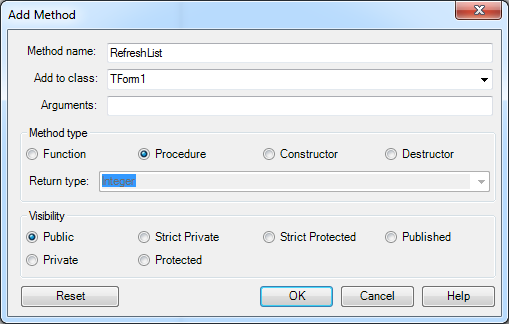
- To add a new method to refresh the list:
- Open the Class Explorer window by choosing View > Class Explorer.
- In the Class Viewer pane, right-click TForm1 under Unit1 and select Add Method.
- Write RefreshList under “Method name”, select Procedure under “Method type" and click OK.
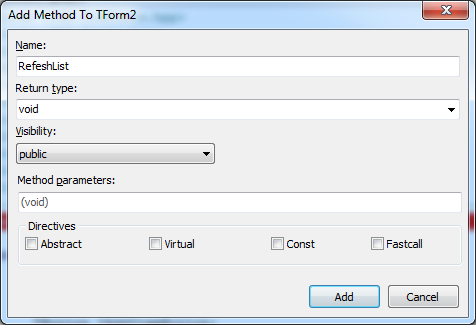
- Open the Class Explorer window by choosing View > C++ Class Explorer.
- In the Type List pane (left pane), expand your project, right-click TForm1 under and select Add Method.
- Write RefreshList under “Name”, void under “Return type”, set “Visibility” to public and click Add.
- Add the following code to the new method:
- Double-click the RefreshButton and the following code so this button calls the RefreshList method:
- To refresh the list once an item is added, double-click the AddItemButton to access the code of the OnClick event added before and add the following code as the very last sentence of the else statement:
- To refresh the list after an item is deleted, select the TListView and in the Events tab of the Object Inspector, double-click the OnDeleteItem event. This event occurs after the item is deleted. Add the following code:
Delphi:

C++:

Delphi:
procedure TForm1.RefreshList;
var
  LJSONArray : TJSONArray;
  LItem: TListViewItem;
  I: Integer;
begin
  LJSONArray := TJSONArray.Create;
  try
    BackendStorage1.Storage.QueryObjects('ShoppingList', [], LJSONArray);
    ListView1.ClearItems;
    for I := 0 to LJSONArray.Count-1 do
    begin
      LItem := ListView1.Items.Add;
      LItem.Text := (LJSonArray.Items[I].GetValue<string>('item'));
    end;
  finally
    LJSONArray.Free;
  end;
end;
C++:
void TForm1::RefreshList()
{
	String LQuery [1];
	TJSONArray *LJSONArray;
	TListViewItem *LItem;
	TJSONObject *LJSONObject;
	String ItemText;
	int i;
	LJSONArray = new TJSONArray;
	try {
		BackendStorage1->Storage->QueryObjects("ShoppingList", LQuery, 0, LJSONArray);
		ListView1->Items->Clear();
		for (i = 0; i < LJSONArray->Count; i++) {
			LItem = ListView1->Items->Add();
			LJSONObject = dynamic_cast<TJSONObject *>(LJSONArray->Items[i]);
			ItemText = (LJSONObject->Values["item"]->Value());
			LItem->Text = ItemText;
		}
	}
	__finally {
		LJSONArray->Free();
	}
}
Delphi:
procedure TForm1.RefreshButtonClick(Sender: TObject);
begin
  RefreshList;
end;
C++:
void __fastcall TForm1::RefreshButtonClick(TObject *Sender)
{
	RefreshList();
}
Delphi:
RefreshList;
C++:
RefreshList();
Delphi:
procedure TForm1.ListView1DeleteItem(Sender: TObject; AIndex: Integer);
begin
  RefreshList;
end;
C++:
void __fastcall TForm1::ListView1DeleteItem(TObject *Sender, int AIndex)
{
	RefreshList();
}
Running Your Application
To run your application, follow these steps:
- In the Projects Window, select the target platform where you want to run your app.
- Note: This app uses the swipe-to-delete feature that is supported on mobile apps (iOS and Android), as well as desktop apps (Windows and OS X) when touch input is available.
- Select Run > Run or Run > Run Without Debugging.
- Once you add or delete items in your application, you can go to your Kinvey console or to your Parse dashboard to see the changes also from the cloud.
| iOS | Android |
|---|---|
|
|
|
See Also
- BaaS Overview
- Getting Started with Kinvey and Parse
- Managing BaaS Users
- Using BaaS for Backend Storage