Submitting Your App to the Windows Store
Go Up to 64-bit Windows Application Development
This topic explains the steps required to submit your applications to the Windows Store.
Prerequisites
Before you can submit your application to the Windows Store you need to:
- Have a Microsoft account.
- Tip: If you do not have an account, create one here. The fees for the individual one-time registration and company accounts differ. You can check the prices here.
- Prepare a Windows Application for appx Package Distribution.
Submitting Your Application
To submit your application to the Windows Store:
- Go to Windows Dev Center and sign in.
- Click Create new app.
- On the Create your app by reserving a name page, enter the name of your application. To check if it is available, click the Check availability button. Once you make sure that the name of your app is unique, click Reserve app name.
- The main page opens. On the left, click App management and then select App identity.
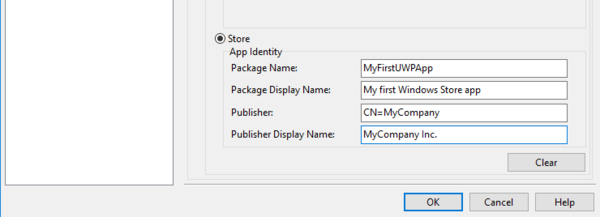
- The page with your application information opens. Here you can see the values required on the Provisioning page.
- Enter the values from the App identity page into the required fields on the Provisioning page:
- • Package Name
- • Package Display Name: enter the name that you have just reserved in the Dev Centre
- • Publisher
- • Publisher Display Name
- Click OK to save changes.
- Select Project > Deployment, and click the Deploy
 button to deploy your application. When your application package is built, you can upload it to the Window Store.
- Select Project > Deployment, and click the Deploy
- Go back to the Windows Dev Center, on the Packages page, drag your package to the upload area or click browse your files and select the package that you want to upload.
- After the analysis and validation processes are complete, you can see a table with your package details, click Save.
