Using Grid and Flow Layouts
Go Up to Tutorial: Using FireMonkey Layouts
This tutorial demonstrates how to use FireMonkey layouts to create a simple calculator interface.
Contents
General Form of the Calculator
- Select File > New > Other... > Delphi Projects > Multi-Device Application > Blank Application:
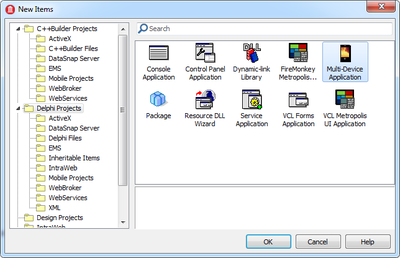
- Creating a Delphi HD Application
- Resize the form to 210x250 (or other dimensions that you want the calculator to have) by setting the Height and Width in the Object Inspector, with the form in focus.
- Add a TFlowLayout to the form.
- In the Object Inspector, with TFlowLayout in focus, do the following:
- Set Name to PrincipalLayout.
- Set Align to
None. - Set Justify to
Center. - Set JustifyLastLine to
Center. - Set VerticalGap to
3to obtain an uncluttered aspect.
- In the Object Inspector, with TFlowLayout in focus, do the following:

Calculator Display
Add a TEdit to the PrincipalLayout to serve as the calculator display.
- In the Object Inspector, with TEdit in focus, do the following:

Calculator display
Calculator Buttons
A calculator has many types of buttons:
- Memory buttons: memory cancel (MC), memory recall (MR), add to memory (M+), and subtract from memory (M-)
- Buttons that manage input data: Backspace , clear/cancel (C), and cancel entry (CE).
- Operations: +, -, *, /, sign change (+/-).
- Equal button =
- Digits button (0 to 9), and a point button--..
In this case there is a total of 25 buttons. For easy using, the most important (the most used) buttons will be twice as big as the rest of the buttons. The important buttons are: Backspace, +, =, and 0. For this layout, a regular button is sized to 50 pixels in width and to 30 pixels in height.

Memory Buttons
For the memory buttons, add a TGridLayout to the PrincipalLayout.
- In the Object Inspector, with TGridLayout in focus, do the following:
- Set Name to MemoryButtonsGrid.
- Set Width to
200(or another value that fits the chosen form dimensions). - Set ItemWidth to a quarter of the total Width of the layout, in this case, to
50. - Set ItemHeight to
30(or another value, depending on the shape you want the buttons to have) to obtain a rectangular shape for the buttons. - Set Height to
30, or to the same value as ItemHeight. This will preserve the aspect within the PrincipalLayout.
- Add 4 TButtons to MemoryButtonsGrid, one for each memory operation listed above.
- In the Object Inspector, with every button in focus, change the Text to MC, MR, M+, or M-.
The result should look like the image at the right.

Manage Input Data Buttons
The manage input data buttons do not have the same width, so they are added to the form through another TFlowLayout. Add a TFlowLayout to the PrincipalLayout.
- In the Object Inspector, with the added TFlowLayout in focus, do the following:
- Set Name to ManageInputDataButtons.
- Set JustifyLastLine to
Center. - Set Width to
200(or to the same value you used for MemoryButtonsGrid). - Set Height to
30(or to the same value you used for MemoryButtonsGrid).
- Add 3 TButton objects to ManageInputDataButtons.
- In the Object Inspector, do the following for each button:
- Set Text to Backspace, C, or CE.
- Set Height to
30or to the same value you used for ManageInputDataButtons. - For the C and CE buttons, set the Width to
50or to the same value you used for the width of the MemoryButtonsGrid buttons. - For the Backspace button, set the Width to
100or to the double of a regular button's width.
- In the Object Inspector, do the following for each button:
Digit and Operation Buttons

+ and = are the most used operations, so the buttons for them are treated separately. For the rest of the operations, regular buttons are used.
- To add the regular operation buttons add to the PrincipalLayout a TGridLayout.
- In the Object Inspector, with TGridLayout in focus, do the following:
- Set Name to RegularOperationButtons.
- Set Width to
200(or to another value that fits the chosen form dimensions). - Set ItemWidth to a quarter of the total Width of the layout, in this case, to
50. - Set ItemHeight to
30, (or to another value, depending on the shape you want the buttons to have) to obtain a rectangular shape for the buttons. - Set Height to
30(or to the same value as ItemHeight).
- Add 4 TButtons to RegularOperationButtons, one for each regular operation listed above.
- In the Object Inspector, with every button in focus, change the Text to +/-, /, *, or -.
- The result should look like in the image at the right.
- In the Object Inspector, with TGridLayout in focus, do the following:
- 0 is the most used digit, and the 0 button is bigger than the buttons for the rest of the digits. The digits are split in 2 groups:
- The 1 through 9 buttons have the same dimensions and can be added through a TGridLayout with 3 columns and 3 rows.
- The 0 and . buttons are added through a TFlowLayout because they do not have the same size as the others.
- To group all digit buttons, add a TFlowLayout to the PrincipalLayout.
- In the Object Inspector, with TFlowLayout in focus, do the following:
- Set Name to DigitsButtons.
- Set Width to
150or to 3 times the width of a regular button. - Set Height to
120or to 4 times the height of a regular button. - Set Justify to
Center. - Set JustifyLastLine to
Center.
- In the Object Inspector, with TFlowLayout in focus, do the following:
- Add a TGridLayout object to DigitsButtons to add the regular digit buttons.
- In the Object Inspector, with TGridLayout in focus, do the following:
- Set Name to RegularDigitsButtons.
- Set Width to
150. - Set ItemWidth to
50. - Set ItemHeight to
30. - Set Height to
90or to 3 times the height of a regular button.
- Add 9 TButtons to RegularDigitsButtons, one for each regular operation listed above.
- In the Object Inspector, with every button in focus, change the Text property like in the image at the right.
- In the Object Inspector, with TGridLayout in focus, do the following:
- Add a TFlowLayout object to DigitsButtons to add the 0 and . digit buttons.
- In the Object Inspector, with TFlowLayout in focus, do the following:
- Set Name to SpecialDigitsButtons.
- Set Width to
150. - Set Height to
30, or to the height of a regular button. - Set JustifyLastLine to
Center.
- Add 2 TButtons to SpecialDigitsButtons.
- In the Object Inspector, do the following for each button:
- The result should look like in the image at the right.
- In the Object Inspector, with TFlowLayout in focus, do the following:
- To add the rest of the operation buttons, add a TGridLayout to the PrincipalLayout.
- In the Object Inspector, with TGridLayout in focus, do the following:
- Set Name to SpecialOperationButtons.
- Set Width to
50or to the same value as the width of a regular button. - Set ItemWidth to
50. - Set ItemHeight to
60or to twice the value of a regular button's height. - Set Height to
120or to twice the value of ItemHeight.
- Add 2 TButtons to SpecialOperationButtons.
- In the Object Inspector, with every button in focus, change the Text to +or =.
- In the Object Inspector, with TGridLayout in focus, do the following:


The interface should look like in the following image.
