Audio Recording
Go Up to Tutorial: FireMonkey Audio-Video
This tutorial demonstrates how to use FireMonkey to capture audio media data.
Contents
Supported File Formats
We recommend that you save and use media files in the following formats according to the platform:
.wavon Windows.cafon iOS and macOS.3gpon Android
You also can play other types of media files, such as MP3 files.
Form Design
- Select: File > New > Multi-Device Application > Blank Application.
- Add a TGridLayout to the form. With the layout in focus, make the following settings in the Object Inspector:
- Add two TFlowLayout objects to the TGridLayout (the second flow layout will be used in the next tutorial: Playing Audio Files).
- Add the following to the first TFlowLayout:
- Change the name of the two buttons to RecordButton and StopButton.
- Set the StopButton as disabled by setting the Enable property of the button to False.
- Add a TSaveDialog to the form.
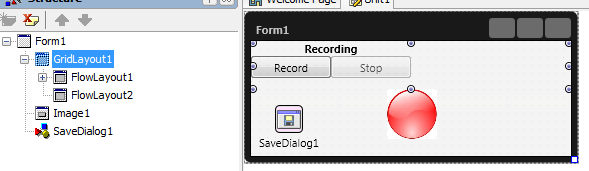
- Add a TImage. Set the Bitmap property of the TImage to an image that is suggestive for the recording process. The usual icon used for a recording process is a red circle.
- The form should look like this:

Implementation
- 1. Include the FMX.Media unit:
Delphi:
// Delphi version of the implementation
uses
 FMX.Media;
C++:
// C++ version of the implementation
#include <FMX.Media.hpp>
- 2. Declare a TAudioCaptureDevice public member, named Mic, to the TForm1 class:
Delphi:
type
  TForm1 = class(TForm)
   // ...............
  public
    Mic: TAudioCaptureDevice;
C++:
  class TForm1 : public TForm
  // ...............
  public:
    TAudioCaptureDevice *Mic;
- 3. Set the Opacity property of the image to
0. The image is visible only when the recording process starts. - 4. Double-click the Record button to attach OnClick event handlers to it:
Delphi:
procedure TForm1.RecordButtonClick(Sender: TObject);
begin
  //Get the default microphone
  Mic := TCaptureDeviceManager.Current.DefaultAudioCaptureDevice;
  if Mic <> nil then
  begin
    //Set the SaveDialog filter to choose only the supported extension
    SaveDialog1.Filter :=  Mic.FilterString;
    if SaveDialog1.Execute then
    begin
      RecordButton.Enabled := false;
      StopButton.Enabled := true;
      //Gets the name of the file where to save the recorded data
      Mic.FileName := SaveDialog1.FileName;
      Mic.StartCapture;
      Image1.Opacity:=1;
    end;
  end
  else
  begin
    ShowMessage('Audio capturing device not available');
  end;
end;
C++:
void __fastcall TForm1::RecordButtonClick(TObject *Sender)
{
  //Get the default microphone
  Mic = TCaptureDeviceManager::Current->DefaultAudioCaptureDevice;
  if (Mic != NULL)
  {
    //Set the SaveDialog filter to choose only the supported extension
    SaveDialog1->Filter = Mic->FilterString;
    if (SaveDialog1->Execute())
    {
      RecordButton->Enabled = 0;
      StopButton->Enabled = 1;
      //Gets the name of the file where to save the recorded data
      Mic->FileName = SaveDialog1->FileName;
      Mic->StartCapture();
      Image1->Opacity = 1;
    }
  }
  else
    ShowMessage("Audio capturing device not available.");
}
- 5. Double-click the Stop button to attach OnClick event handlers to the Stop button:
Delphi:
procedure TForm1.StopButtonClick(Sender: TObject);
begin
  if (Mic <> nil) and (Mic.State = TCaptureDeviceState.Capturing) then
  begin
    Mic.StopCapture;
    Image1.Opacity := 0;
    StopButton.Enabled := false;
    RecordButton.Enabled := true;
  end;
end;
C++:
void __fastcall TForm1::StopButtonClick(TObject *Sender)
{
  if ((Mic != NULL) && (Mic->State == TCaptureDeviceState::Capturing))
  {
    Mic->StopCapture();
    Image1->Opacity = 0;
    StopButton->Enabled = 0;
    RecordButton->Enabled = 1;
  }
}
Run the Application
- 1. To run the project, press F9.
- 2. To start recording audio data, press the Record button. The SaveDialog opens.
- 3. Choose a path and a file name to save the recorded data.
- 4. To stop recording, press the Stop button. If the recording is not ended by calling the StopCapture method, the saved file is not properly decoded when it is played by a media player.
Previous
Next
See Also
- Creating a FireMonkey Component (Delphi)
- Creating a FireMonkey Component (C++)
- HD Multi-Device Application
- FireMonkey Layouts Strategies
- Audio-Video in FireMonkey
Samples
- FireMonkey Audio Rec-Play sample