Installer
Go Up to Graphic Utilities Index
This is a reference page about one of the tools required to install RAD Studio. For installation instructions, see Installation.
The Installer is the installation wizard that installs RAD Studio.
You can get the Installer from Embarcadero.
The Installer provides a minimal installation of RAD Studio. This minimal installation does not provide project support, it can only be used as a plain text editor. You must use the Feature Installer (which the Installer opens automatically) or the Feature Manager from your minimal installation of RAD Studio to install additional features.
Contents
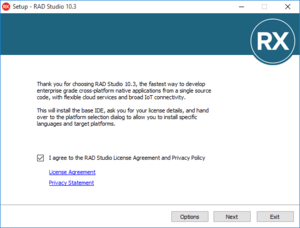
Agreement Page
The Agreement page gives you access to the RAD Studio License Agreement and the RAD Studio Privacy Statement.
To install RAD Studio, you must first mark the check box in this page to indicate that you agree with the terms of both documents.
At the bottom of the page you can see the following buttons:
- Options opens the Options page.
- Install starts the installation of a minimal version of RAD Studio according to the installation options.
- Exit cancels the installation and closes the Installer.
During the installation, the Installer opens the Registration dialog box unless you previously install a registration file.
After the installation, the Installer opens the Feature Installer.
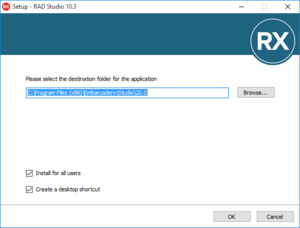
Options Page
The Options page allows you to customize some aspects of the RAD Studio installation:
| Option | Description |
|---|---|
|
Installation folder |
Folder where you want to install RAD Studio. The default installation path is |
|
Install for all users |
Check this option to install RAD Studio for all system users. |
|
Create a desktop shortcut |
Create a shortcut on the Windows desktop to start RAD Studio. |
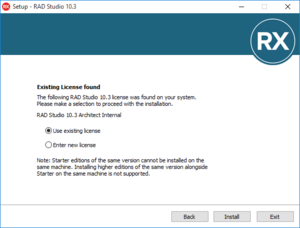
Existing License Detected
If an existing license of the same version of the product is found on your system, you will see this screen in the install process. You can proceed with the installation using an existing license or enter a new license. Please note that this screen is shown only when an existing license is found on your system.
Enabling Installation Logs for Troubleshooting
Sometimes RAD Studio fails to install when using the GetIt Web Installer, throwing a non-conclusive error message. As a method to collect additional information on the potential causes to the installation failure, you can enable the creation of a GetItInstall.log file.
The installation logs are disabled by default, when enabled, the GetItInstall.log file can provide useful information for troubleshooting installation issues. To enable the installation logs, follow the steps below:
- After the failed attempt to install RAD Studio, open the RegEdit Windows tool and navigate to the following key:
HKEY_CURRENT_USER\SOFTWARE\Embarcadero\BDS\xx.0\CatalogRepository\. Wherexx.0is the internal version of RAD Studio, like 21.0 for the Sydney version. - Add a DWORD (32-bit) Value with the name Debug and set 1 as the Value data.
When you restart the installation or restart the IDE to add new features, the system should create a GetItInstall.log file at the following path: C:\Users\Public\Documents\Embarcadero\Studio\xx.0\.
You can submit this file when requesting assistance from Quality Portal or the Embarcadero Support team.


