About Team Server and Repository Upgrade
With the release of ER/Studio 16.0, the Repository is combined into a single installer and database implementation with Team Server.
Prerequisites
![]() Note: Before running the installer for an upgrade, stop the IderaTeamServer service from the Services control panel.
Note: Before running the installer for an upgrade, stop the IderaTeamServer service from the Services control panel.
- 64-bit OS. Team Server/Repository 16.0 and later are only supported on 64-bit machines.
- Download the latest Team Server installer
- Highly recommended that you back up the database
- Repository must be on version 6.5, 6.6, 6.7, or 7.0. See topics below if you are on an earlier version.
- Database server where the current Repository database resides
- Database user who owns the Repository objects
- Database user currently must have db_owner (SQL Server) and DBA role (ORACLE)
- Repository Admin password
- ER/Studio Data Architect version that corresponds to the version you to which you want to upgrade must be installed on a separate client machine
Preparing the Upgrade
Repository User Preparations
- Ensure you have backed up all your .dm1 files.
- Check in all your diagrams and objects. If you try to check in a file from the previous version with the same name as a current file, the current file will become corrupted.
- Rename all local copies of Repository diagrams in the active file directory as follows:
- Choose Repository > Options. and make note of the Active File Directory.
- Switch to the Windows Explorer and rename all the diagrams in the Active File Directory in order to protect them of being overwritten. Example: Backup_DiagramName.dm1.
Repository Administrator Preparations
Ensure no one is logged into the Repository, and then back up the current Repository database.
![]() Note: If you are upgrading from a Repository version prior to 4.0, you can delete the C:\Program Files\Embarcadero\Repository\Data directory. This directory is not used with Repository versions 4.0 and later.
Note: If you are upgrading from a Repository version prior to 4.0, you can delete the C:\Program Files\Embarcadero\Repository\Data directory. This directory is not used with Repository versions 4.0 and later.
Upgrading from Team Server 4.0.x, CONNECT 3.0.x or ER/Studio Portal 2.0.x
- Make a copy of the license files, for example: license.txt, ao_12345678.txt or .slip until the upgrade has completed. Then copy to the license folder in the installation directory of the new Team Server installation folder.
- Depending on your installation location, you can find the license file in the program directory. For example: C:\Embarcadero\ERStudio Portal 2.0\license
- If you have already used the uninstaller, you may also have a license backup in the following location:
- 32-bit Windows: C:\Program Files (x86)\Common Files\ersEnterprisePortalBackup\license
- 64-bit Windows: C:\Program Files\Common Files\ersEnterprisePortalBackup\license
- After copying over the license.txt file to the license folder within the installation folder of Team Server, log into Team Server as Admin, select My Settings > Admin > Licenses, and then click Refresh for Team Server to recognize your licenses.
 Note: We always recommend backing up your data before starting the process. You may have to back up your database and, for Team Server and Connect, export your Glossaries and Terms.
- Uninstall the previous version.
Upgrade scenarios
First of all, prepare the upgrade for any scenario.
Upgrades from Team Server 16.X which includes Repository 7.0.1
- DO NOT UNINSTALL the previous version of Team Server. The new version will back up the data from the previous version and restore it as part of the new Team Server/Repository installation procedure. This procedure allows published diagrams and workspaces to remain published after upgrade
- Install Team Server 19.1.
Upgrades from Repository 7.0.X (Standalone)
- Uninstall Repository 7.0.X.
- Install Team Server 19.1.
- On the repository setup page, select Specify location for Team Server database..., this will expand the information fields.
Upgrades from Repository prior to 6.5/6.6/6.7 (Standalone) and Team Server 4.0 or previous
You can perform an upgrade to the latest version of Team Server and Repository directly from versions 6.5 and later. There is no need for incremental upgrades before attempting to upgrade to Team Server and Repository.
- Install the latest version of Team Server and Repository.
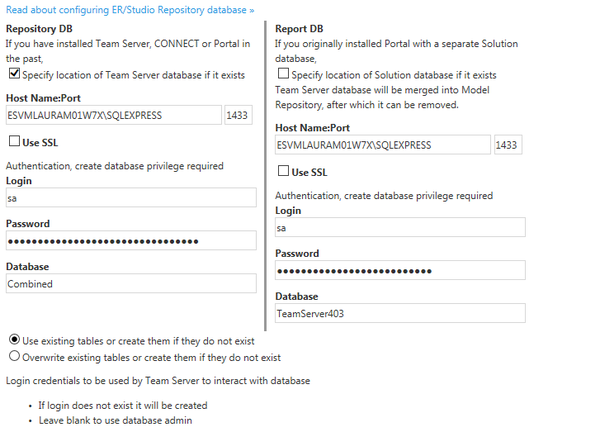
- On the repository setup page, if you were also using Team Server 4.0 or previous, select Specify location for Team Server database.... This will expand the information fields to the ones explained here.
Upgrade Configuration
If you are upgrading from Team Server 16.x or later, you already have one unique combined database, so you can directly follow the steps on the repository setup.
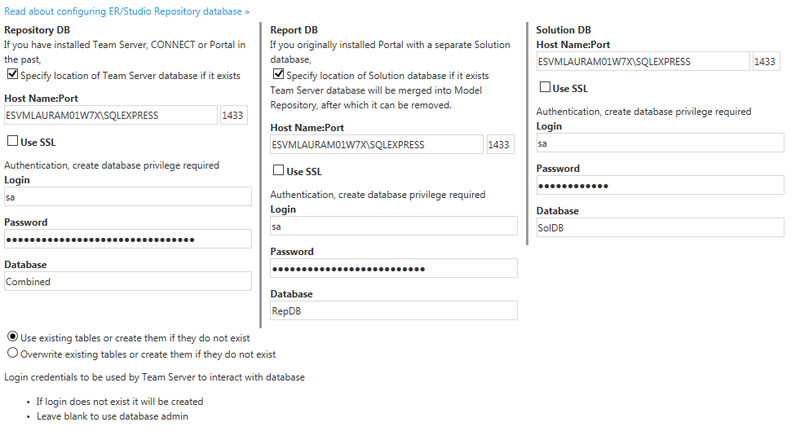
If you have installed Team Server XE7 or any previous version, including CONNECT or Portal, you need to specify the information to connect to its database. The new installer will copy the Team Server database tables into the Repository database, after which both Repository and Team Server Web will share the same database.
- Check the repository setup and introduce repository database information.
- Select Specify location for Team Server database..., this will expand the information fields to include Team Server database information.
- Fill the fields with the Team Server database information with the same structure than you have introduced previously for repository database.
- If your Portal installation was using a separate Solution database, select Specify the location of Solution database....
- Specify Portal Solution database details so the tables can also be copied to the Repository database.
Note for Oracle: Once the upgrade is done, the alias in the tnsnames file must be updated to point the new database server in case you had Team Server and Repository old databases in different machines.
Important Notes
- Always back up databases before upgrading.
- Upgrading diagrams can be time consuming and memory intensive. The number and size of the diagrams managed in the upgrade dictates how long the upgrade process takes.
- Regardless of the process that you must follow to back up your licenses, which depends on the previous version that you are upgrading from and other factors, after you restore your licenses in your new installation, you must log in as a super user and use the Manage Users page to assign different types of available licenses to your users.

