InterBase Quick Start: Part V - Access Privileges
Go Up to InterBase Quick Start: Part V - Advanced Topics
Initially, only a creator of a table, its owner, and the SYSDBA user have access to a table. On UNIX servers that have a superuser, or a user with root privileges, those users also have access to all database objects.
You can grant other users the right to look at or change your tables by assigning access privileges using the GRANT statement. The table below lists the available access privileges:
|
Privilege |
Access |
|---|---|
| ALL |
SELECT, DELETE, INSERT, UPDATE, and REFERENCES; note that ALL does not include the EXECUTE privilege. |
|
SELECT |
Read data. |
|
DELETE |
Delete data. |
|
INSERT |
Write new data. |
|
UPDATE |
Modify existing data. |
|
EXECUTE |
Execute or call a stored procedure. |
|
REFERENCES |
Reference a primary key with a foreign key. |
|
ROLE |
All privileges assigned to the role |
SQL Access Privileges
The GRANT statement assigns access privileges for a table or view to specified users, roles, or procedures. The REVOKE statement removes previously granted access privileges.
Contents
Assigning Privileges with GRANT
The GRANT statement can grant one or more privileges to one or more users. The privileges can be to one or more complete tables or can be restricted to certain columns of the tables. Only UPDATE and REFERENCES privileges can be assigned at the column level.
Granting Access to Whole Tables
The following statement grants one privilege on the Department table to one user:
GRANT SELECT ON Department TO EMIL
The following statement assigns two privileges (INSERT and UPDATE) on the Department table to three users:
GRANT INSERT, UPDATE ON Department TO EMIL, RAVI, HELGA
To grant privileges to everyone, use the PUBLIC keyword. The following statement grants all privileges except EXECUTE on the Department table to anyone who connects to the database:
GRANT ALL ON Department to PUBLIC
Granting Access to Columns
In the previous examples, users were granted access to entire tables. Often, however, you may want to grant access only to certain columns of a table. The following statement assigns UPDATE privilege to all users for the contact and phone columns in the Customers table:
This is a very brief introduction to an important topic: security. For more information about granting access, see Data Definition Guide.
Revoking Privileges
The REVOKE statement removes access privileges that were granted with GRANT. The following statement removes the insert and update privileges on the Department table that were granted to Emil, Ravi, and Helga in an earlier example.
REVOKE INSERT, UPDATE ON Department FROM EMIL, RAVI, HELGA
Using Roles to Control Security
MarketPlace® is compliant with entry- and mid-level SQL92 standards regarding roles. A role is a named group of privileges.
In practice, a company might want to grant a particular collection of privileges to its sales people and different collection of privileges to its accounting staff. The privileges list in each case might be quite complex. Without roles, you would have to use a lengthy and detailed GRANT statement each time a new sales or accounting person joined the company. The role feature avoids that.
Implementing roles is a four-step process:
- Define the role.
CREATE ROLE role_name
- Grant privileges to the role
When the access is restricted to certain columns, as in the second line, only UPDATE and REFERENCES can be granted. EXECUTE must always be granted in a separate statement.
GRANT {one or more of INSERT, UPDATE, DELETE, SELECT, REFERENCES, EXECUTE}
 ON table_name to role_name

 GRANT UPDATE (col_name1, col_name 2) ON table_name TO role_name
- Grant the role to users
The users now have all the privileges that were granted to the role_name role. But there is an additional step they must take before those privileges are available to them. They must specify the role when they connect to a database.
GRANT role_name TO user_name1, user_name2
- Specify the role when connecting to a database.

 Committing your Work
If you have not committed your work in IBConsole lately, do so now (Transaction > Commit). That way, if anything goes astray, you can roll back your work to this point (Transaction > Rollback).
Using a Role to Control Access
This exercise takes you through all four steps of implementing a role. You begin by creating another user and trying to access one of your tables when you are connected as this new user, in order to experience InterBase security at work. Then you create the Salesperson role, assign some privileges to it, assign the role to your new user, and finally, repeat the access that failed earlier to experience that your new user now has the necessary permissions.
- Logout from the server.
- Disconnect from the Tutorial database by selecting Database > Disconnect.
- Login to the server as SYSDBA (password "masterkey) by choosing Server > Login.
- Create a new user called CHRIS with a password of chris4ib. Refer to InterBase Quick Start: Part I - Create a New User if you have forgotten how to create a user.
- Highlight the Tutorial database icon in the left pane and choose Database > Connect As to connect to the database as Chris.
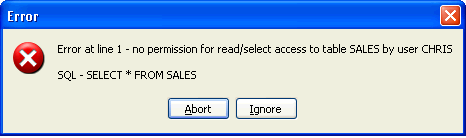
- Execute the following SELECT statement:
SELECT * FROM SALES
- Note: InterBase issues an error statement, because all those tables you have created in this tutorial belong to user TUTOR. User CHRIS does not have permission to do anything at all with them.
- Now disconnect from CHRIS and reconnect to the TUTORIAL database again, this time as TUTOR. Leave the Role field empty.
- Create a role called SALESPEOPLE.
CREATE ROLE SALESPEOPLE
- Execute the following GRANT statements to assign privileges to the SALESPERSON role.
- Note: Remember that you must execute each GRANT statement before entering the next one.
GRANT SELECT, UPDATE, INSERT ON Sales to SALESPEOPLE
 GRANT update (contact_first, contact_last, phone_no) ON Customer to SALESPEOPLE
 GRANT SALESPEOPLE TO CHRIS
- Connect to the TUTORIAL database as user CHRIS.
- Now enter the same query that failed in Step 5. This time, InterBase retrieves all the rows in the Sales table, because CHRIS now has the required permissions, thanks to the role.
- Now reconnect to the database as user TUTOR.
