Multi-Device Application to Receive Push Notifications
Go Up to Mobile Tutorial: Using Remote Notifications (iOS and Android)
Contents
You create a basic application to receive push notification with elements that are generic to Android and iOS, and you add the code that makes the characteristics for the specific platforms.
- Note: Because our implementation is based on the REST BAAS framework, RAD Studio allows you to use in your iOS or Android apps one of the following service providers:
- Kinvey
- Parse
- RAD Server (EMS)
Before you create your application to receive push notifications, ensure to complete these two required steps:
- Setting Up the Messaging Service
- Choose the provider:
Design and Set Up the User Interface
- To create an Multi-Device Application, select either of the following:
- File > New > Multi-device Application - Delphi > Blank Application
- File > New > Multi-device Application - C++Builder > Blank Application
- Drop a TCheckBox component on the form.
- In the Object Inspector, set the following properties of the CheckBox:
- Add a TMemo component to the form and set the Align property to Client.
- Drop a TPushEvents object.
- Set the AutoActivate to False.
- In LiveBindings Designer add a link from Active in PushEvents to IsChecked in CheckBox. The Active property of PushEvents is set to True when the CheckBox component is checked.
- Depending on the service provider you want to use, add:
- For Parse: a TParseProvider.
- For Kinvey: a TKinveyProvider.
- For RAD Server (EMS): a TEMSProvider.
-
Using TKinveyProvider (iOS or Android)
- Expand the Android Push node and copy to GCMAppID the Project Number from Registering with Google.
- Set the AppKey, AppSecret and MasterSecret to API Keys values from setting up your project in Kinvey.
- Set UserName and Password to the values defined at Adding an User in Kinvey.
-
Using TParseProvider (iOS or Android)
- Set the ApplicationID, MasterKey and RestApiKey to API Keys from Creating a Project at Parse.
Note: You do not need to add the GCM AppID when developing Android apps and using Parse. -
Using TEMSProvider (iOS or Android)
- Expand the Android Push node and copy to GCMAppID the Project Number from Registering with Google.
- Set the ApplicationId, AppSecret and MasterSecret to API Keys values from setting up your RAD Server Engine.


Creating the Event Handlers
-
On the form, select PushEvents1 and go to the Object Inspector:
- Check whether the Provider property is set to KinveyProvider1, to ParseProvider1 or to EMSProvider1 , depending on which provider you used.
- Go to Events tab and create an event handler for each event by double-clicking the Value field.
- Switch to Code tab by pressing F12.
- Define the event handlers as follows:
- Delphi:
implementation

{$R *.fmx}

procedure TForm1.PushEvents1DeviceRegistered(Sender: TObject);
begin
  Memo1.Lines.Add('Device Registered');
  Memo1.Lines.Add('');
end;

procedure TForm1.PushEvents1DeviceTokenReceived(Sender: TObject);
begin
  Memo1.Lines.Add('Device Token Received');
  Memo1.Lines.Add('');
end;

procedure TForm1.PushEvents1DeviceTokenRequestFailed(Sender: TObject;
  const AErrorMessage: string);
begin
  Memo1.Lines.Add('Device Token Request Failed');
  Memo1.Lines.Add(AErrorMessage);
  Memo1.Lines.Add('');
end;

procedure TForm1.PushEvents1PushReceived(Sender: TObject;
  const AData: TPushData);
begin
  Memo1.Lines.Add('Device push received');
  Memo1.Lines.Add(AData.Message);
  Memo1.Lines.Add('');
end;

end.
- C++:
//--------------------------------------------------------------------------
void __fastcall TForm1::PushEvents1DeviceRegistered(TObject *Sender)
{
   Memo1->Lines->Add("Device Registered");
   Memo1->Lines->Add("");
}
//--------------------------------------------------------------------------
void __fastcall TForm1::PushEvents1DeviceTokenReceived(TObject *Sender)
{
   Memo1->Lines->Add("Device Token Received");
   Memo1->Lines->Add("");
}
//--------------------------------------------------------------------------
void __fastcall TForm1::PushEvents1DeviceTokenRequestFailed(TObject *Sender, const UnicodeString AErrorMessage)

{
  Memo1->Lines->Add("Device Token Request Failed");
  Memo1->Lines->Add(AErrorMessage);
  Memo1->Lines->Add("");
}
//--------------------------------------------------------------------------
void __fastcall TForm1::PushEvents1PushReceived(TObject *Sender, TPushData * const AData)

{
  Memo1->Lines->Add("Push Received");
  Memo1->Lines->Add(AData->Message);
  Memo1->Lines->Add("");
}
//--------------------------------------------------------------------------

Android Settings
Project Settings
To enable your application to receive remote notifications:
- Right-click your project in the Project Manager.
- Choose Project > Options > Entitlement List.
- Set Receive Push Notification value to
True.
You need to include an additional entry in the AndroidManifest.xml for the project, by customizing your AndroidManifest.template.xml. In the AndroidManifest.template.xml file of your project search for the following tag:
<%receivers%>
Add the following code below it:
<service android:name="com.embarcadero.gcm.notifications.GCMIntentService" />
Note: Please consider the following updates in your code:
- Before applying your project settings, you need to register the GCM on a background thread.
- You can assign the
'TPushEvents.Active'property on the main thread without raising an instance of the'IOException'Java exception. - You can assign the
'TPushServiceConnection.Active'property on the main thread without raising an instance of the'IOException'Java exception.
- You can assign the
- The state changing to
'Starting'is now supported.'Android'and'iOS'platforms started to behave similarly regarding thepush service'slifecycle.- Now, you can test if the
'push service'entered in the'Starting'state when a connection change happens, similar to the following code approach:
procedure TForm1.OnServiceConnectionChange(Sender: TObject; PushChanges: TPushService.TChanges);
begin
  if TPushService.TChange.Status in PushChanges then
  begin
    if FPushService.Status = TPushService.TStatus.Starting then
    begin
      Memo1.Lines.Add('GCM registration is going to start.');
    end;
  end;
end;
Event-handlersare now called on the main thread.- The
'TPushEvents.OnDeviceRegistered','TPushEvents.OnDeviceTokenReceived','TPushEvents.OnDeviceTokenRequestFailed'and'TPushEvents.OnPushReceived'event-handlers no longer need to use the'TThread.Synchronize'when interacting with the visual controls. - The
'TPushServiceConnection.OnChange'and'TPushServiceConnection.OnReceiveNotification'event-handlers no longer need to use the'TThread.Synchronize'when interacting with the visual controls.
- The
iOS Settings
Project Settings
- Right-click your project in the Project Manager.
- Choose Project > Options > Version Info, and set the CFBundleIdentifier key. This should be the same as the identifier of your App ID. It is the Bundle ID from Creating iOS App ID on Apple Developer Program section.

Running Your Application on a Mobile Device
Now your application is ready to run on either a simulator or your connected mobile device.
To run your application
- In Projects Window, select your target platform.
- Choose either of the following commands:
- Run > Run
- Run > Run Without Debugging
- Click the Active checkbox.
- Go to Parse, Kinvey or Sending RAD Server Push Messages and send a new push:
Note: You can use your own RAD Server application to send RAD Server Push Notifications messages.Parse 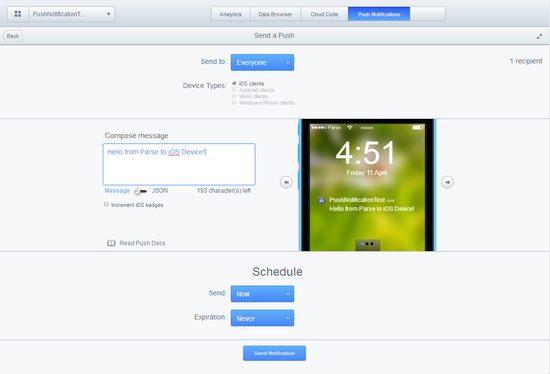
Kinvey 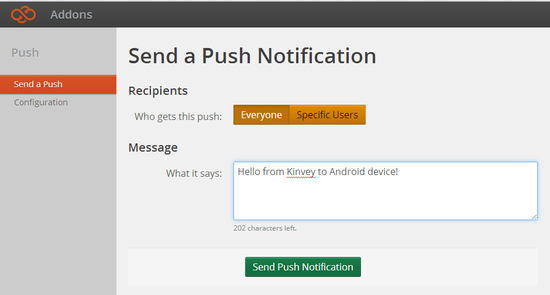
RAD Server (EMS) 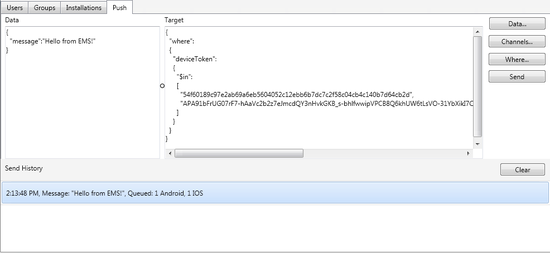
- Switch to your mobile device:
iOS 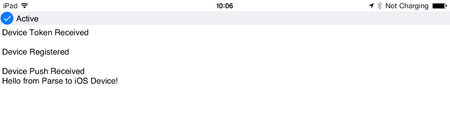
Android 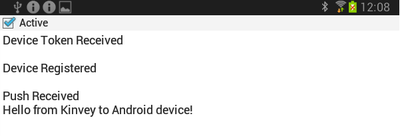
iOS RAD Server (EMS) 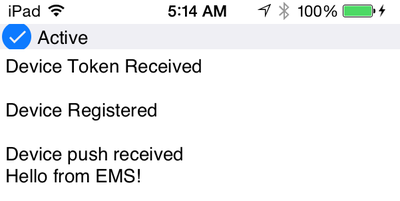
- Send your app to background and send another push from Parse or Kinvey. Now go to Notifications:
iOS 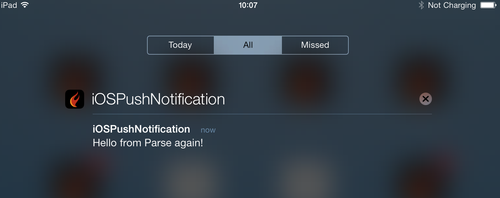
Android 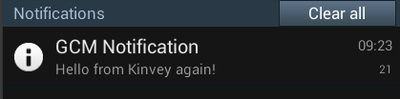


See Also
- Mobile Tutorial: Using Notifications (iOS and Android)
- Mobile Tutorial: Using BaaS for Backend Storage (iOS and Android)
- RAD Server (EMS)
- RAD Server Push Notifications
- Entitlement List