Add a Data Module (IBX General Tutorial)
Go Up to Tutorial: Using InterBase Express to Access a Database
In this section, you create a data module (TDataModule), which is a form that contains nonvisual components that your application uses.
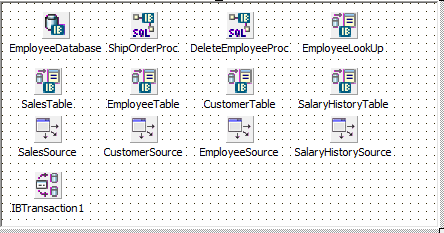
Here is a view of the fully populated TDataModule:
After you create a TDataModule, you can use the data module in other forms.
Contents
Add the TDataModule
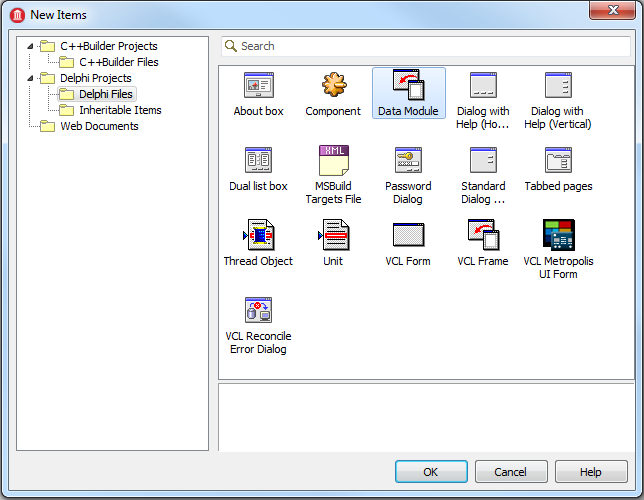
To add the data module to your project, right-click the project name in the Project Manager and then click Add New > Other... to display the New Items dialog.
Delphi
Select Data Module and click OK.
Select the new TDataModule. Set its Name property to "DmEmployee". Set OldCreateOrder to true.
Save the new unit:
- For Delphi, save the unit to DmCSDemo.pas.
Now add components to the new TDataModule.
Add Database and Transaction
Add two fundamental database components: the TIBDatabase and the TIBTransaction.
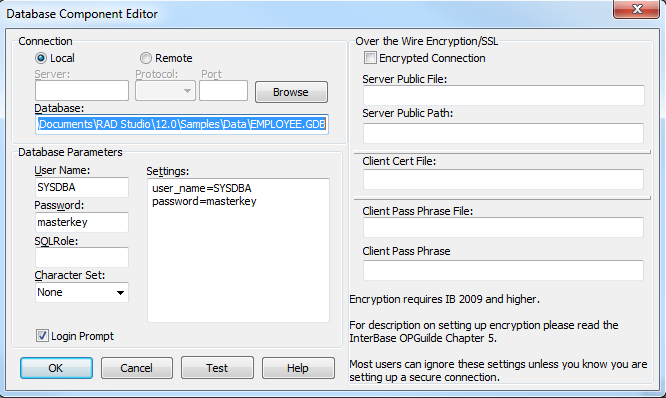
- Just as in the View Various Tables section, drag a TIBDatabase onto the data module. Double-click the new TIBDatabase to display the Database Component Editor or Connection Broker Component Editor. Set the TIBDatabase's properties by filling out the dialog then clicking OK:
Note: If you embed the password in the application, as in this example, anyone has access to this database without logging in.
- Finish configuring the TIBDatabase by setting the Name to "EmployeeDatabase". Set Connected to true.
- Add a TIBTransaction to the TDataModule. Set the DefaultTransaction property of the TIBDatabase to "IBTransaction1".
Add Stored Procedures
Add two TIBStoredProc components to use stored procedures in the database.
- Place a TIBStoredProc on the module. Set Name to "ShipOrderProc". Set Database to "EmployeeDatabase" from the drop-down menu. Set StoredProcName to "SHIP_ORDER" from the drop-down menu. SHIP_ORDER is one of the stored procedures in the EMPLOYEE database.
- Add another TIBStoredProc to the module. Set Name to "DeleteEmployeeProc". Set Database to "EmployeeDatabase" from the drop-down menu. Set StoredProcName to "DELETE_EMPLOYEE" from the drop-down menu.
Add DataSets
Add five TIBDataSet components to the module. Each TIBDataSet accesses a different database table in the EMPLOYEE database or accesses the table in a different way.
- "EmployeeLookup" TIBDataSet
- Set the Transaction property to "IBTransaction1". This may already be set.
- Connect this TIBDataSet to the database by setting its Database property to "EmployeeDatabase" using the drop-down menu.
- Set the Name property to "EmployeeLookup".
- Right-click the "EmployeeLookup" TIBDataSet and select Edit SQL.
- Set the CommandText property to
select * from EMPLOYEE - Double-click the TIBDataSet component to display the Fields Editor dialog. Right-click the empty list and select Add all fields from the context menu. Close the Fields Editor.
- Right-click the "EmployeeLookup" TIBDataSet and select Dataset Editor.
- Select "EMP_NO" from the Key Fields column and click the Generate SQL button.
- Click the OK button to close the wizard.
- You use this component to access the EMPLOYEE table in the database.
- "SalesTable" TIBDataSet
- Set the Transaction property to "IBTransaction1".
- Set Database property to "EmployeeDatabase" using the drop-down menu.
- Set the Name property to "SalesTable".
- Right-click the "SalesTable" TIBDataSet and select Edit SQL.
- Set the CommandText property to
select * from SALES. - Double-click the TIBDataSet component to display the Fields Editor dialog. Right-click the empty list and select Add all fields from the context menu. Close the Fields Editor.
- Right-click the "SalesTable" TIBDataSet and select Dataset Editor.
- Select "PO_NUMBER" from the Key Fields column and click the Generate SQL button.
- Click the OK button to close the wizard.
- You use this component to access the SALES table in the database.
- "CustomerTable" TIBDataSet
- Set the Transaction property to "IBTransaction1".
- Set the Database property to "EmployeeDatabase" using the drop-down menu.
- Set the Name property to "CustomerTable".
- Right-click the "CustomerTable" TIBDataSet and select Edit SQL.
- Set the CommandText property to
select * from CUSTOMER WHERE CUST_NO = :CUST_NO. - Double-click the TIBDataSet component to display the Fields Editor dialog. Right-click the empty list and select Add all fields from the context menu. Close the Fields Editor.
- Right-click the "CustomerTable" TIBDataSet and select Dataset Editor.
- Select "CUST_NO" from the Key Fields column and click the Generate SQL button.
- Click the OK button to close the wizard.
- You use this component to access the CUSTOMER table in the database.
- "EmployeeTable" TIBDataSet
- Set the Transaction property to "IBTransaction1".
- Set Database property to "EmployeeDatabase" using the drop-down menu.
- Set the Name property to "EmployeeTable".
- Right-click the "EmployeeTable" TIBDataSet and select Edit SQL.
- Set the CommandText property to
select * from EMPLOYEE. - Right-click the "EmployeeTable" TIBDataSet and select Dataset Editor.
- Select "EMP_NO" from the Key Fields column and click the Generate SQL button.
- Click the OK button to close the wizard.
- You also use this component to access the EMPLOYEE table in the database.
- "SalaryHistoryTable" TIBDataSet
- Set the Transaction property to "IBTransaction1".
- Set Database property to "EmployeeDatabase" using the drop-down menu.
- Set the Name property to "SalaryHistoryTable".
- Right-click the "SalaryHistoryTable" TIBDataSet and select Edit SQL.
- Set the CommandText property to
select * from SALARY_HISTORY WHERE EMP_NO=:EMP_NO. - Right-click the "SalaryHistoryTable" TIBDataSet and select Dataset Editor.
- Select "EMP_NO" from the Key Fields column and click the Generate SQL button.
- Click the OK button to close the wizard.
- You also use this component to access the SALARY_HISTORY table in the database.
Add Data Sources
Add four TDataSource components to the module. The TDataSources are linked to the TIBDataSets above. A TDataSource component serves as an interface between the TIBDataSet and data-aware controls.
- "SalesSource" TDataSource. Set the TDataSource's DataSet to "SalesTable" with the drop-down menu. Set the Name property to "SalesSource".
- "CustomerSource" TDataSource. Set the TDataSource's DataSet to "CustomerTable" with the drop-down menu. Set the Name property to "CustomerSource".
- "EmployeeSource" TDataSource. Set the TDataSource's DataSet to "EmployeeTable" with the drop-down menu. Set the Name property to "EmployeeSource".
- "SalaryHistorySource" TDataSource. Set the TDataSource's DataSet to "SalaryHistoryTable" with the drop-down menu. Set the Name property to "SalaryHistorySource".
- Some of the TIBDataSets need to link to a TDataSource to set up a relationship with another table.
- Select the "CustomerTable" TIBDataSet. Set DataSource to "SalesSource" from the drop-down menu.
- Select the "SalaryHistoryTable" TIBDataSet. Set DataSource to "EmployeeSource" from the drop-down menu.
Add Event Handlers
The final step in constructing the TDataModule is to add a few event handlers.
- Select the TDataModule. In the Object Inspector, click the Events tab. Double-click the OnCreate event to generate skeleton code for the event. Add the following code for this event:
Delphi
procedure TDmEmployee.DmEmployeeCreate(Sender: TObject);
begin
  EmployeeDatabase.Open;
end;
- Select the "EmployeeTable" TIBDataSet. In the Events tab, double-click the AfterPost event. Use the following code for this handler:
procedure TDmEmployee.EmployeeTableAfterPost(DataSet: TDataSet);
begin
  { A change in an employee salary triggers a change in the salary history,
    so if that table is open, it needs to be refreshed now }
  with SalaryHistoryTable do if Active then Refresh;
end;
- Select the "EmployeeTable" TIBDataSet. In the Events tab, double-click the BeforeDelete event. Use the following code for this handler:
procedure TDmEmployee.EmployeeTableBeforeDelete(DataSet: TDataSet);
begin
  { Assign the current employee's id to the stored procedure's parameter }
  DeleteEmployeeProc.Params.ParamValues['EMP_NUM'] := EmployeeTable['EMP_NO'];
  DeleteEmployeeProc.ExecProc;          { Trigger the stored proc }
  EmployeeTable.Refresh;                { Refresh the data }
  { Block the EmployeeTable delete since the stored procedure did the work }
  Abort;
end;
This completes the data module, which you will use in the next section. Before moving on, examine the code for this module. Note that numerous objects have been automatically added to the data module class that represent table fields, such as SalesTablePO_NUMBER.


