Configuring Your EMS Server or EMS Console Server on Windows
Go Up to Setting Up Your EMS Server
Go Up to Setting Up Your EMS Console Server
To set up your Enterprise Mobility Service (EMS) properly, you need the resources and the stand-alone developer applications that are delivered with RAD Studio.
Contents
EMS Configuration Files
RAD Studio provides the scripts to render the web-browser console, the EMS server configuration file and the script to create the EMS database, and the stand-alone applications to run the EMS Console Server and the EMS Server.
In C:\Program Files (x86)\Embarcadero\Studio\19.0\ObjRepos\en\EMS folder you can find:
- webresources folder: This folder contains scripts to render the web-browser console. You can customize the appearance of your EMS Console Server by modifying the layouts, templates and styles defined here.
- emsserver.ini file: This is a template for the EMS server configuration file (for the EMS Server and for the EMS Console Server).
- EMS Database creation files:
- emsmserver.sql and emsserver.sql files. SQL script files to create the EMS Database.
- EMSMSERVER.IB and EMSSERVER.IB files. License template files to create the EMS Database.
The stand-alone applications (EMSDevConsole.exe and EMSDevServer.exe) are located in the following folders:
- Windows 32-bit:
C:\Program Files (x86)\Embarcadero\Studio\19.0\bin - Windows 64-bit:
C:\Program Files (x86)\Embarcadero\Studio\19.0\bin64
Configuring Your EMS Environment for the First Time
The EMSDevServer.exe and EMSDevConsole.exe programs only run the setup wizard when there is no registry key or if the emsserver.ini file does not exist.
- Note: For a production environment, you need to set up the Interbase EMS database properly before running the EMS Setup Wizard.
To start the EMS Setup Wizard:
- Locate one of the following stand-alone applications on your system, and double-click:
- EMSDevConsole.exe: The EMS Console opens with a confirmation dialog.
- EMSDevServer.exe: The EMS Server opens with a confirmation dialog.
- Click Yes to run the configuration EMS Setup Wizard. The EMS Setup Wizard opens to create a new EMS database.
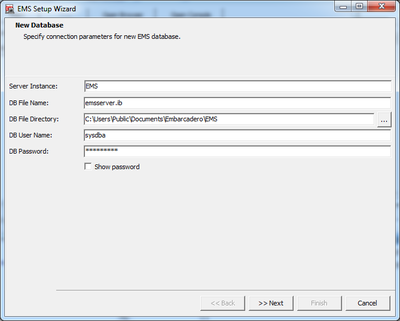
- The New Database page opens.
- Enter the following values on the New Database page to specify its connection parameters:
- Server Instance: Specify the InterBase instance that hosts the EMS database. Leave it blank for a developer environment; for a production environment use
EMS- Note: See EMS Database Requirements for a Production Environment on Windows for more information.
- DB File Name: emsserver.ib
- DB File Directory: The default path is
C:\Users\Public\Documents\Embarcadero\EMS - DB User Name:
sysdbaas the parameter by default. - DB Password:
masterkeyas the parameter by default.- Note: Select Show password to see the unencrypted password.
- Click Next.
- Server Instance: Specify the InterBase instance that hosts the EMS database. Leave it blank for a developer environment; for a production environment use
- Enter the following values on the New Database page to specify its connection parameters:
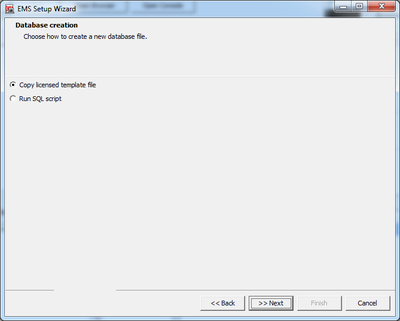
- The Database creation page opens.
- Select how to create the new EMS database from the delivered files.
- Copy the license template file.
- Run the SQL script.
- Click Next.
- Select how to create the new EMS database from the delivered files.
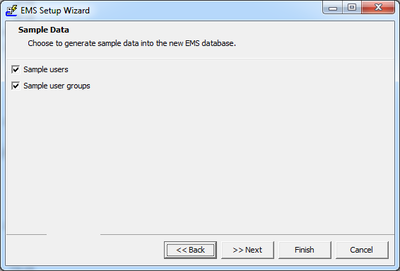
- The Sample Data page opens.
- Select one or more options indicating the sample data to be generated in the EMS database.
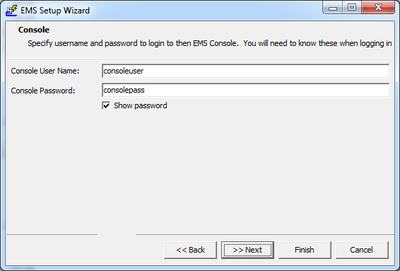
- Click Next. The Console page opens.
- Specify a Console User Name and a Console Password. The default values are:
consoleuserandconsolepass.- Note: The user name and password are saved in the emsserver.ini file in plain text.
- Specify a Console User Name and a Console Password. The default values are:
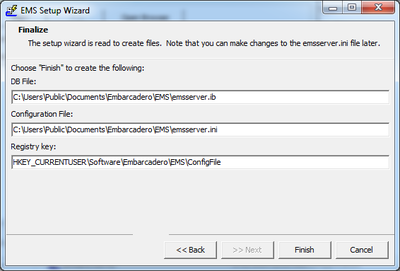
- Click Next. The Finalize page opens.
- Click Finish to create the following files in the default path:
C:\Users\Public\Documents\Embarcadero\EMS- DB File: The EMS Database file (emsserver.ib). You need to have an InterBase server running.
- Configuration File: The EMS Server configuration file (emsserver.ini).
- Registry Key: The EMS Registry key on the system.
- Click Finish to create the following files in the default path:
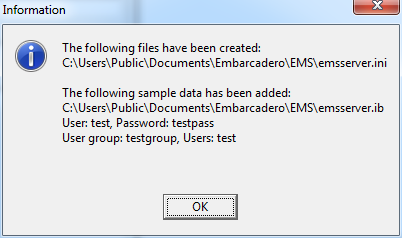
- An Information wizard appears with the files created and the data added to the database. Click OK.
If you are planning to have the EMS Server and the EMS Console running on different servers, you need a configuration file (.ini) on each server.
In this scenario, you need to configure the .ini file on the Console Server to access the Interbase database on the EMS Server.
Running the Setup Wizard
You can run the setup wizard again as follows:
- Open the command prompt (cmd.exe).
- Type the following command:
emsdevserver -setup
- Open the command prompt (cmd.exe).
- Navigate to the EMSDevServer.exe folder:
- Windows 32-bit:
C:\Program Files (x86)\Embarcadero\Studio\19.0\bin - Windows 64-bit:
C:\Program Files (x86)\Embarcadero\Studio\19.0\bin64
- Windows 32-bit:
- Type the following command:
EMSDevServer.exe -setup
