Upgrading Your EMS Server
Go Up to Setting Up Your EMS Server
You can upgrade and make a backup of your EMS Database and configuration file, by using the EMS Upgrade Wizard.
If the EMS database version number is lower than the Version number expected by EMS Server, the EMS Upgrade Wizard runs automatically.
Use the EMS Upgrade Wizard to update your EMS database that was created with previous versions of RAD Studio.
On Windows, you can upgrade your EMS Server with the EMS Upgrade Wizard and with the command line.
On Linux, you can upgrade your EMS Server with the command line only.
Upgrading Your EMS Server on Windows
To start the EMS Upgrade Wizard:
- Open the command prompt (cmd.exe).
- Navigate to the EMSDevServer.exe:
- Windows 32 bits:
C:\Program Files (x86)\Embarcadero\Studio\19.0\bin - Windows 64 bits:
C:\Program Files (x86)\Embarcadero\Studio\19.0\bin64
- Windows 32 bits:
- Type the following command:
EMSDevServer.exe -upgrade
- Tip: You can also run the EMS Upgrade Wizard at command prompt with the following command:
EMSDevServerCommand.exe -upgrade
- The EMS Upgrade Wizard opens to create a new EMS database or copy an existing EMS database.
- The New database content page opens.
- Select whether to create an empty database or a database with content:
- Copy an existing EMS database: To copy the content of an existing EMS Database installed in your system.
- Note: The Source Database page opens to specify it.
- Create an empty EMS database: To create an EMS Database without content.
- Note: The New Database page opens then.
- Create an EMS database with sample data: To add test sample data to the new EMS Database.
- Note: The New Database page opens then.
- Copy an existing EMS database: To copy the content of an existing EMS Database installed in your system.
- Select whether to create an empty database or a database with content:
- The Source Database page opens (only if you copy the content from an existing EMS database).
- Enter the following values on the Source Database page to specify connection parameters to the existing source EMS database:
- Server Instance: Specify the InterBase instance that hosts the source EMS database.
- DB File Name: Specify the database file, the default value is
emsserver.ib - DB File Directory: The default path is
C:\Users\Public\Documents\Embarcadero\EMS - DB User Name:
sysdbaas the parameter by default. - DB Password:
masterkeyas the parameter by default.- Note: Select Show password to see the unencrypted password.
- Click the Test Connection button to test the connection parameters. If the connection is set up successfully, you will get a message with the current version number of the EMS database.
- Click Next.
- Enter the following values on the Source Database page to specify connection parameters to the existing source EMS database:
- The New Database page opens.
- Enter the following values on the New Database page to specify connection and configuration parameters for the new EMS database:
- Server Instance: Specify the InterBase instance that hosts the EMS database.
- DB File Name: specify the database file, the default value is
emsserver1.ib - DB File Directory: The default path is
C:\Users\Public\Documents\Embarcadero\EMS - DB User Name:
sysdbaas the parameter by default. - DB Password:
masterkeyas the parameter by default. - Click Next.
- Enter the following values on the New Database page to specify connection and configuration parameters for the new EMS database:
- The Finalize page opens.
- Click Finish to create the following files in the default path:
C:\Users\Public\Documents\Embarcadero\EMS- DB File: The EMS Database file (
emsserver.ib). You need to have an InterBase server running. - Configuration File: The EMS Server configuration file (
emsserver.ini). - Backup Configuration File: A copy of the existing EMS Server configuration file (saved as emsserver.ini.backup).
- DB File: The EMS Database file (
- Click Finish to create the following files in the default path:
- An Information wizard appears with the files created and the data copied to the database. Click the OK button.


Upgrading Your EMS Server on Linux
To run the upgrade wizard:
- Open the Terminal.
- Type the following command:
/usr/lib/ems/EMSDevServerCommand -upgrade
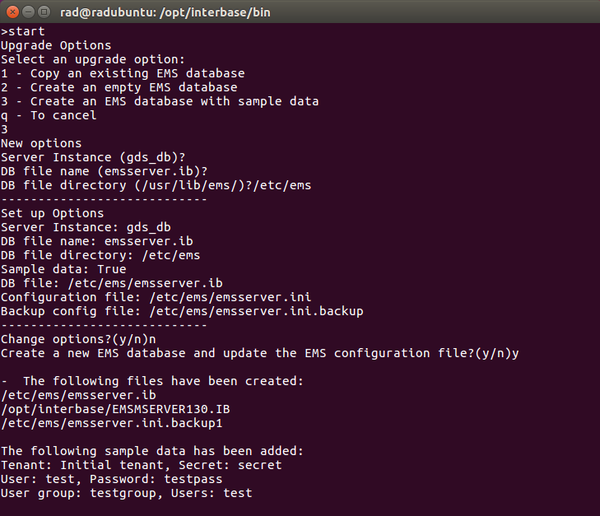
- Enter a symbol for the required option depending on what do you need to do:
Symbol Option Name Description 1 Copy an existing EMS database Copy the content of an existing EMS Database installed in your system. Enter the following values for the Source Database section to specify connection parameters to the existing source EMS database: - Server Instance: Specify the InterBase instance that hosts the source EMS database.
- DB File Name: Specify the database file, the default value is emsserver.ib
- DB File Directory: specify the directory for database file name.
- DB User Name:
sysdbais the default parameter. - DB Password:
masterkeyis the default parameter.
2 Create an empty EMS database Create an EMS Database without a content. Enter the following values for the New Database section to specify connection and configuration parameters for a new EMS database: - Server Instance: Specify the InterBase instance that hosts the EMS database.
- DB File Name: Specify the database file, the default value is emsserver1.ib
- DB File Directory: Specify the directory for database file name.
- DB User Name:
sysdbais the default parameter. - DB Password:
masterkeyis the default parameter.
3 Create an EMS database with sample data Add a test sample data to the new EMS database. Enter the following values for the New Database section to specify connection and configuration parameters for the new EMS database: - Server Instance: Specify the InterBase instance that hosts the EMS database.
- DB File Name: Specify the database file, the default value is emsserver1.ib
- DB File Directory: Specify the directory for database file name.
- DB User Name:
sysdbais the default parameter. - DB Password:
masterkeyis the default parameter.
q Cancel Cancel upgrading your EMS Server. 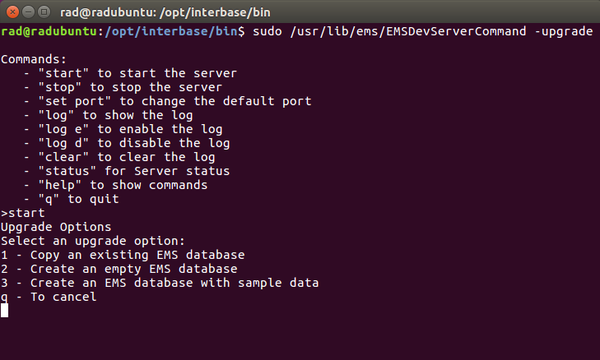
- Make sure all parameters are correct and enter
nto confirm it.