Offline Installer
Go Up to Graphic Utilities Index
Contents
- 1 Agreement Page
- 2 Welcome Page
- 3 Input License Page
- 4 Setup Personalities Page
- 5 Setup Languages Page
- 6 Select Features Page
- 7 Android Page
- 8 Start Menu Page
- 9 Destination Folder Page
- 10 Update File Associations Page
- 11 Ready to Install Page
- 12 Installing Page
- 13 Setup Complete Page
- 14 Uninstall Page
- 15 Ready to Uninstall Page
- 16 Uninstalling Page
- 17 See Also
- Tip: This is a reference page about one of the tools required to install RAD Studio. For installation instructions, see Installation.
The Offline Installer is an installation wizard that lets you install RAD Studio on a system that does not have a working internet connection. After you install RAD Studio, the Offline Installer allows you to install additional features or remove installed features.
When you open the Offline Installer before you install RAD Studio Tokyo, it opens in the Agreement page.
When you open the Offline Installer after you install RAD Studio Tokyo, it opens in the Welcome page.
Each page of the Offline Installer provides a combination of the following buttons at the bottom:
- Next advances to the next page.
- Back returns to the previous page.
- Cancel aborts the installation.
- Finish closes the Offline Installer after a successful installation.
Agreement Page
The Agreement page gives you access to the RAD Studio License Agreement and the RAD Studio Privacy Statement.
To install RAD Studio, you must first mark the check box in this page that indicates that you agree with the terms of both documents.
If you leave the "Join Embarcadero Customer Experience Program to help improve RAD Studio" option checked, your RAD Studio installation sends anonymous usage data to RAD Studio. See Customer Experience Program.
The Next button opens the Input License page.
Welcome Page
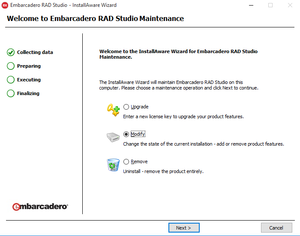
The Agreement page allows you to upgrade, modify, or remove an existing RAD Studio installation.
Check the desired action and select Next. A different page opens depending on the chosen action:
- If you select Upgrade, the Input License page opens.
- If you select Modify, the Setup Languages page opens.
- If you select Remove, the Uninstall page opens.
Input License Page
In the Input License page you must check a licensing option:
- Check "I have signed up for a trial at embarcadero.com" and select Next if you signed up for a RAD Studio trial .
- Note: If you are upgrading RAD Studio, the trial option is disabled. You can upgrade from a trial, but you cannot upgrade to a trial.
- Check "I already have a product serial number" and select Next to open a Registration dialog box where you can input your serial number and EDN credentials to register RAD Studio.
- Check "I have a valid license file (*.slip or reg*.txt) to import" and select Next to open the License Manager, where you can import a license file to register RAD Studio.
After you register RAD Studio, the Setup Personalities page opens.
Setup Personalities Page
In the Setup Personalities page you can choose which programming languages you want your RAD Studio installation to support:
- Delphi 10.2 Tokyo (Delphi support)
- C++Builder 10.2 Tokyo (C++ support)
Select Next to open the Setup Languages page.
Setup Languages Page
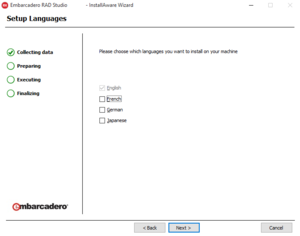
In the Setup Languages page you can choose which natural languages you want your RAD Studio installation to support:
- English (always checked)
- French
- German
- Japanese
Select Next to open the Select Features page.
Select Features Page
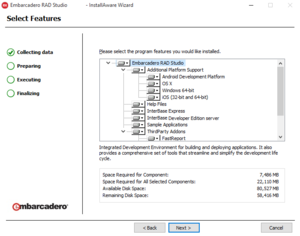
In the Select Features page you can choose which additional features you want your RAD Studio installation to support. All features are selected by default.
You can disable nodes under Additional Platform Support to disable support for any target platform other than 32-bit Windows.
Select Next to open:
- The Android page if you did not disable Android support.
- The Update File Associations page if you are upgrading or modifying RAD Studio.
- The Start Menu page otherwise.
Android Page
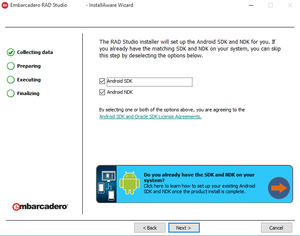
In the Android page you can choose whether you want to install the Android SDK and the Android NDK, which along with the Java Development Kit (JDK) are required for Android development.
If you have the required version of the Android development tools installed already, you can uncheck both check boxes and configure them in RAD Studio after the installation.
Select Next to open the Start Menu page otherwise.
Start Menu Page
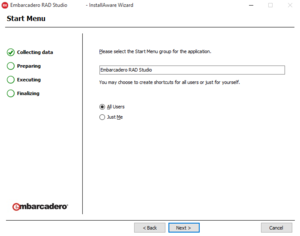
In the Start Menu page you can choose the name of the RAD Studio entry in your applications menu, and whether you want to install RAD Studio for any user of the system (All Users) or just for the current user (Just Me).
Select Next to open the Destination Folder page.
Destination Folder Page
In the Destination Folder page you can choose the installation path of RAD Studio, the installation path of the sample applications and the installation path of the RAD Studio common files.
Select Next to open the Update File Associations page.
Update File Associations Page
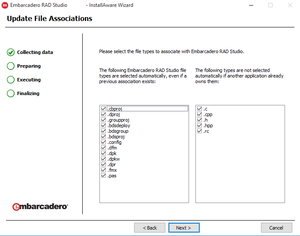
In the Update File Associations page you can choose which file extensions you want to associate with RAD Studio.
- Tip: Use the File Association options page to update file associations after the RAD Studio installation.
Select Next to open the Ready to Install page.
Ready to Install Page
Select Next in the Ready to Install page to start the RAD Studio installation.
Installing Page
The Installing page shows details about the progress of the RAD Studio installation.
Specifically, you can see the Overall Install Progress on the bottom-left corner of the page.
When the installation finishes, the Setup Complete page opens.
Setup Complete Page
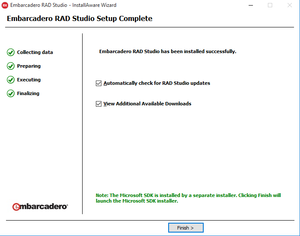
If you are installing, upgrading, or modifying RAD Studio, the Setup Complete page informs you that that the process has finished successfully, and offers you some actions to take after the installation:
- If you leave the "Automatically check for RAD Studio updates" option checked, the Offline Installer checks whether or not there are updates available for RAD Studio Tokyo.
- If you leave the "View Additional Available Downloads" option checked, the Offline Installer opens the
C:\Program Files (x86)\Embarcadero\Studio\19.0\available_downloads_en.htmlfile, where you can see instructions to install additional, optional software.
If you are removing RAD Studio, the Setup Complete page informs you that RAD Studio has been successfully removed.
Click Finish to close the Offline Installer.
If you are installing RAD Studio (as opposed to upgrading, modifying, or removing it), the Offline Installer opens the Microsoft Windows 10 SDK Installer. If you selected to install a trial version of RAD Studio, when the Microsoft Windows 10 SDK Installer finishes it opens the Embarcadero Product Registration tool, where you can request a trial.
Uninstall Page
The Uninstall page allows you to indicate whether you want to remove all RAD Studio Tokyo entries from the Windows registry (YES) or remove only installed files (NO).
Select Next to continue to the Ready to Uninstall page.
Ready to Uninstall Page
Select Next in the Ready to Uninstall page to start the RAD Studio removal.
Uninstalling Page
The Uninstalling page shows details about the progress of the RAD Studio removal.
Specifically, you can see the Overall Uninstall Progress on the bottom-left corner of the page.
When the removal finishes, the Setup Complete page opens.

