EMS.Sample RAD Server Multi-Tenant Application
This sample application demonstrates Multi-Tenancy Support in RAD Server Overview.
It requires InterBase to be installed on the machine or to connect to a remote server. Make sure that the server is running before you run the sample application.
With Multi-Tenancy support, a single RAD Server instance with a single RAD Server database connection can support multiple isolated tenants. Each tenant has a unique set of RAD Server resources including Users, Groups, Installations, Edge Modules, and other data. All tenants have custom resources that are installed in the EMS Server. Also, as an administrator you can create new tenants, edit existing ones, add, edit, or delete details of your tenants, specify if the tenant is active, and delete the tenants that you do not need.
Contents
Location
You can find the RAD Server Overview Multi-tenant sample project at:
- Start | Programs | Embarcadero RAD Studio 10.4 Sydney | Samples and then navigate to the following:
Object Pascal\DataBase\EMS\Multi-Tenancy Demo
- Subversion Repository:
- You can find Delphi code samples in GitHub Repositories. Search by name into the samples repositories according to your RAD Studio version.
Overview
This sample application demonstrates RAD Server’s Multi-Tenancy support. RAD Server Overview is a turn-key application foundation for rapidly building and deploying services based applications. RAD Server enables developers to quickly build new application back-ends or migrate existing Delphi or C++ client/server business logic to a modern services based architecture that is open, stateless, secure and scalable.
A single RAD Server Overview instance with a single RAD Server database connection can support multiple isolated tenants.
This demo uses a chain of toy stores to highlight RAD Server’s multi-tenancy support where each store with its employees and goods is a tenant implementation.
Using the RAD Server Multi-Tenant Application
The sample application demonstrates a retail store deployment use case. Each store with its employees and goods is a tenant implementation.
Employees
There are two groups of users with different rights:
- Managers
- Cashiers
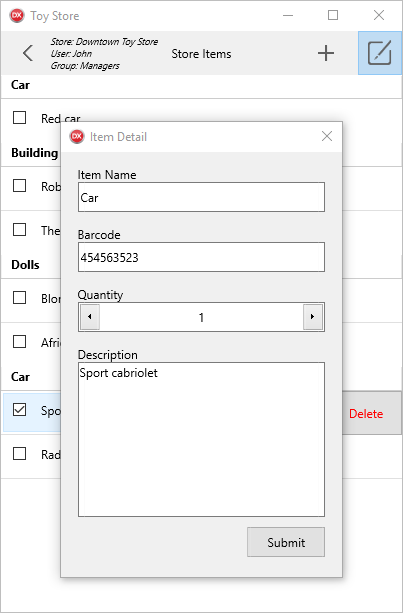
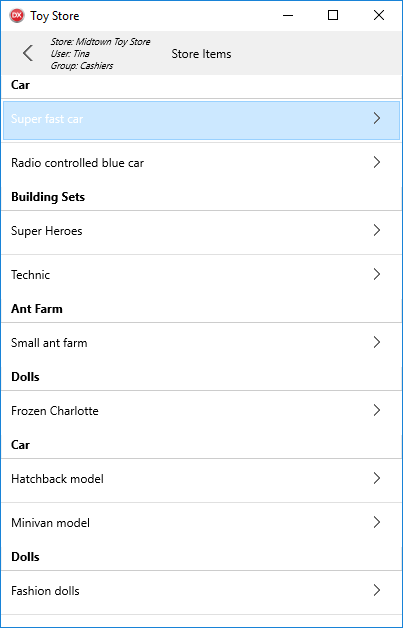
Managers can add new store items, delete them, and edit the details of the existing ones while cashiers can only view the information about the existing goods. Neither employee can see the information about the other stores in the chain.
Description
Now, let us have a look at the sample application.
Store Log in Page
To access store specific information, enter the following information on the Store Log in page:
- Toy Store: select a store from the list. Each store is a tenant implementation.
- Store password: enter the password.
Tip: You can find credentials in the Readme.txt file provided with the sample application.
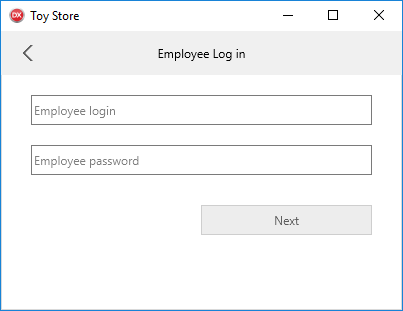
Employee Log in Page
On the Employee Log in page, each employee enters the following:
- Employee login
- Employee password
Tip: You can find credentials in the Readme.txt file provided with the sample application.
Store Items Page
After logging in, each employee sees the store items screen. The screen is displayed in two different modes: edit or view only, and access depends on the employee’s position. This uses EMS groups (a feature of RAD Server) to define access rights.
- Managers can view, add, and delete the store items and edit the details.
- Cashiers can view the items’ details only.
| Store Items for managers | Store Items for cashiers |

|

|
Implementation
EMS Package
On initialization, EMS Package runs scripts that create the template data for your tenants.
The EMS Package includes two resources with the following names: “settings” and “items”. You can find them in the SettingsDataModule.pas and StoreDataModule.pas files.
- The
“settings”resource provides the GET method. This method returns the list of stores of the Toy Store Chain. The“settings”resource does not require you to provide TenantId and TenantSecret from EMS Client, because it has the AllowAnonymousTenant attribute which skips Tenant validation step. - The
“items”resource manages the store items. This resource defines the GET and POST methods. The store items are filtered by the TenantId that you provided. We use the GetData method to filter the data by tenants accessing the Tenant ID through AContext.Tenant.ID.
MultiTenant Client
The MultiTenant client app has three following TabItems:
- On the first screen, you need to select the store and enter the associated password.
- On the second screen, you need to enter the username and password for the selected store (tenant).
- On the third screen, you can view the store items or edit them depending on user privileges: manager or cashier.
TEMSProvider component
The client application has the TEMSProvider component. This component identifies the address of the RAD Server Engine (EMS Server) (http://localhost:8080). After the user selects a certain store (tenant), tenant’s credentials are provided for TEMSProvider. From now on, each further request contains Tenant details, and the data that users see is filtered depending on the tenant that is selected.

