MongoDB Support
Go Up to Supported Database Platforms
MongoDB is a different type of database, it does not have tables like a relational database, but rather 'collections' which each collection holds a set of documents. Each document (which can be thought of as a 'row' in a relational table) is usually serialized as JSON data. Data Architect will reverse engineer this JSON data and produce a schema of the data it finds. It will also look at existing relationships between collections and add these to the schema. For the hierarchical structures in these JSON documents, Data Architect will render these as rolled-up structures inside the Collections for ease of viewing. It will also generate a logical data model based on the objects it finds within the JSON.
ER/Studio Data Architect supports MongoDB authentication of username and password. No authentication is also supported.
Contents
Generating a Physical Data Model for MongoDB
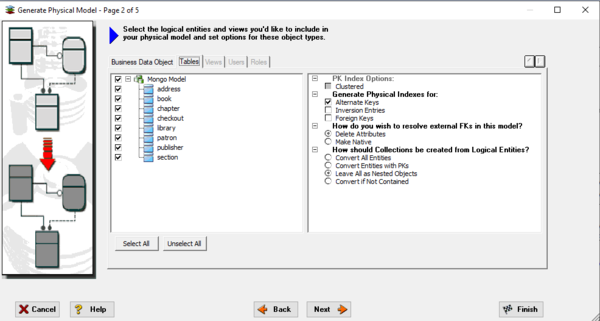
The Generate Database wizard differs for each target platform but for MongoDB models there will be the following options: For MongoDB on Page 2 of the wizard
Propagated Foreign Key properties can be removed from generated objects or made as native fields which may be useful later to connect objects together elsewhere via code.
There is an option to select how Collections will be created from entities:
- Convert All Entities - all logical entities become Collections
- Convert Entities with PKs - all logical entities with primary keys become Collections
- Leave All as Nested Objects - all logical entities become Nested Objects
- Convert if Not Contained - takes a rules-based approach as detailed below using the containment properties set in the logical
Convert if Not Contained
The generator wizard will follow the following steps:
- For each entity in the logical model create an object. Primary key attributes will become standard fields.
- Logical relationship lines will generate either a referencing relationship or a containment relationship.
- For each generated object the wizard will review whether the object has a containing relationship from any other object. If it does it will become a Nested Object. If not it will become a top level Collection.
- All Collections are given a surrogate primary key "_id"
- For referencing relationships primary keys are propagated
The Rolled Up View
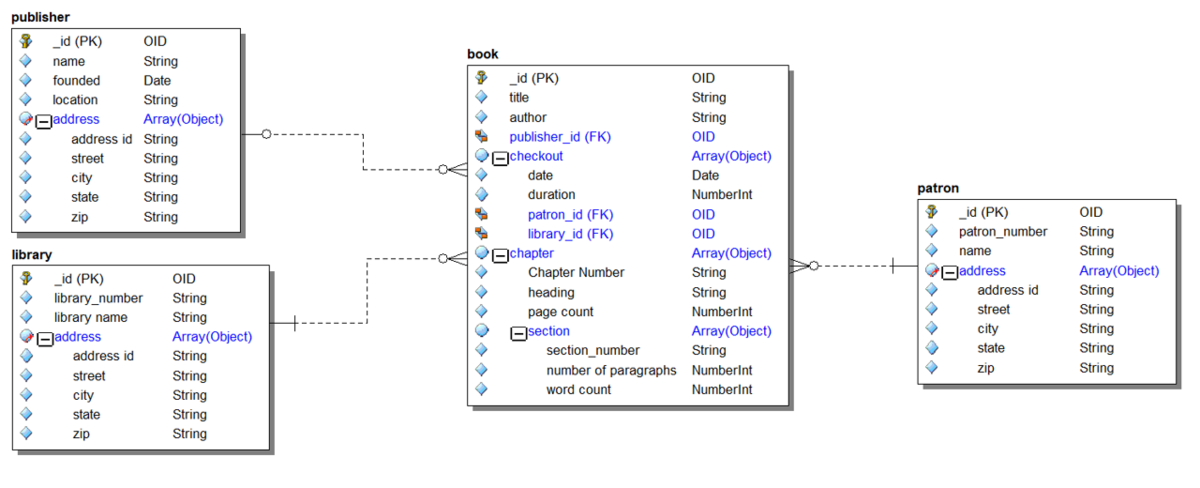
The object view is useful to understand the reuse of objects and edit the cardinality to Nested Objects. You can also select a rendering of the model that is easier to visualize the hierarchical nature of the model.
- On the Diagram tab of the ribbon bar select Diagram/Display Options

- On the Object tab select the checkbox 'Roll Up Contained Objects'
Forward Engineering
For guidance on how to forward engineering MongoDB, please see Generating a Script File or Database. The Generate Database wizard will produce sample JSON output for each Collection
Reverse Engineering
For a walkthrough of reverse engineering MongoDB, please see Reverse Engineer MongoDB Walkthrough.
Connecting to MongoDB
Ensure that you have network access to your MongoDB server. The default port is 27017 and should be open for incoming connections on the MongoDB server firewall.
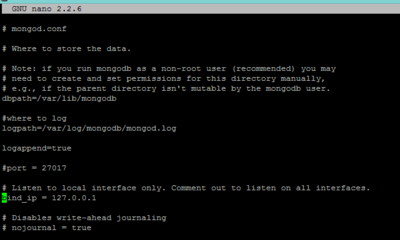
The default MongoDB setup on some installations use the BindIP section of the config file to bind the listening port to 127.0.0.1. Unless your ER/Studio Data Architect installation is on the same server, this will need to include the interface that you are connecting to.
The following image shows the default setting. The list is comma separated and so the server network interface would be added to this in the form of:
bind_ip = 127.0.0.1,10.150.100.90
Where 10.150.100.90 is the network address of the MongoDB server.
You can test the connection by using telnet to connect to the port. Verifying that the port is accepting connections by using the following command in a terminal\command window., replacing the 10.150.100.90 with your server's address. The telnet window will go blank if the connection is available.
telnet 10.150.100.90 27017
To connect with a reverse engineer wizard
- From the file menu, click File > New
- Select Reverse-engineer an existing database, and then click Login.
- In the Reverse Engineer wizard, specify the Connection Type.
- Specify the Database Type.
- Add the connection details to the Datasource box.
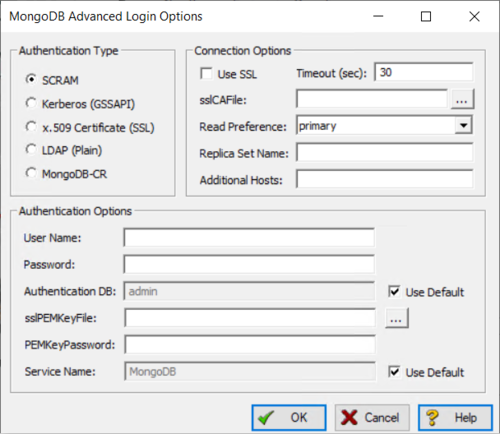
- If required, add authentication details by opening the advanced options button.
![]() Note: MongoDB-CR is deprecated in MongoDB 4.0 and later.
Note: MongoDB-CR is deprecated in MongoDB 4.0 and later.
![]() Note: Note that it is possible to complete the reverse engineer wizard on a MongoDB datasource without having permission to do so. However as you do not have permission, nothing is imported.
Note: Note that it is possible to complete the reverse engineer wizard on a MongoDB datasource without having permission to do so. However as you do not have permission, nothing is imported.
Document sampling
Because MongoDB documents can be in any type of format, the documents need to be queried before the DB can be reverse engineered. The Document Sample Size option on Page 2 of the Reverse Engineer wizard allows you to specify how many documents are used for sampling. The default is 100. Should any documents that have a different format not be sampled, the reverse engineer will fail.
Creating Collections
When the reverse engineer takes place, a 'union' of documents create the collection. The wizard will scan through multiple instances of documents and merge the fields it finds into the collection.
| Document 1 | Document 2 | Collection - author | |
|---|---|---|---|
| Field 1 | "_id": 2 | "_id": 3 | _id (PK) - NumberDouble |
| Field 2 | "awards" | "awards" | awards - Array(Object) |
| Field 3 | "name" | name - Object | |
| Field 4 | "title" | "title" | title - String |
Nested Objects
Where objects are nested within objects, the wizard creates separate objects that are created with a containment relationship. For example the following JSON object has nested objects within the "name" object:
"name": {
 "first": "John",
 "last": "Smith"
 },
![]() Tip: Separate object creation is useful for improved modeling. For example, nested objects such as address can be shared between different objects rather than duplicated. This also allows modifications to be made to all address fields without having to change each nested item individually.
Tip: Separate object creation is useful for improved modeling. For example, nested objects such as address can be shared between different objects rather than duplicated. This also allows modifications to be made to all address fields without having to change each nested item individually.
Switching Object Classes
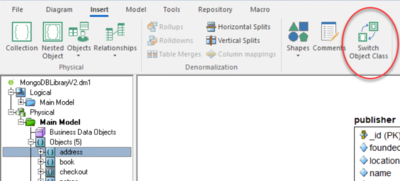
Use the Switch Object Class option in the Insert ribbon to switch MongoDB objects between Collection or Nested Object.
Once you select the object you want to switch, click Switch Object Class in the Insert ribbon, as shown in the following image.
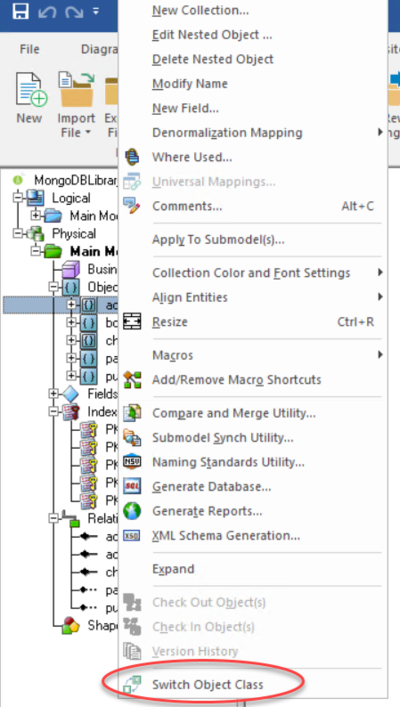
You also can make this switch by using the right-click option on the diagram or the Explorer tree.
ID Fields
MongoDB automatically creates an _id field (ObjectID) which you will see added to every collection after a reverse engineer. The exception is objects that are created from nested objects as they are not assigned an _id by MongoDB.
Because of the design of a MongoDB database everything is optional in the related editors, except for the _id field.
