Reverse Engineer MongoDB Walkthrough
Go Up to MongoDB Support
Use the steps in this topic to reverse engineer your MongoDB database.
- Install ER/Studio Data Architect.
- Choose File > New, and then select Reverse-engineer an existing database.
- Click Login.
- On the following window, choose the type of connection you would like. For MongoDB select Native Connection, and then choose MongoDB.
- Type your MongoDB URI or click Advanced Options to manually enter connection and authentication information. In our example we are using the server IP address (10.150.40.240) and the default admin account which we entered the username and password in the Advanced Options section.
- Click Next to connect to the MongoDB server.
- Now you have authenticated and connected to the MongoDB server, you can select, or type in the name of the database you would like to reverse engineer.
- Error creating thumbnail: Unable to save thumbnail to destination
- To choose from a list, click the [...] button to the right of the Database List. In our example we are using the library database.
- Error creating thumbnail: Unable to save thumbnail to destination
- Error creating thumbnail: Unable to save thumbnail to destination
- Click Next.
- Select the tables or collections you would like to reverse engineer, and then click Next..
- On Page 4 you can choose the desired layout. You can change this again at a later time from within the model explorer, using the layout menu.
- There is also an option to Handle Repeated Elements. For denormalized objects that are repeated across multiple parents, you can choose to combine them into one object. Here if nested objects have the same name the wizard will combine all the fields into the same object.
- Error creating thumbnail: Unable to save thumbnail to destination
- Page 5 allows you to set the type of physical model, any external naming standards, and a summary of the selected objects.
- Click Finish to complete the wizard.
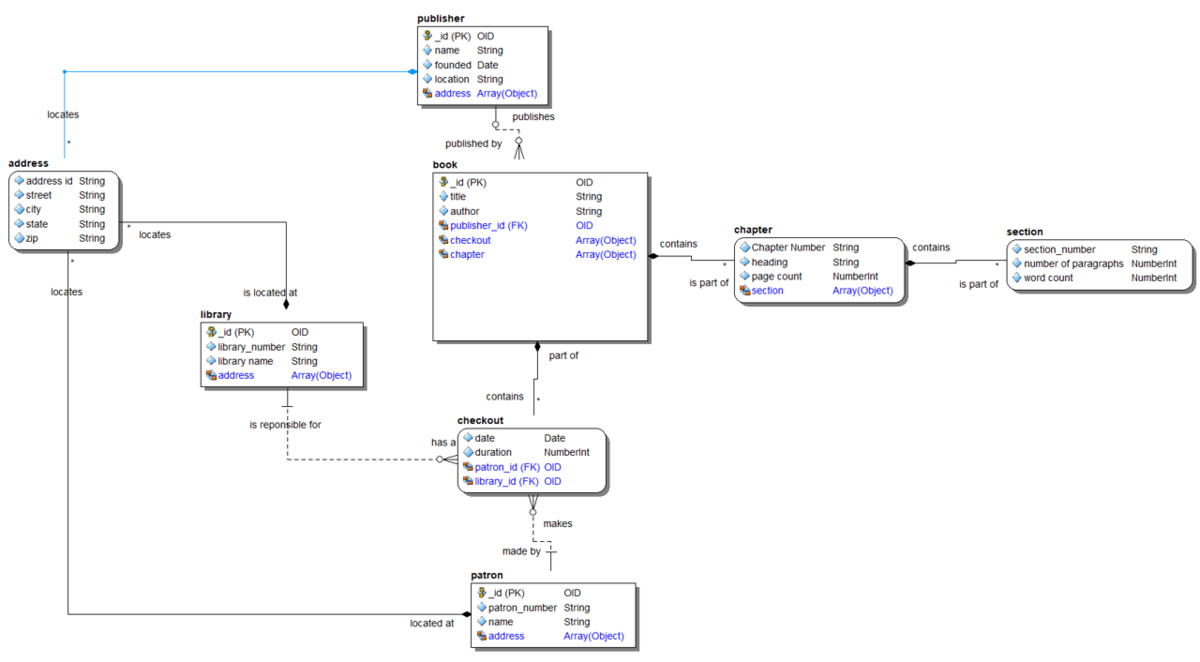
- The wizard will generate a physical model rendered in Rolled-up' mode
- Error creating thumbnail: Unable to save thumbnail to destination
- All the Nested Objects are rolled-up into the Collections. To see the Nested Objects as separate symbols on the diagram, select Diagram/Display Options

- All the Nested Objects are rolled-up into the Collections. To see the Nested Objects as separate symbols on the diagram, select Diagram/Display Options
- Error creating thumbnail: Unable to save thumbnail to destination
- ER/Studio Data Architect separates the logical data model from the physical representation for a specific DBMS. After the reverse engineering, the logical model is shown. Click on the Physical model node in the tree to see the Physical model of the reverse engineered.
- Collections are indicated by square corners. All collections have an _id field. Nested objects are indicated by rounded corners.
- Error creating thumbnail: Unable to save thumbnail to destination
- Containment relationship lines show how nested objects are used by collections. The diamond endpoint connects to the parent object and the other end connects to the nested object. Containment relationships can contain one or many which are signified by a 1 or * at the end of the relationship.
- Add Collections to your model by selecting the Add Collection tool and dropping them in.
- Add nested objects to your model by selecting the Add Nested Object tool and dropping them in. If you have a collection or other nested object selected before using the nested object tool, then a containment relationship is automatically created from that selected object.
- Error creating thumbnail: Unable to save thumbnail to destination
- You can double-click on any object to edit, add, modify, or remove fields.
- Open the Collection Editor by double-clicking an object.
- Error creating thumbnail: Unable to save thumbnail to destination
- From here, you are able to set field names and datatypes, as well as other informational data, such as a definition.
- You can also mark fields as Arrays by checking the Array option in the field editor.
- Error creating thumbnail: Unable to save thumbnail to destination


 Tip: Go to diagram and object display options and check the Datatype option under Table to show the data types of your fields in the model.
