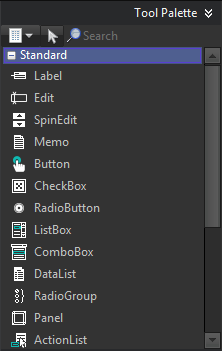
Tool Palette
The Tool Palette widget lists any component installed on HTML5 Builder so you can add them to a form to configure the interface design or develop the logic of your application. The widget is available on the Design view, top-right corner.
Contents
Usage
Browse the Components
Components are grouped into different categories. You can scroll down to see the whole list.
To see the list of component inside a section, expand it by clicking the name of the section, its + button, or click ![]() and select the target category from the list. To hide back its components, either click the name of the section again, click its - button, or expand a different section.
and select the target category from the list. To hide back its components, either click the name of the section again, click its - button, or expand a different section.
You can also right-click anywhere in the Tool Palette and select Collapse All or Expand All to collapse or expand all the categories at once.
Use the search box in the top part of the Tool Palette to search for a certain component if you know its name, or part of it.
Add a Component to the Designer
There are several way you can add a component to the Designer:
- Double-click the component.
- Click the component and click then the place on the Designer where you want the component to be placed.
- Drag and drop the component into the Designer.
- Shift+Click the component to hold it selected, so you can then click on the Designer as many times as you want to add several components of the same type. To cancel component selection later, so new clicks on the Designer do not generate new instance of the selected component, click
 .
.
Manage the Categories
To create a new category, right-click somewhere in the Tool Palette and select Add New Category…. Then enter the name of the new category and click OK.
To rename an existing category, right-click on it, select Rename “CategoryName” Category, enter its new name and click OK.
You can also delete categories: right-click the target category, select Delete “CategoryName” Category…, and click Yes to confirm.
Manage the Buttons
You can hide a button (an entry for a component) from the Tool Palette: right-click the target button, and select Hide “ComponentName” Button.
To get back any hidden button, right-click anywhere in the Tool Palette, and from Unhide Button, navigate to the target button and select it. You can also click the first-level instance of Show All Buttons to get back all the hidden buttons at once, or click the Show All Buttons inside a category to get back all the hidden buttons from the target category.
You can also reorganize the entries for components by dragging them around. You can change their position in a category, or even move them between categories, are with drag and drop.
Reset
You can reset the Tool Palette to its default configuration. Just right-click somewhere in the Tool Palette, and select Reset Palette.
Features
Context-aware Components
Component availability will change depending on the type of project you are working on.
Settings
You can access to the Tool Palette settings page from Home > Options > Environment Options > Tool Palette, or by right-clicking anywhere in the Tool Palette and selecting Properties. Some settings are also available from the Tool Palette’s context menu (see below).
Appearance
You can configure the appearance of the Tool Palette from its settings page. The following options are available:
- Button size. The size of the component icons: Small, Medium or Large.
- Show button captions. Whether there should be text with the component name at the right side of the component icons, or not.
- Vertical category captions. Display the name of the expanded categories vertically, saving a bit os space.
- Use +/- icons. Whether to display + and - icons along with the category names to indicate which categories are expanded and which ones are collapsed, or to use » instead, with vertical and horizontal orientation depending on whether the categories are expanded or collapsed.
Behavior
You can change the behavior of the tool palette using the following settings:
- Auto collapse categories. By default, Tool Palette’s categories are collapsed whenever a category is expanded, so only one category can be expanded at a given time. To change this behavior, so you can have multiple categories expanded at the same time, follow one of these methods:
- Right-click anywhere in the Tool Palette and click on Auto Collapse Categories to unmark that option.
- In the Tool Palette’s settings page, unmark Auto collapse categories.
Note: You can always use Expand All to expand all the categories, no matter if the Auto Collapse Categories option is marked or not.
- Show button hints. Display a tooltip with information about the controls when you hover them.
- Persistent search filter. By default, when you add a component to the Designer from the Tool Palette, the search filter gets emptied. You can override this behavior by marking this option.
- Lock palette reordering. By default, you can reorganize the buttons in the Tool Palette by dragging them around. If you want to avoid this behavior, follow one of these methods:
- Right-click anywhere in the Tool Palette and click on Lock Reordering to mark that option.
- In the Tool Palette’s settings page, mark Lock palette reordering.
See Also
- How to install custom components so they are listed in the Tool Palette.
