Performing a full backup using IBConsole
Go Up to Performing backups and restores using IBConsole
Contents
To initiate a full, logical backup using IBConsole, take the following steps:
- Right-click on a database in the tree pane, and select Backup/Restore from the context menu.
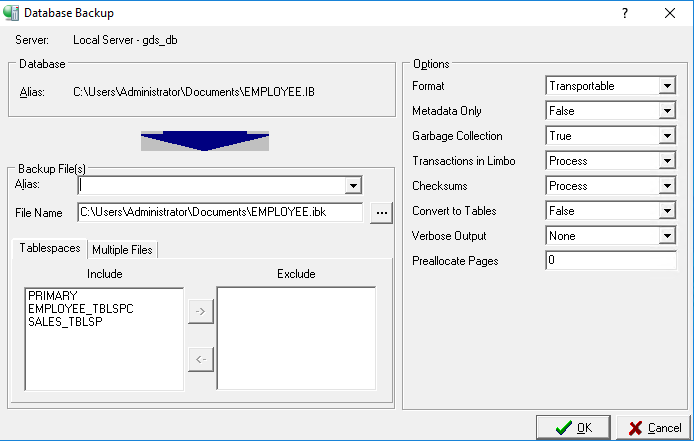
- When the context menu expands to display backup and restore options, select Backup. The Database Backup dialog appears, as shown in the figure:
- Check the database server to make sure the indicated server is correct. If it is not, cancel this dialog and re-initiate the Database Backup dialog under the correct server.
- If you accessed the Database Backup dialog from a database alias, the Alias field is automatically assigned. If you accessed the Database Backup dialog from the Databases menu, then you must select an alias from the list of database aliases.
- The database alias references the associated database file name, so you need to specify only the alias name, not the actual database filename, when indicating the database to back up. If the database spans multiple files, the server uses the header page of each file to locate additional files, so the entire database can be backed up based on the alias filename.
- Select a destination server from a list of registered servers in the Backup Files Server drop‑down list.
- Once a destination server has been selected, a list of backup file aliases is available from the Backup Files Alias drop‑down list. If you want to overwrite an existing backup file, select the appropriate file from the drop‑down list. If you want to create a new backup file, you can type a new alias name in the Backup File(s) Alias field.
- On the File Name section, click
 to set the name and destination folder of your backup.
 - On the Tablespaces the Include field lists all the tablespaces included in the backup. If you want to exclude a tablespace from the backup process, select it and click the right arrow
 to add it to the Excluded list.
- To use multiple files, go to the Multiple Files tab and select Use Multiple Files then click
 to add files.
- To use multiple files, go to the Multiple Files tab and select Use Multiple Files then click
- You can specify backup options by entering a valid value, by clicking the option value and choosing a new value from a drop‑down list of values, or by double-clicking the option value to rotate its value to the next in the list of values. See About IBConsole backup options below for descriptions of these options.
- Click OK to start the backup.

Database files and backup files can have any name that is legal on the operating system; the
ib and ibk file extensions are InterBase conventions only.A backup file typically occupies less space than the source database because it includes only the current version of data and incurs less overhead for data storage. A backup file also contains only the index definition, not the index data structures.
If you specify a backup file that already exists, IBConsole overwrites it. To avoid overwriting, specify a unique name for the backup file.
About IBConsole backup options
The backup options are shown on the right side of the Database Backup dialog. You can specify options by entering a value, by clicking the option value and choosing a new value from a drop‑down list of values, or by double-clicking the option value to rotate its value to the next in the list of values.

Format
To move a database to a machine with an operating system different from the one under which the backup was performed, make sure the Format option is set to Transportable. This option writes data in a generic format, enabling you to move to any machine that supports InterBase.
Never copy a database from one location to another. Back it up and then restore it to the new location.
Metadata Only
Option values are True and False.
When backing up a database, you can exclude its data, saving only its metadata. You might want to do this to:
- Retain a record of the metadata before it is modified.
- Create an empty copy of the database. The copy has the same metadata but can be populated with different data.
To back up metadata only, select True for the Metadata Only option.
You can also extract a database’s metadata using
isql. isql produces a SQL data definition text file that contains the SQL code used to create it. IBConsole backup Metadata Only creates a binary backup file containing only metadata.This function corresponds to the -metadata option of gbak.
Garbage Collection
Option values are True and False.
By default, IBConsole performs garbage collection during backup. To prevent garbage collection during a backup, set the Garbage Collection option value to False.
Garbage Collection marks space used by old versions of data records as free for reuse. Generally, you want IBConsole to perform garbage collection during backup.
Disabling garbage collection during the backup process improves backup performance. If garbage collection is necessary, you can run a separate sweep operation using gfix. In addition, you do not want to perform garbage collection if there is data corruption in old record versions and you want to prevent InterBase from visiting those records during a backup.
This function corresponds to the -garbage_collect option of gbak.
Transactions in limbo
Option values are Process and Ignore.
To ignore limbo transactions during backup, set the Transactions in Limbo option value to Ignore.
When IBConsole ignores limbo transactions during backup, it ignores all record versions created by any limbo transaction, finds the most recently committed version of a record, and backs up that version.
Limbo transactions are usually caused by the failure of a two-phase commit. They can also exist due to system failure or when a single-database transaction is prepared.
Before backing up a database that contains limbo transactions, it is a good idea to perform transaction recovery, by choosing Database>Maintenance>Transaction Recovery in the Database Maintenance window. Refer to Recovering Transactions for more information.
This function corresponds to the -limbo option of gbak.
Checksums
For performance reasons, InterBase supports true checksums only for ODS 8 and earlier. For ODS 9 and later, InterBase always generates the string “12345” as the checksum. This maintains compatibility with older versions.
Option values are Process and Ignore.
To ignore checksums during backup, set the Checksums option value to Ignore.
A checksum is a page-by-page analysis of data to verify its integrity. A bad checksum means that a data page has been randomly overwritten; for example, due to a system crash.
Checksum errors indicate data corruption, and InterBase normally prevents you from backing up a database if bad checksums are detected. Examine the data the next time you restore the database.
This function corresponds to the -ignore option of gbak.
Convert to Tables
To convert external files to internal tables, set the Convert to Tables option value to True.
This function corresponds to the -convert option of gbak.
Performing a Full Backup with Verbose Output
Option values are None, To Screen and To File.
To monitor the backup process as it runs, set the Verbose Output option value to To Screen. This option opens a standard text display window to display status messages during the backup. For example:

The standard text display window enables you to search for specific text, save the text to a file, and print the text. For an explanation of how to use the standard text display window, see Text Viewer Window.
This function corresponds to the -verbose option of gbak.
Transferring databases to servers running different operating systems
- Set the Format option to Transportable in the Database Backup dialog.
- Back up the database.
- If you backed up to a removable medium, proceed to Step 4. If you created a backup file on disk, use operating-system commands to copy the file to a removable medium, such as a tape. Then load the contents of the medium onto another machine, or copy it across a network to another machine.
- On the destination machine, restore the backup file. If restoring from a removable medium, such as tape, specify the device name instead of the backup file.