オーディオ ファイルの再生
チュートリアル:FireMonkey のオーディオ/ビデオ機能 への移動
このチュートリアルでは、FireMonkey アプリケーションにオーディオ メディア データを追加し、再生する方法を説明します。
フォームの設計
- 前のチュートリアルで作成したフォームを使用します。
- 空のフロー レイアウトに以下を追加します。
- 2 つのボタンの名前を「PlayButton」および「StopPlayButton」に変更します。
- StopPlayButton の Enable プロパティを False に設定して無効にします。
- TMediaPlayer をフォームに追加します。
- さらに 2 つの TImages をフォームに追加します。それぞれの TImage の TImage.Bitmap プロパティを、再生および一時停止のアクションを示す画像に設定します。再生アクションには矢印のアイコンが、一時停止アクションには縦の 2 本線のアイコンが、通常は使われます。
- すべての画像を同じ位置および同じサイズに設定します。3 つの画像は完全に重なるはずです。
- すべての画像の Opacity プロパティを
0に設定します。表示される画像は、現在実行中の処理を表す画像になります。 - TTimer をフォームに追加します。有効に設定します。
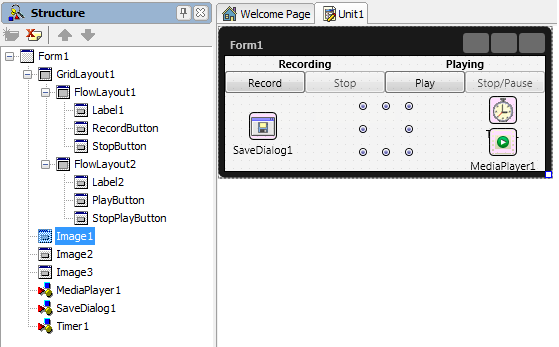
- フォームは次のようになります。

実装
TMediaPlayer を使ってオーディオ ファイルを再生するには、FileName を設定します。
- 1. [Play]ボタンをダブルクリックして、OnClick イベント ハンドラを付加します。
Delphi の場合:
procedure TForm1.PlayButtonClick(Sender: TObject);
begin
// This application plays only recorded data, so if there is no data recorded there is nothing to play.
  if (Mic <> nil) and (Mic.State = TCaptureDeviceState.Stopped) then
  begin
    //Specifies the file to be played.
    MediaPlayer1.FileName := Mic.FileName;
    //Checks if the data can be decoded.
    if MediaPlayer1.Media <> nil then
    begin
      if (MediaPlayer1.State = TMediaState.Stopped) then
      begin
        Timer1.Enabled := true;
        StopPlayButton.Enabled := true;
        MediaPlayer1.Play;
        //Updates the opacity of each image.
        // Image2 shows the play sign.
        Image1.Opacity := 0;
        Image2.Opacity := 1;
        Image3.Opacity := 0;
      end;
    end;
  end
  else
  begin
    ShowMessage('The audio device is still capturing');
  end;
end;
C++ の場合:
void __fastcall TForm1::PlayButtonClick(TObject *Sender)
{
  // This application plays only recorded data, so if there is no data recorded there is nothing to play.
  if ((Mic != NULL) && (Mic->State == TCaptureDeviceState::Stopped))
  {
    //Specifies the file to be played.
    MediaPlayer1->FileName = Mic->FileName;
    //Checks if the data can be decoded.
    if (MediaPlayer1->Media != NULL)
    {
      Timer1->Enabled = 1;
      StopPlayButton->Enabled = 1;
      MediaPlayer1->Play();
      //Updates the opacity of each image.
      // Image2 shows the play sign.
      Image1->Opacity = 0;
      Image2->Opacity = 1;
      Image3->Opacity = 0;
    }
  }
  else
    ShowMessage("The audio device is still capturing.");
}
- 2. [Stop/Pause]ボタンをダブルクリックして、OnClick イベント ハンドラを追加します。
Delphi の場合:
procedure TForm1.StopPlayButtonClick(Sender: TObject);
begin
  if MediaPlayer1.Media <> nil then
  begin
    if MediaPlayer1.State = TMediaState.Playing then
    begin
      MediaPlayer1.Stop;
      Image1.Opacity := 0;
      Image2.Opacity := 0;
      Image3.Opacity := 1;
      Timer1.Enabled := false;
    end
    else
    begin
      Image1.Opacity := 0;
      Image2.Opacity := 1;
      Image3.Opacity := 0;
      MediaPlayer1.Play;
      Timer1.Enabled := true;
    end;
  end;
end;
C++ の場合:
void __fastcall TForm1::StopPlayButtonClick(TObject *Sender)
{
  if (MediaPlayer1->Media != NULL)
  {
    if (MediaPlayer1->State == TMediaState::Playing)
    {
      MediaPlayer1->Stop();
      Image1->Opacity = 0;
      Image2->Opacity = 0;
      Image3->Opacity = 1;
      Timer1->Enabled = 0;
    }
    else
    {
      Image1->Opacity = 0;
      Image2->Opacity = 1;
      Image3->Opacity = 0;
      Timer1->Enabled = 1;
    }
  }
}
- 3. タイマをダブルクリックして、OnTimer イベント ハンドラを追加します。このタイマは、再生処理中に画像の不透明度を操作するために使用します。
Delphi の場合:
procedure TForm1.Timer1Timer(Sender: TObject);
begin
  if (MediaPlayer1.Media <> nil) and
    (MediaPlayer1.CurrentTime = MediaPlayer1.Duration) then
  begin
    Image1.Opacity := 0;
    Image2.Opacity := 0;
    Image3.Opacity := 0;
    StopPlayButton.Enabled:=false;
    MediaPlayer1.Stop;
    MediaPlayer1.CurrentTime:=0;
  end;
end;
C++ の場合:
void __fastcall TForm1::Timer1Timer(TObject *Sender)
{
  if ((MediaPlayer1->Media != NULL) &&
      (MediaPlayer1->CurrentTime == MediaPlayer1->Duration))
  {
    Image1->Opacity = 0;
    Image2->Opacity = 0;
    Image3->Opacity = 0;
    StopPlayButton->Enabled = 0;
    MediaPlayer1->Stop();
    MediaPlayer1->CurrentTime = 0;
  }
}
アプリケーションの実行
- 1. F9 キーを押して、プロジェクトを実行します。
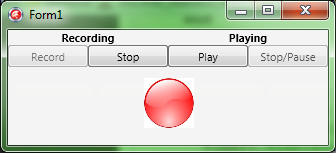
- 2. [Record]ボタンを押してオーディオ データの録音を開始します。SaveDialog が開きます。
- 3. 録音したデータを保存するパスとファイル名を選択します。
- フォームは次のようになります。
- 4. [Stop]ボタンを押して録音を終了します。StopCapture メソッドを呼び出して録音の終了処理を行わなければ、メディア プレーヤーで再生しようとしたときに保存ファイルが正しくデコードされません。
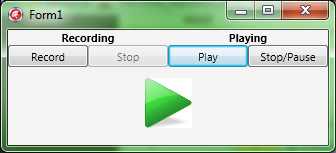
- 5. [Play]ボタンを押します。メディア ファイルの再生が始まります。
- 再生中のフォームは次のようになります。
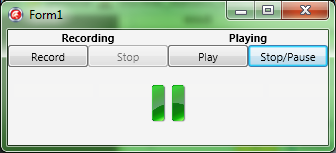
- 6. [Stop/Pause]ボタンを押します。メディア ファイルが一時停止します。
- メディア ファイルの一時停止中のフォームは次のようになります。


前のトピック
次のトピック
関連項目
サンプル
- PlayAudioFile サンプル