FireMonkey コンポーネントのコンポーネント エディタおよびプロパティ エディタを作成する
このチュートリアルでは、FireMonkey コンポーネント用のプロパティ エディタとコンポーネント エディタを作成します。
これらのエディタの親コンポーネントは、関連チュートリアル「既存のコンポーネントを拡張してスタイル付きの FireMonkey コンポーネントを作成する」のコンポーネント TClockLabel です。 ここでは、TClockLabel が作成済みだと想定して説明を始めます。
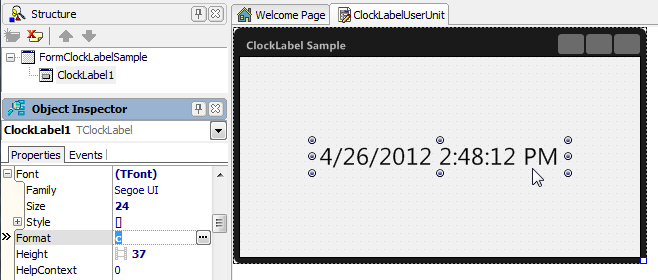
TClockLabel コンポーネント:
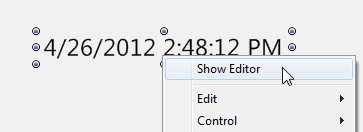
コンポーネント エディタは、コンポーネントをダブルクリックするか、コンポーネントを右クリックしてコンテキスト メニューで[Show Editor]を選択すると開くことができる、IDE の機能です。
カスタム コンポーネントからコンポーネント エディタを開く:
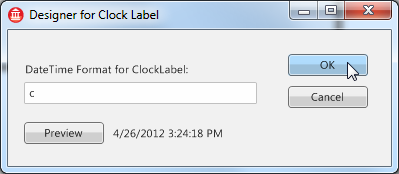
ダイアログとして開くコンポーネント エディタの例:
目次
プロパティ エディタは、[オブジェクト インスペクタ]から別のダイアログとして開いてプロパティ(またはプロパティ群)を編集するために提供できる、IDE の機能です。
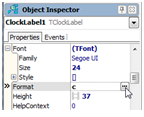
[オブジェクト インスペクタ]からプロパティ エディタを開くには、プロパティの値の列にある参照([...])ボタンをクリックします。
[オブジェクト インスペクタ]からプロパティ エディタを開く:
このチュートリアルのコンポーネント エディタとプロパティ エディタでは、同じダイアログ ボックスを開いて TClockLabel コンポーネントの Format プロパティを編集します。
ステップ 1:設計時パッケージを作成する
プロパティ エディタやコンポーネント エディタを作成するには、そのプロパティ エディタを含む設計時パッケージが必要です。
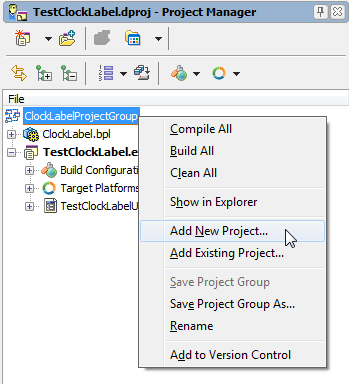
- [プロジェクト マネージャ]で ClockLabelProjectGroup を右クリックし、コンテキスト メニューから[新規プロジェクトを追加...]を選択します。
- [ファイル|新規作成|その他...|Delphi プロジェクト]を選択します。
- その後、[新規作成]ダイアログ ボックスで[パッケージ]を選択します。
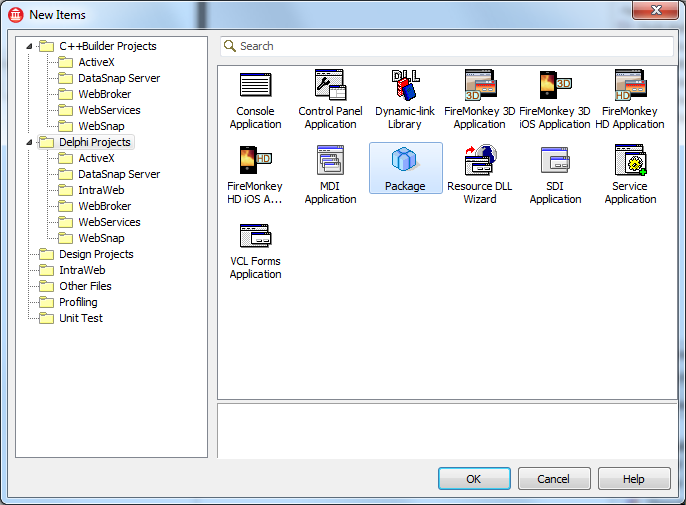
- このパッケージを dclClockLabel という名前で保存します。
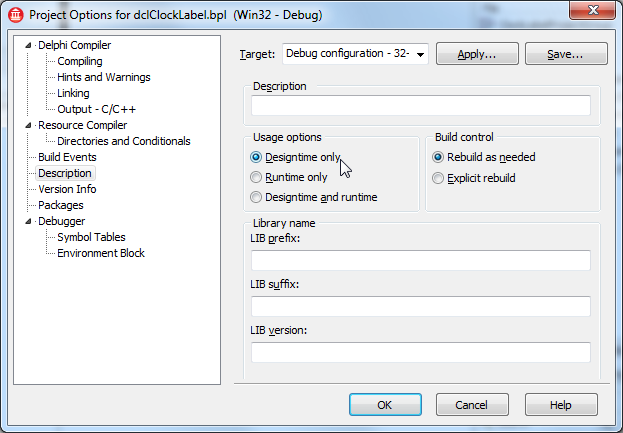
- dclClockLabel に対して[プロジェクト|オプション...|説明]を選択します。
ステップ 2:プロパティを編集するための FireMonkey HD フォームを追加する
ダイアログ ボックスで TClockLabel コンポーネントのプロパティを編集するには、プロパティを編集できるフォームを追加する必要があります。
- dclClockLabel プロジェクトがアクティブであることを確認します。アクティブでなければ、dclClockLabelproject プロジェクトをダブルクリックしてアクティブ プロジェクトにします。
- [ファイル|新規作成|その他...|Delphi ファイル|マルチデバイス フォーム]を選択します。
- このフォームが FireMonkey 用かを確認する画面が開くので、[はい]を選択します。
- 新しく作成したフォームを ClockLabelDialog という名前で保存します。
- [オブジェクト インスペクタ]で、フォームの Name を ClockLabelDlg に変更します。
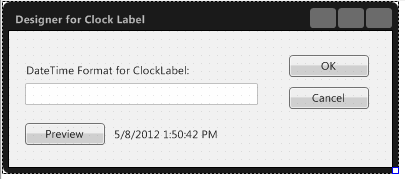
- FireMonkey コントロールをいくつか追加して構成し、ダイアログのルック アンド フィールを変更して、次の画像のようにします。
 object ClockLabelDlg: TClockLabelDlg
  Left = 0
  Top = 0
  Caption = 'Designer for Clock Label'
 ClientHeight = 136
 ClientWidth = 383
  Visible = False
 StyleLookup = 'backgroundstyle'
 object ClockLabel1: TClockLabel
 Position.Point = '(104,96)'
    Width = 257.000000000000000000
    Height = 15.000000000000000000
 TabOrder = 0
    Text = '5/8/2012 1:50:42 PM'
    Format = 'c'
 end
 object EditFormat: TEdit
 Position.Point = '(16,52)'
    Width = 233.000000000000000000
    Height = 22.000000000000000000
 TabOrder = 1
 KeyboardType = Default
    Password = False
 end
 object Label1: TLabel
 Position.Point = '(16,32)'
    Width = 177.000000000000000000
    Height = 15.000000000000000000
 TabOrder = 2
    Text = 'DateTime Format for ClockLabel:'
 end
 object btnOK: TButton
 Position.Point = '(280,24)'
    Width = 80.000000000000000000
    Height = 22.000000000000000000
 TabOrder = 3
 ModalResult = 1
    Text = 'OK'
    Default = True
 end
 object btnCancel: TButton
 Position.Point = '(280,56)'
    Width = 80.000000000000000000
    Height = 22.000000000000000000
 TabOrder = 4
 ModalResult = 2
    Text = 'Cancel'
    Cancel = True
 end
 object btnPreview: TButton
 Position.Point = '(16,92)'
    Width = 80.000000000000000000
    Height = 22.000000000000000000
 TabOrder = 5
    Text = 'Preview'
 end
 end
- 7. 編集ボックス(EditFormat)を選択し、その OnChange イベント ハンドラを EditFormatChange という名前で作成します。
  procedure TClockLabelDlg.EditFormatChange(Sender: TObject);
  begin
    ClockLabel1.Format := EditFormat.Text;
  end;
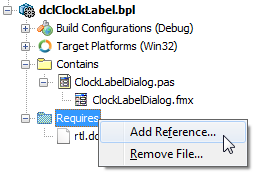
- 8. このパッケージのコンパイルを成功させるには、[Requires]セクションに以下のパッケージを追加する必要があります。
-
- fmx
- ClockLabel
- designide
- 9. パッケージをコンパイルします。
ステップ 3:コンテキスト メニューからダイアログ ボックスを開くためのコンポーネント エディタを作成する
コンポーネント エディタは TComponentEditor を継承したクラスです。
以下のようにして、新しいユニットを作成し、その中にクラスを作成します。
- 新しいユニットを作成し、ClockLabelEditors.pas という名前で保存します。
- 以下の 2 つのユニットの参照を uses 句に追加します。
uses
  DesignEditors, DesignIntf;
- 3. 新しいクラスを TComponentEditor のサブクラスとして作成します。
type
  TClockLabelComponentEditor = class(TComponentEditor)
  end;
コンテキスト メニューを追加する
先ほど説明したように、コンポーネント エディタでは、ターゲットであるコンポーネントのコンテキスト メニューを表示することができます。ユーザーがコンポーネントを右クリックすると、コンポーネント エディタの GetVerbCount メソッドと GetVerb メソッドが呼び出されて、コンテキスト メニューが作成されます。
この 2 つのメソッドを次のようにオーバーライドして、コンテキスト メニューにコマンド(Verb)を追加することができます。
type
  TClockLabelComponentEditor = class(TComponentEditor)
  public
    function GetVerbCount: Integer; override;
    function GetVerb(Index: Integer): string; override;
  end;

function TClockLabelComponentEditor.GetVerbCount: Integer;
begin
  Result := 1;
end;

function TClockLabelComponentEditor.GetVerb(Index: Integer): string;
begin
  case Index of
    0: Result := '&Show Editor';
  else
    raise ENotImplemented.Create('TClockLabelEditor has only one verb (index = 0) supported.');
  end;
end;
コマンドを実装する
GetVerb に記述したコマンドをデザイナで選択すると、ExecuteVerb メソッドが呼び出されます。GetVerb メソッドに記述したコマンドそれぞれについて、ExecuteVerb メソッド内でアクションを実装しなければなりません。編集対象のコンポーネントには、エディタの Component プロパティを使ってアクセスすることができます。先ほど定義したダイアログを開くには、ClockLabelDIalog ユニットへの参照を追加する必要があります。
type
  TClockLabelComponentEditor = class(TComponentEditor)
  private
    procedure ShowDesigner;
  public
    procedure ExecuteVerb(Index: Integer); override;
  end;


procedure TClockLabelComponentEditor.ShowDesigner;
var
  DesignerForm: TClockLabelDlg;
begin
  DesignerForm := TClockLabelDlg.Create(nil);
  try
    // Set curent value to designer form
    DesignerForm.ClockLabel1.Format := (Component as TClockLabel).Format;
    DesignerForm.EditFormat.Text    := (Component as TClockLabel).Format;

    // Show ModalForm, and then take result
    if DesignerForm.ShowModal = mrOK then
      (Component as TClockLabel).Format := DesignerForm.ClockLabel1.Format;

    Designer.Modified;
  finally
    DesignerForm.Free;
  end;
end;

procedure TClockLabelComponentEditor.ExecuteVerb(Index: Integer);
begin
  case Index of
    0: ShowDesigner;
  else
    raise ENotImplemented.Create('TClockLabelEditor has only one verb (index = 0) supported.');
  end;
end;
コンポーネント エディタを IDE に登録する
コンポーネント エディタを IDE に登録するには、次のようにして Register 手続きから RegisterComponentEditor ルーチンを呼び出す必要があります。
procedure Register;
begin
  RegisterComponentEditor(TClockLabel, TClockLabelComponentEditor);
end;
パッケージをビルドしてインストールすると、新しいコンポーネント エディタを使用できるようになります。
TestClockLabelUnit に戻って TClockLabel でコンテキスト メニューを開きます。[Show Editor]コマンドが表示されるはずです。
ステップ 4:[オブジェクト インスペクタ]からダイアログ ボックスを開くためのプロパティ エディタを作成する
プロパティ エディタを作成するステップは、コンポーネント エディタを作成するステップとほとんど同じです。
プロパティ エディタは TPropertyEditor のサブクラスです。標準の TPropertyEditor クラスの他に、designide ユニットではいくつかの便利なクラスが定義されています。Format プロパティは文字列値なので、このサンプルでは TPropertyEditor のサブクラスである TStringProperty を基底クラスに使用します。
プロパティ エディタの属性を設定する
プロパティ エディタでは、どのツールを表示するかを[オブジェクト インスペクタ]が判断できるよう情報を提供しなければなりません。たとえば、[オブジェクト インスペクタ]には、プロパティにサブプロパティがあるかどうかや、取り得る値のリストを表示できるかどうかなどの情報が必要です。
エディタの属性を指定するには、プロパティ エディタの GetAttributes メソッドをオーバーライドする必要があります。 GetAttributes は、値の集合(TPropertyAttributes 型)を返すメソッドです。このチュートリアルでは、GetAttributes から [paDialog] を返して、ダイアログ ボックスを使用できることを IDE に伝えます(使用可能な値の一覧は「エディタの属性を指定する」を参照)。
IDE では、ダイアログ ボックスを開くためにプロパティ エディタの Edit メソッドを呼び出します。そのため、コードは次のようになります。
TClockLabelPropertyEditor = class(TStringProperty)
private
  procedure ShowDesigner;
public
  function GetAttributes: TPropertyAttributes; override;
  procedure Edit; override;
end;

{ TClockLabelPropertyEditor }

function TClockLabelPropertyEditor.GetAttributes: TPropertyAttributes;
begin
  Result := [paDialog];
end;

procedure TClockLabelPropertyEditor.Edit;
begin
  ShowDesigner;
end;

procedure TClockLabelPropertyEditor.ShowDesigner;
var
  DesignerForm: TClockLabelDlg;
begin
  DesignerForm :=TClockLabelDlg.Create(nil);
  try
    // Set curent value to designer form
    DesignerForm.ClockLabel1.Format := GetStrValue;
    DesignerForm.EditFormat.Text    := GetStrValue;

    // Show MordalForm, and then take result
    if DesignerForm.ShowModal = mrOK then
      SetStrValue(DesignerForm.ClockLabel1.Format);
  finally
    DesignerForm.Free;
  end;
end;
最後に、先ほど新しいコンポーネント エディタを登録したように、新しいプロパティ エディタを登録する必要があります。それには、Register 手続きに RegisterPropertyEditor の呼び出しを追加します。
RegisterPropertyEditor(TypeInfo(string), TClockLabel, 'Format', TClockLabelPropertyEditor);
