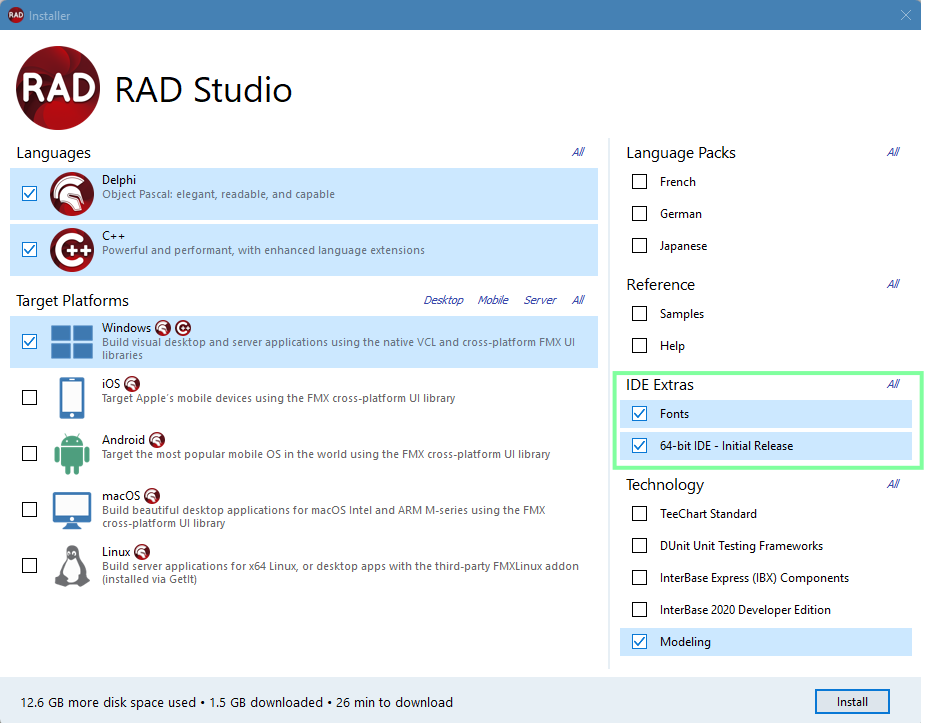
Feature Manager Dialog
Go Up to Graphic Utilities Index
Contents
Tools > Manage Features
The Feature Manager is a dialog box that lets you select an initial set of RAD Studio features to install, such as support for specific combinations of programming languages and target platforms, language support, or help resources.
During the installation process, the Online Installer starts the Feature Installer automatically. If you accidentally close the Feature Installer, open RAD Studio and select Tools > Manage Features to open it again.
After you install RAD Studio, you can install additional features or remove installed features using the Feature Manager. Please note that you must have a working internet connection to download the required content.
If you are using the Offline Installer, you can also choose which additional features you want to add or remove from your RAD Studio installation.
Feature Selection Screen
The Feature Selection screen displays the RAD Studio features that you can install:
- Platform Selection contains features that provide support for pairs of programming language and target platform.
- Additional Selection contains the following features:
Platform Selection
The Platform Selection screen allows you to select combinations of programming languages and target platforms that you want to include in your initial RAD Studio installation. Note that the contents of what’s displayed change depending on what platforms are chosen for installation, refreshing each time a different platform is selected.
The installed features are checked. You can check features you want to install or uncheck features you want to remove.

This screen shows:
- A list of supported combinations of programming languages and target platforms. You can select any combination of platforms that you want to install; you can install additional combinations later using the Feature Manager.
- On the bottom-left corner of the screen, there are three fields that show information about the required space, expected download size, and download time. For more information about the estimated required space, see Estimated Required Space.
- An Install button on the bottom-right corner. Press Install to start the installation of checked features and the removal of unchecked features.
Additional Selections
The Additional Selection option allows you to select additional features you wish to add or remove from your RAD Studio installation.
Language Packs
This screen shows the different language packs available for installation. Choose to add or remove from French, German, or Japanese.

References
This screen shows sample applications and offline help files that you can choose to include in your installation.

IDE Extras
This screen shows extra options that can be installed on the IDE.

Technology
Shows Optional Additional Software you can choose to include in the installation. You can check or uncheck any features you wish to include or remove in your RAD Studio installation.

The Android development tools appear after selecting an Android platform on the Platform Selection page:
Estimated Required Space
The Feature Installer calculates the required space for the installation, depending on your selection. The calculation includes the following:
- Disk space needed for the downloaded files.
- Disk space needed for extraction of downloaded files.
- Disk space needed for the installation.
The Feature Installer uses the following directories:
- The Temp folder for downloaded files (default location is
C:\Windows\Temp). - The
%PUBLIC%documents folder for the extraction of downloaded files (default location isC:\Users\Public\Documents\). - The directory that you choose in the Options Page of the Online Installer for the installation (default is Program Files).
Suppose you choose a disk/partition for the installation that is not the same disk/partition where the Temp and the %PUBLIC% documents folders are located. In that case, the installer may not detect a problem even if you do not have sufficient space on the latter. That is because the Feature Installer uses the disk/partition that you choose in the Options Page of the Online Installer as a base for the calculation of estimated required disk space.
If you have insufficient space on the disk/partition where the Temp and the %PUBLIC% documents folders are located, you may need to change the location of those folders. See Change location of TEMP files folder to another drive and How can I move default location of Public folders to a new drive? for more information.
Operation Progress Screen
The Operation Progress screen shows the progress of the installation.

Installing RAD Studio features requires the download, extraction, and installation of several items. This screen of the installer shows information about the installation of these items:
- At the top of the screen, you can see the item that the installer is currently processing.
- At the bottom of the screen, you can see two progress bars:
- The progress bar at the top shows the progress of the current download, extraction, or installation process of the item that the installer is currently processing.
- The progress bar at the bottom shows the overall progress of the installation.
- A Cancel button at the bottom of the screen. Click Cancel to cancel the installation process.
Operation Complete Screen
The Operation Complete screen informs you that the operation was successful.

At the bottom of this screen, there is a Start Working button. When you click Start Working, the installer restarts RAD Studio.
If any of the file types that RAD Studio supports is currently associated with a different application, when RAD Studio opens it, it shows a dialog box similar to the File Association options page where you can select which ones of those file types you want to associate with RAD Studio.
Operation Canceled Screen
The Operation Canceled screen appears when the installation is canceled by the user.
Click Retry to continue the installation or Close to exit the Feature Manager.
