Using the macOS Notification Center
Contents
Go Up to macOS Application Development
Local notifications allow background or inactive applications to notify users that an event has occurred that is of interest or related to the app. This topic describes the basic steps to use local notifications on your macOS application.
Mountain Lion (OS X 10.8) added the notification functionality and the Notification Center. This is very similar to iOS, where you can schedule local notifications or present them immediately.
About Notifications
There are three types of notifications in macOS:
| Notification Type | Description | Preview |
|---|---|---|
|
Alert |
Appears in the upper right-hand corner of the Mac, but the alert remains on the screen until the user takes an action. |
|
|
Banner |
Appears in the upper right-hand corner of the Mac for a short period of time, then slides off screen to the right. |
|
|
Badge |
A red badge with a number appears in the upper-right of the icon of an app. The badge keeps a count of how many notifications are waiting for you in an app.
|
Accessing the Notification Service
RAD Studio provides the TNotificationCenter component that allows you to easily access the Notification Service.
To access the Notification Service, drop a TNotificationCenter component on your form.
- RAD Studio adds the following unit for Delphi:
uses
  System.Notification;
- RAD Studio adds the following include operator to the project header file for C++:
#include <System.Notification.hpp>
Notification Center on macOS
All un-actioned notifications go to the Notification Center. When a pop-up notification appears on the screen, and the user does not click it, it goes to the Notification Center. Alerts remain in the Notification Center until the user takes the appropriate action.
You can easily show and hide the Notification Center just by clicking ![]() on the right-hand side of the menu bar. When the user clicks a notification in the Notification Center, the app opens or comes to the foreground.
on the right-hand side of the menu bar. When the user clicks a notification in the Notification Center, the app opens or comes to the foreground.
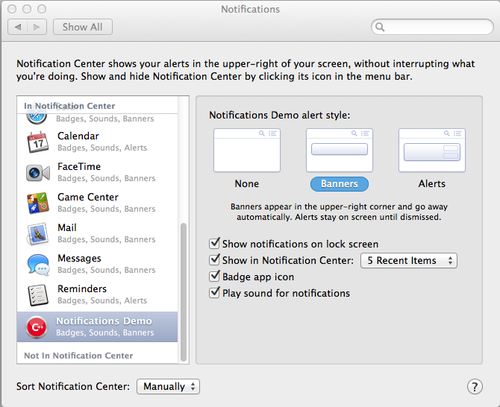
A notification can appear as a pop-up banner or as an alert when the app is running in the background or is inactive. The user can decide the way these notifications are presented in macOS:
- Open System Preferences > Notifications.
- Find the app on the left.
- Select None, Banners or Alerts.
- Note: When the user selects None, no pop-up notification is shown, and notifications go directly to the Notification Center. By default, your app shows the notification banner.
The following screenshot shows the configuration window for the Notification Center:
Creating Notifications
To allow your app to display local notifications on macOS, you need to create an instance of the TNotification class object. The System.Notification.TNotificationCenter.CreateNotification method allows you to create this instance.
When your app creates a local-notification object, the app can either schedule the notification with the operating system or present it immediately. Local notifications are ideally suited for apps with time-based behaviors. You can specify the time the operating system delivers the notification; this is known as the fire date. You can also repeat a scheduled notification.
To include notification messages in your macOS apps:
- Create an instance of the TNotification class.
- Create a notification using CreateNotification.
- Define the Name, AlertBody, and FireDate fields.
- To schedule the notification and present it to the Notification Center, use the ScheduleNotification method that the TNotificationCenterclass inherits from TCustomNotificationCenter.
- To repeat a scheduled notification and present it to the Notification Center, create a scheduled notification and use the RepeatInterval property of the TNotificationCenter class.
- To present a notification immediately, use the PresentNotification method that the TNotificationCenter class inherits from TCustomNotificationCenter.
Notifications stay in the Notification Center until you delete them.
Each Notification Message is identified by the Name property of the TNotification object.
To update or delete a notification:
- To update a scheduled notification, call the ScheduleNotification method again with an instance of TNotificationCenter that has the same name (Name property).
- To cancel a notification, call the CancelNotification method with the identifier you used.
- To cancel all notifications, call the CancelAll method.
See Also
- Using Notifications
- System.Notification.TNotification
- System.Notification.TNotificationCenter
- FMX.SendCancelNotification Sample
- FMX.Notification.Mac (Delphi code example)
- FMX.Notification.Mac (C++ code example)
- Mobile Tutorial: Using Notifications (iOS and Android)
- Mobile Tutorial: Using Remote Notifications (iOS and Android)


