Tutorial: How to Use Cameras in a FireMonkey 3D Application
Go Up to FireMonkey Tutorials
This tutorial shows how to use cameras within a simple FireMonkey 3D application. It will explain how to use TCamera objects to define the scene perspective and projection of the objects in the scene.
Contents
Creating a FireMonkey 3D Application
To use TCamera you need to create a FireMonkey 3D Application. To do that, follow the next steps:
- Select File > New > Multi-Device Application - Delphi > 3D Application.
- To open the Form Designer, double-click the .pas unit in the Project Manager, and then click the Design tab at the lower edge of the Code Editor.
Adding and Adjusting Components
- From the Tool Palette, add the following FireMonkey 3D components (by entering the component name in the Search field and pressing Return): 3 TCamera objects, 2 TCube objects, and 2 TLight objects.
- To be able to change the camera off Form1 at run time, set, in the Object Inspector, the UsingDesignCamera of the Form1 to False.
- The control panel:
- To be able to observe how the scene perspective and projection change, depending on the cameras position and rotation angle, create a control panel that allows changing the properties of the TCamera objects.
- Follow the instruction described in the Creating a 2D Interface in a 3D Application tutorial to build a 2D control panel.
- To the added 2D surface, add 3 TGroupBox objects.
- Set the text property of the first TGroupBox object to Camera, and add 3 TRadioButton objects (Camera1, Camera2, and Camera3).
- Set the text property of the second TGroupBox object to Position, and add 3 TTrackBar objects (X, Y, and Z coordinates).
- Set the text property of the third TGroupBox object to RotationAngle, and add 3 TTrackBar objects (X, Y, and Z planes).
- To see the values of the TTrackBar objects, add a TLabel object to the Position and the RotationAngle group boxes.
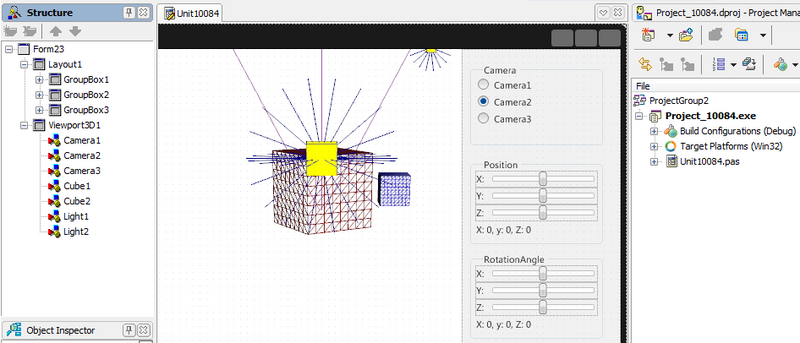
After adding the components, your Design tab should look like this:
Writing Code to Adjust the Cameras
- 1. Add a variable, FIsChangingCamera, and a procedure, RB_Use_CameraChange, to the form declaration private section as follows:
  // Delphi code for the form class declaration
private
  { Private declarations }
  FIsChangingCamera : boolean;
  procedure RB_Use_CameraChange(Sender:TObject);
// C++ code for the form class declaration
private:  // User declarations
  bool FIsChangingCamera;
  void RB_Use_CameraChange(TObject *Sender);
The private Boolean instance variable FIsChangingCamera lets the program know that a button click event handler is updating the camera properties to keep the track bar event handlers from also trying to update a camera at the same time.
The RB_Use_CameraChange procedure allows us to provide one camera property change method for all three cameras. The implementation for the RB_Use_CameraChange method:
// Delphi code for the RB_Use_CameraChange method implementation
procedure TForm23.RB_Use_CameraChange(Sender: TObject);
begin
  FIsChangingCamera := true;
  try
     Form23.Camera := Sender as TCamera;
     TrackBar1.Value := Camera.Position.X;
     TrackBar2.Value := Camera.Position.Y;
     TrackBar3.Value := Camera.Position.Z;
  finally
     FIsChangingCamera := false;
  end;
end;
// C++ code for the RB_Use_CameraChange method implementation
void TForm23::RB_Use_CameraChange(TObject *Sender)
{
  FIsChangingCamera = True;
  try {
    Form23->Camera = dynamic_cast<TCamera*>(Sender);
    TrackBar_PositionX->Value = Form23->Camera->Position->X;
    TrackBar_PositionY->Value = Form23->Camera->Position->Y;
    TrackBar_PositionZ->Value = Form23->Camera->Position->Z;
  }
  __finally {
    FIsChangingCamera = False;
  }
}
- 2. Next, you need to write the code to assign the properties of the cameras to the values of the TTrackBar and TRadioButton objects.
  { The Delphi implementation for changing the coordinates of the camera position }
  procedure TForm23.RB_Use_Camera1Click(Sender: TObject);
  begin
    RB_Use_CameraChange(Camera1);
  end;

  procedure TForm23.RB_Use_Camera2Click(Sender: TObject);
  begin
    RB_Use_CameraChange(Camera2);
  end;

  procedure TForm23.RB_Use_Camera3Click(Sender: TObject);
  begin
    RB_Use_CameraChange(Camera3);
  end;

  { The Delphi implementation for changing the coordinates of the camera position }
  procedure TForm23.TrackBar_PositionChange(Sender: TObject);
  begin
    if not FIsChangingCamera then
    begin
      TForm23.Camera.Position.X := TrackBar_PositionX.Value;
      TForm23.Camera.Position.Y := TrackBar_PositionY.Value;
      TForm23.Camera.Position.Z := TrackBar_PositionZ.Value;
    end;
    { Updating the displayed values of the coordinates }
    Label_Position.Text := Format('X: %d, Y: %d, Z: %d',
      [Round(TForm23.Camera.Position.X), Round(TForm23.Camera.Position.Y),
      Round(TForm23.Camera.Position.Z)]);
  end;

  { The Delphi implementation for changing the rotation angle of the camera }
  procedure TForm23.TrackBar_RotationAngleChange(Sender: TObject);
  begin
    if not FIsChangingCamera then
    begin
      TForm23.Camera.RotationAngle.X := TrackBar_RotationAngleX.Value;
      TForm23.Camera.RotationAngle.Y := TrackBar_RotationAngleY.Value;
      TForm23.Camera.RotationAngle.Z := TrackBar_RotationAngleZ.Value;
    end;
    { Updating the displayed values of the coordinates }
    Label_RotationAngle.Text := Format('X: %d, Y: %d, Z: %d',
      [Round(TForm23.Camera.RotationAngle.X), [Round(TForm23.Camera.RotationAngle.Y),
      Round(TForm23.Camera.RotationAngle.Z)]);
    end;
  end;
// C++ code for choosing the camera
void __fastcall TForm23::RadioButton1Click(TObject *Sender)
{
   RB_Use_CameraChange(Camera1);
}
//----------------------------------------------------------
void __fastcall TForm23::RadioButton2Click(TObject *Sender)
{
   RB_Use_CameraChange(Camera2);
}
//----------------------------------------------------------
void __fastcall TForm23::RadioButton3Click(TObject *Sender)
{
   RB_Use_CameraChange(Camera3);
}

// C++ code for changing the coordinates of the camera position
void __fastcall TForm23::TrackBar_PositionChange(TObject *Sender)
{
  if (!Form23->FIsChangingCamera) {
    Form23->Camera->Position->X = TrackBar_PositionX->Value;
    Form23->Camera->Position->Y = TrackBar_PositionY->Value;
    Form23->Camera->Position->Z = TrackBar_PositionZ->Value;
  }
  // Update the displayed values of the coordinates
  TVarRec vr[] = {
    round(Form23->Camera->Position->X),
    round(Form23->Camera->Position->Y),
    round(Form23->Camera->Position->Z)
  };
  PositionLabel->Text = Format("X: %d, Y: %d, Z: %d",vr,3);
}

// C++ code for changing the rotation angle of the camera
void __fastcall Form23::TrackBar_RotationAngleChange(
      TObject *Sender)
{
  if (!Form23->FIsChangingCamera) {
    Form23->Camera->RotationAngle->X =
      TrackBar_RotationAngleX->Value;
    Form23->Camera->RotationAngle->Y =
      TrackBar_RotationAngleY->Value;
    Form23->Camera->RotationAngle->Z =
      TrackBar_RotationAngleZ->Value;
  }
  // Update the displayed values of the coordinates
  TVarRec vr[] = {
    round(Form23->Camera->RotationAngle->X),
    round(Form23->Camera->RotationAngle->Y),
    round(Form23->Camera->RotationAngle->Z)
  };
  RotationLabel->Text = Format("X: %d, Y: %d, Z: %d",vr,3);
}
Before running the application, set the Camera property of the form to Camera2. This sets Camera2 as the default perspective. You can change it after running the project by changing the camera and its properties from the control panel you created.
Running the Application
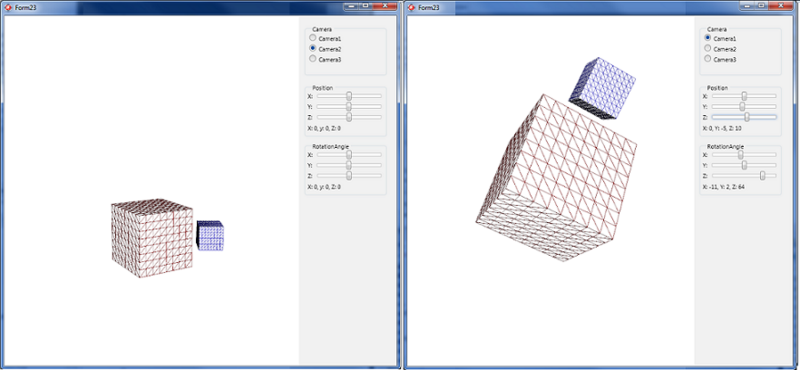
Run the project. The main window of the project is displayed. Observe that the camera from which the objects are seen is Camera2. Change the camera, the position of the camera or its rotation angle, and observe the new perspective from which the objects are seen. Observe how the TLight objects affect the lighting of the 3D object, depending on the position of the camera.
See Also
- FireMonkey 3D
- 3D Multi-Device Application
- FMX.Controls3D.TCamera
- Creating a 2D Interface in a 3D Application (FireMonkey 3D Tutorial)
Samples
- FireMonkey 3D Arrows sample
- FireMonkey First App3D sample
- FireMonkey Planets sample
- FireMonkey Cameras Textures 3D sample

