Code Editor
Go Up to Getting Started with RAD Studio
The Code Editor and the Form Designer occupy the center pane of the IDE window. The Code Editor is a full-featured, customizable UTF8 editor that provides syntax highlighting, multiple undo capability, and context-sensitive help for language elements.
As you design the user interface for your application, RAD Studio generates the underlying code. When you modify object properties, your changes are automatically reflected in the source files.
Because all of your programs share common characteristics, RAD Studio autogenerates code to get you started. You can think of the autogenerated code as of an outline that you can examine to create your program.
Code Editor Context Menu describes the context menu commands for the Code Editor.
The video RAD Studio Code Editor, by Mike Rozlog provides good hints and tips.
To help you write code, the Code Editor provides the features described in this section.
Contents
- 1 Change Bars
- 2 Indenting Code
- 3 Formatting Code
- 4 Code Insight
- 5 Navigation Toolbar
- 6 Code Navigation
- 7 Live Templates
- 8 Code Folding
- 9 Refactoring
- 10 SyncEdit
- 11 To-Do Lists
- 12 Keystroke Macros
- 13 Bookmarks
- 14 Synchronizing Prototypes
- 15 Structural Highlighting
- 16 Smart Keys
- 17 Selection Expansion
- 18 Block Comments
- 19 Using F1 Help
- 20 See Also
Change Bars
The left margin of the Code Editor displays a green change bar to indicate lines that have not been changed in the current editing session. A yellow change bar indicates that changes have been made since the last File > Save operation.
You can, however, customize the change bars to display in colors other than the default green and yellow. Select Tools > Options > Editor Options > Color. In the Element drop-down menu, select Modified Line then change the foreground and the background colors.
Indenting Code
You can use the Tab key to indent the current line of code or a block of code in the Code Editor. The number of spaces that the Tab key indents is determined by the Block indent option on the Tools > Options > Editor Options > Source Options dialog box.
- To indent a line of code, place the cursor at the beginning of the line and press
Tab. - To indent an entire block of code, highlight the code block and press
Tab. - To move text to the left ("outdent"), use
Shift + Tab.
Formatting Code
RAD Studio provides the customizable source code formatter. Editing Delphi or C++ code in the Code Editor, you can apply the Format Source context menu command (or the Edit > Format Source menu command) to format the source code. You can set the Indentation, Spaces, Line Breaks, Capitalization, and Align formatting options under the Formatter group in the Options dialog box (Tools > Options > Formatter). Notice that the Format Source command implements automatic formatting of your code. It takes into account only formatting options specified in the Options dialog box and totally overwrites all your manual formatting implemented in the Code Editor. For example, it ignores your manual code indenting. You can select a block of code and call the Format Source command, so that only this block will be formatted.
Code Insight
Code Insight refers to a subset of features embedded in the Code Editor (such as Code Parameter Hints, Code Hints, Help Insight, Code Completion, Class Completion, Block Completion, and Code Browsing) that aid in the code writing process. These features help identify common statements you want to insert into your code, and assist you in the selection of properties and methods. Some of these features are described in more detail in the following subsections.
To invoke Code Insight, press Ctrl+Space while using the Code Editor. A pop-up window displays a list of symbols that are valid at the cursor location.
To enable and configure Code Insight features, choose Tools > Options > Editor Options and click Code Insight.
When you're using the Delphi Language, the pop-up window filters out all interface method declarations that are referred to by property read or write clauses. The window displays only properties and stand-alone methods declared in the interface type. Code insight supports WM_xxx, CM_xxx, and CN_xxx message methods based on like-named constants from all units in the uses clause.
Code Parameter Hints
Displays a hint containing argument names and types for method calls. Available between the parenthesis of a call, for example, ShowMessage ( | );.
You can invoke Code Parameter Hints by pressing Ctrl+Shift+Space.
Code Hints
Displays a hint containing information about the symbol such as type, file, and line # declared at.
You can display Code Hints by hovering the mouse over an identifier in your code, while working in the Code Editor.
Help Insight
Help Insight displays a hint containing information about the symbol such as type, file, line # declared at, and any XML documentation associated with the symbol (if available).
Invoke Help Insight by hovering the mouse over an identifier in your code, while working in the Code Editor. You can also invoke Help Insight by pressing CTRL+SHIFT+H.
Code Completion
The Code Completion feature displays a drop-down list of available symbols at the current cursor location. You invoke Code Completion for your specific language in the following way:
- In Delphi:
- Press
Ctrl+Space(always invokes Code Completion). - Enter
.(only works when Auto Invoke is enabled on the Code Insight page).
- Press
- In C++:
- Press
Ctrl+Space(always invokes Code Completion). - Enter
.or->(only works when Auto Invoke is enabled on the Code Insight page).
- Press
To cancel a Code Completion request, press the Esc key.
Class Completion
Class completion simplifies the process of defining and implementing new classes by generating skeleton code for the class members that you declare. By positioning the cursor within a class declaration in the interface section of a unit and pressing Ctrl+Shift+C (or right-clicking and selecting Complete class at cursor on the Code Editor context menu), any unfinished property declarations are completed. For any methods that require an implementation, empty methods are added to the implementation section.
You can also use class completion to fill in interface declarations for methods that you define in the implementation section.
Block Completion
When you press Enter while working in the Code Editor and there is a block of code that is incorrectly closed, the Code Editor enters the closing block token at the next available empty line after the current cursor position. For instance, if you are using the Code Editor with the Delphi language, and you type the token begin and then press Enter, the Code Editor automatically completes the statement so that you now have: begin end. This feature also works for the C++ language.
Code Browsing (Ctrl+Click)
While using the Code Editor to edit an application such as a VCL or FireMonkey Forms application, you can use Ctrl+click to automatically "jump to" the code that defines an identifier. To browse code, hold down the Ctrl key while passing the mouse over the name of any class, variable, property, method, or other identifier. After the mouse pointer turns into a hand and the identifier is highlighted and underlined, click the highlighted identifier, and the Code Editor jumps to the declaration of the identifier, opening the source file, if necessary.
You can do the same thing by right-clicking an identifier and choosing Find Declaration from the context menu.
Code browsing can find and open only the units that exist in the project Search path or in the global Browsing path. Directories are searched in the following order:
- Either the project-specific Search path for Delphi (Project > Options > Delphi Compiler) or the Include path for C++ (Project > Options > Directories and Conditionals).
- The global Browsing path (for Delphi: Tools > Options > Environment Options > Delphi Options > Library , or for C++: Tools > Options > Environment Options > C++ Options > Paths and Directories).
An alternative to using Ctrl+click to go to the declaration of an identifier is to use Alt+Up (arrow). For other useful key combinations, see Default Keyboard Shortcuts.
The Navigation Toolbar is displayed at the top of the Code Editor, and it helps you move through your code.

From left to right, the Navigation Toolbar contains the following controls:
- Used Units: The drop-down menu attached to this button
 displays the list of all the units that the current unit uses. Chose a unit from the list to open such unit. The menu displays the units in declaration order. You can also open the drop-down menu pressing the shortcut
 CTRL+ALT+N & CTRL+ALT+U. - File Sections: The drop-down menu attached to this button
 displays a list of the sections in the file. These sections can include Top of File, Interface Section, Interface Uses Clause, Implementation Section, Implementation Uses Clause, Initialization Section, and Bottom of File. Choose one of these sections to display it, and to place the cursor at the beginning of such section. You can also open the drop-down menu pressing the
 CTRL+ALT+N & CTRL+ALT+Sshortcut. - Types: This combo box includes the names of all the types that the current unit declares. Choose one of these types to move the cursor to the declaration of that type. The
CTRL+ALT+N & CTRL+ALT+Tshortcut opens the types combo box. - Methods: This combo box includes the names of all procedures and functions of the current unit. Choose one of these items to move the cursor to the implementation of the procedure or function. The
CTRL+ALT+N & CTRL+ALT+Pshortcut opens the methods combo box. - Project Symbol Search: The
 button allows you to search for all symbols in the active selected project. The
 CTRL+ALT+N & CTRL+ALT+Fshortcut opens the project symbol search tool. The project symbol search filters as you type. The search window displays any search that matches a substring of the symbol name; for example, about matches AboutBox, TAboutBox, and reabout.
To hide the Navigation Toolbar, follow the steps defined in: How to Hide the Navigation Toolbar.
For further details, see How to Use the Navigation Toolbar.
The sections below describe features that you can use to navigate your code while you are using the Code Editor.
Method Hopping
You can navigate between methods using a series of editor hotkeys. You can also lock the hopping to occur only within the methods of the current class. For example, if class lock is enabled and you are in a method of TComponent, then hopping is only available within the methods of TComponent.
The keyboard shortcuts for Method Hopping are as follows:
Ctrl+Q^L-- toggles class lock.Ctrl+Alt+Up arrow-- moves to the top of the current method, or the previous method.Ctrl+Alt+Down arrow-- moves to the next method.Ctrl+Alt+Home-- first method in source.Ctrl+Alt+End-- last method in source.Ctrl+Alt+Mouse_Wheel-- scrolls through methods.
Finding Classes
Allows you to find classes. Use the Search > Find Class command to see a list of available classes that you can select. After you choose one, the IDE navigates to its declaration.
Finding Units
If you are programming in the Delphi language, you can use a refactoring feature to locate namespaces or units. Use the Find Unit command to locate and add units to your code file.
Finding the Next and Previous Changes
As you edit code, you can use keystrokes to quickly navigate to the Next and the Previous changes that you have made. The keyboard shortcuts are:
Ctrl+Shift+F7-- moves to the previous line modified since the file was opened (green marking in the gutter).Ctrl+Shift+F8-- moves to the next line modified since the file was opened (green marking in the gutter).Alt+Shift+F7-- moves to the previous line modified since the last save (yellow marking in the gutter).Alt+Shift+F8-- moves to the next line modified since the last save (yellow marking in the gutter).
If the next or previous line is in an elided (folded) block, the block is unfolded. Code folding is described later in this topic.
Keystrokes are the same for the following keyboard mappings: Default, IDE classic, Brief, and Epsilon. The Visual Studio and Visual Basic keyboard mappings do not have keystrokes for Next/Previous change.
Searching Source Code for Usages
If you are programming in the Delphi language, you can use the Search for Usages feature to find usages of classes, methods, variables, and overriding methods, derived classes and implemented interfaces in your source code projects.
Live Templates
Live Templates allow you to have a dictionary of pre-written code that can be inserted into your programs while you're working with the Code Editor. This reduces the amount of typing that you must do.
Use the links at the end of this topic to learn more about creating and using Live Templates.
Code Folding
Code folding lets you collapse or expand regions or blocks of code. Collapsing your code creates a hierarchical view of the code and makes it easier to read and navigate. The collapsed code is not deleted, but hidden from view until you expand it. Code folding is on by default.
To use code folding, click the plus (+) and minus (-) signs located on the left edge of the Code Editor:
- Click the plus (+) sign to expand the associated region of code.
- Click the minus (-) sign to collapse the associated region of code.
To enable/disable code folding:
- Use the Code Folding check box on the Tools > Options > Editor Options dialog box.
- Use the keyboard shortcut
Ctrl+Shift+K+O.
You can also use the context menu Fold command to fold specific types of regions, such as Types, Methods, XML Doc comments (for Delphi), and the 'Nearest' region. The Fold and Unfold commands are described in Code Editor Context Menu. For more information about code folding, including how to create code folding regions, see Using Code Folding.
Refactoring
Refactoring is the process of improving your code without changing its external functionality. For example, you can turn a selected code fragment into a method by using the extract method refactoring. The IDE moves the extracted code outside of the current method, determines the needed parameters, generates local variables if necessary, determines the return type, and replaces the code fragment with a call to the new method. Several other refactoring methods, such as renaming a symbol and declaring a variable, are also available.
SyncEdit
Video! Video: Sync Editing in RAD Studio, by Mike Rozlog
The Sync Edit feature lets you simultaneously edit identical identifiers in code. As you change the first identifier, the same change is performed automatically on the other identifiers. You can also set jump points to navigate to specific sections of your code.
To-Do Lists
A To-Do List records tasks that need to be completed for a project. After you add a task to the To-Do List, you can edit the task, add it to your code as a comment, indicate that it has been completed, and then remove it from the list. You can filter the list to display only those tasks that interest you.
Keystroke Macros
You can record a series of keystrokes as a macro while editing code. After you record a macro, you can play it back to repeat the keystrokes during the current IDE session. Recording a macro replaces the previously recorded macro.
Bookmarks
Bookmarks provide a convenient way to navigate long files. You can use two different types bookmarks in the Code Editor: Toggle Bookmarks and Stack Bookmarks.
Toggle Bookmarks
You can mark a location in your code with a toggle bookmark and jump to that location from anywhere in the file.
When you set a bookmark, a book icon ![]() is displayed in the left gutter of the Code Editor. You can use up to ten bookmarks, numbered 0
is displayed in the left gutter of the Code Editor. You can use up to ten bookmarks, numbered 0 ![]() through 9
through 9 ![]() , within a file.
, within a file.
You can drag-and-drop bookmark icons in the gutter of the Code Editor, and a moved bookmark has the number of the original bookmark.
For further details, see Using Bookmarks.
Stack Bookmarks
You can use stack bookmarks to navigate through your code. You can drop stack bookmarks in different places of your code adding them in a pile order; you can then navigate back through the pile.
When you place a stack bookmark, this icon ![]() is displayed in your code indicating the position of the stack bookmark.
is displayed in your code indicating the position of the stack bookmark.
For further details, see Using the Bookmark Stack.
Synchronizing Prototypes
RAD Studio provides the Sync Prototypes feature to synchronize the interface and implementation copies of your Delphi method prototypes.
The Sync Prototypes feature is only for Delphi; and allows you to sync the type of method (function, procedure, constructor, or destructor), its parameters, parameter types, parameter modifiers, and the function return type. You cannot sync the function name or the function modifiers.
If you want to sync a method prototype:
- Make any modification in the interface or implementation of your method prototype.
- Press the Sync Prototypes shortcut
CTRL+SHIFT+ALT+P, or Sync Prototypes in the context menu. - RAD Studio synchronizes the prototypes, making any necessary changes.
The Sync Prototypes feature helps you to keep the interface and the implementation of your prototype methods synchronized.
If RAD Studio does not find any method to synchronize, the following message is displayed: No synchronizable method found.
Limitations: Bear in mind the following limitations:
- Overloaded methods cannot be synchronized.
- Synchronizing prototypes of methods does not change the prototype of the methods in ancestor or descendant classes.
Structural Highlighting
Structural Highlighting
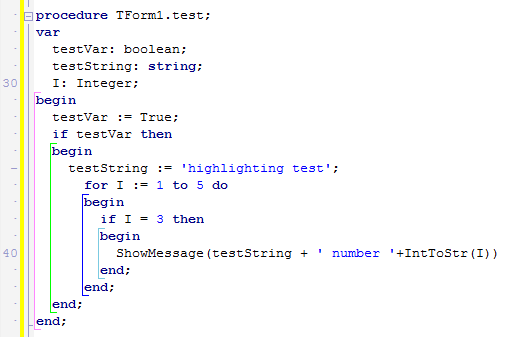
RAD Studio highlights the code structures with lines, such as begin-end blocks. The structural highlighting of RAD Studio provides enhanced syntax highlighting to help you to keep your code and your work process organized.
Structural highlighting keeps blocks of code grouped together and identifies the relevant keywords. Structural highlighting uses an alternating sequence of four colors to distinguish the depth of a particular block.
You can enable or disable the structural highlighting, and configure the colors of the lines from the structural highlighting options page.
Flow Control Highlighting
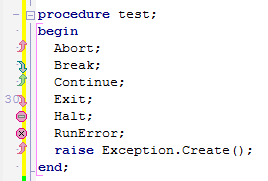
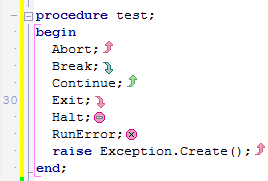
RAD Studio highlights the use of procedures that interrupt the linear flow execution in your code. The flow control highlighting of RAD Studio provides a visual reminder for lines of code that interrupt the linear execution of your project.
The icons can either appear in the gutter of the code editor, or at the end of the line that contains the flow change.
You can enable or disable the control flow highlighting, and configure the location of the icons from the structural highlighting options page.
Smart Keys
Smart Home Key
The Smart Home Key provides a shortcut to position the cursor at the beginning of the line, and at the beginning of the text.
Pressing the HOME key when you are in the Code Editor, positions the cursor at the beginning of the line where the cursor was located; pressing the HOME key again places the cursor right before the text starts in the same line. If you keep pressing the HOME key, the cursor position toggles between the beginning of the line, and the beginning of the text.
You can enable or disable the Smart Home Key in Tools > Options > Editor Options > Key Mappings.
Smart Surround Keys
The Smart Surround Keys provide a fast way to surround your code with "()", "[]", or "{}".
To surround your code with "()", "[]", or "{}", select the text you want surround in the Code Editor, an click "(", "[", or "{". The Code Editor surrounds the selected text with "()", "[]", or "{}" according with the character you typed.
You can enable or disable the Smart Surround Keys in Tools > Options > Editor Options > Key Mappings.
Selection Expansion
The Selection Expansion is a keyboard-only feature that allows you to select the word/identifier under the cursor and then expand the selection to larger syntactic groups such as statement, line, block, method, and so on.
Pressing the CTRL+W shortcut selects the identifier under the cursor. If you keep pressing the CTRL+W shortcut, the Code Editor expands the selection by logical groups, selecting the current expression, statement, block, and so on until you select the entire method, the whole implementation section, and finally the entire document.
Block Comments
You can comment-out a section of code by selecting the code in the Code Editor and pressing Ctrl+/ (slash). Each line of the selected code is prefixed with // and is ignored by the compiler. Pressing Ctrl+/ adds or removes the slashes, based on whether the first line of the code is prefixed with //. When using the Visual Studio or Visual Basic key mappings, use Ctrl+K+C to add and remove comment slashes.
Using F1 Help
What happens when you press F1, when the Code Editor is focused?
- Pressing F1, when an
identifiercorresponding to a name of a procedure, function, constant, property, variable, field, type, program, unit, library, or package described in installed CHM help files is pointed, instructs the IDE to open a help topic describing thisidentifier.- If the installed CHM help files contain exactly one help topic describing this
identifier, then this topic opens. - If more than one of the installed CHM help files contain topics describing this
identifier, then the IDE opens the prompt dialog box listing CHM files containing such topics. If the selected CHM file contains more than one topic describing theidentifier, the IDE opens the prompt dialog box listing all topics describing theidentifier. Select the desired one. If the selected CHM file contains exactly one topic describing theidentifier, then the IDE opens this help topic.
- If the installed CHM help files contain exactly one help topic describing this
- Note: In case of multiple topics describing an
identifier, you can additionally detail theidentifierselecting a qualified identifier. The syntax of a qualified identifier is:identifier1.identifier2. Whereidentifier1qualifiesidentifier2. For example, if you point an identifierClear, then the IDE finds hundreds of topics describing this identifier and it is rather complicated to select the desired topic. However, you can select the qualified identifier asTCollection.Clear. Then pressing F1 directly opens the uniquely defined System.Classes.TCollection.Clear topic.
- Pressing F1, when a pointed
word(ortoken) is a reserved word, directive, or C++ keyword, instructs the IDE to open a help topic describing thistoken.
- If more than one help topic is associated with this
token, then the IDE opens the prompt dialog box listing all topics describing thetoken. Select the desired topic. For example you can see this prompt dialog box, when you point thewhilereserved word and press F1.
- In all other cases, pressing F1 opens this Code Editor help topic.
- You can see topics associated with
identifiersin the Index tabs of the system.chm, fmx.chm, vcl.chm, libraries.chm, codeexamples.chm, data.chm help files describing supplied libraries. Index entries in these CHM files are generated automatically during generation of CHM files from corresponding Wikis. These index entries are generated from the identifiers used in titles of Wiki topics and from global identifiers described inside topics. - You can see topics associated with
words(tokens) corresponding to reserved words, directives, or C++ keywords in the Index tab of the topics.chm help file. These index entries should be written manually in the Index topic.
See Also
- Video: RAD Studio 2010 Editor, by Mike Rozlog
- Video: Sync Editing in RAD Studio 2010, by Mike Rozlog
- Code Editor Context Menu
- Customizing the Code Editor
- Formatting Source Code
- Using Bookmarks
- Using Class Completion
- Using Code Folding
- Using Code Insight
- Using the History Manager
- Using Sync Edit
- Using the HTML Tag Editor
- Creating Live Templates
- Using Live Templates
- Creating Template Libraries
- Recording a Keystroke Macro
- Refactoring Code
- Code Completion
- XML Documentation Comments
- Using To-Do Lists
- Form Designer
- History Manager
- Key Mappings