Tutorial: Linking Controls via LiveBindings Designer
Go Up to Database and LiveBindings Tutorials
This tutorial shows how to use the LiveBindings Designer to visually create LiveBindings between controls in order to create applications that require little or no source code.
In this tutorial, you create an HD Multi-Device Application that uses LiveBindings to bind several objects in order to change the stroke and fill colors of a circle. All the bindings are seamlessly created in a visual manner using the LiveBindings Designer.
Contents
Step 1: Creating the Project
Create a new project. Choose an HD Multi-Device Application for this example.
- Drag and drop a TCircle component onto the Form Designer.
- In the Tool Palette, locate a TColorPanel component and drop it onto the form.
- Do the same for a TComboColorBox control.
The color panel control will be setting the fill color of the circle, while the color combo box will be setting the color of the stroke of the circle.
After placing the components on the form, it should look as in the following picture.

Step 2: Creating the LiveBindings
Now look at the LiveBindings Designer window. If it is not visible, then go to the View menu and select the LiveBindings Designer command.
Your diagram contains individual blocks that represent objects on your form. At this point, they are not linked to each other. Locate the block that represents the circle (Circle1) and click the 3 dots in the lower-right corner.
- Select the
Fill.ColorandStroke.Colorproperties from the Bindable Members dialog box.
After you press OK, the Circle1 component is drawn with the two exposed properties. - Click the
Colorproperty of the ComboColorBox1 block and drag a line to theStroke.Colorproperty of the Circle1 block.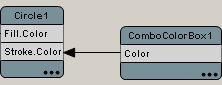
- Click the
Colorproperty of the ColorPanel1 block and drag a line to theFill.Colorproperty of the Circle1 block. - Press the Rearrange button (
 ) in order to auto-arrange the diagram, or you can arrange the blocks yourself.


At this point, your bindings diagram should look as pictured below.

The Results
Run the Application by pressing F9 or using the Run > Run menu command. Change the colors and observe the results.
