Using Live Templates
Go Up to How To Edit Code in the Code Editor
Live templates are reusable code statements that are accessible from the Code Editor. You can insert pre-defined code segments into your code or add your own code snippets to the Templates Window. Live templates are available for both Delphi and C++.
The video Delphi Live Templates, Code Faster shows the basics of using Live Templates.
Contents
To insert an existing Live Template into your code
- In the Code Editor, choose View > Templates.
- Expand the tree in the Templates Window by clicking the plus (+) sign in front of the name of the language you are using (Delphi or C++).
- Position the cursor at the place in your code where you want to add the template.
- In the Templates Window, either double-click the template you want to use, or highlight the template and then click the Insert button. The Live Template is inserted at the cursor position in the Code Editor.
- For example, here is the point template, which defines the three attributes of a jump point:
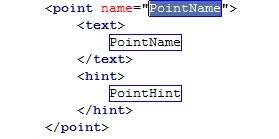
- The point template itself has three jump points (for name, text, and hint attributes). The first jump point (for the name attribute) is active; here you can type a name for the jump point you are creating. Then enter values for the other two fields (text and hint).
- After you have inserted a template, you will probably need to fill in data, variables, methods, or other information that is specific to your code. You can use the Code Completion feature with some of the templates, as described below.

- Hint: Another way to quickly select a code template is to press
Ctrl+Jto display the templates popup window after the cursor is positioned where you want to insert a template.
To quickly insert a Live Template using the Tab key
- On a new line in the Code Editor, type the name of a Live Template. For example, you might want to insert the forb Delphi template (inserting a for loop):
forb
- Press the Tab key. The Live Template is inserted at the cursor position.
- For example, here is the forb template that is inserted:
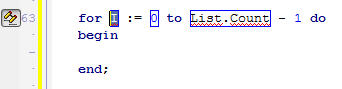
- In the active field or jump point (in this example, I), type the value you want to use.
- Advance to the next field or jump point (in this example, 0) by pressing the Tab key.
- Continue in this manner to enter real values into the fields or jump points in the template.
- Move the cursor to the line below
beginand enter the code you want in the for loop.

Tip: Use Shift-Tab to cycle among all the jump points (even those where you have entered values) without losing focus on the jump points. The jump points lose focus if you press Tab when the cursor is in the last jump point (List.Count in this example).
To use Code Completion with your template
A template can enable Code Completion for specific jump points by including the script element. You can use script to enable other useful function calls, such as DeclareVariable and InvokeClassCompletion.
- Insert a template in the Code Editor.
- Place your cursor at a jump point in the template.
- Press
Ctrl+Spaceto invoke the Code Completion window.
To surround text with a template using the mouse
- Select the code in the Code Editor that you want the template to surround.
- Click the right mouse button and choose the Surround command. This will give you a choice of 'surround-able' templates.
- Choose a template from the list.
To surround text with a template using the Templates Window
- In the Code Editor, choose View > Templates.
- Expand the tree in the Templates Window by clicking the plus sign in front of the name of the language you are using (Delphi or C++).
- Choose the template you want to use in the Templates Window window.
- Select the code in the Code Editor that you want the template to surround.
- Click the Insert button in the Templates Window window.