Mobile Tutorial: Set Up Your Development Environment on Windows PC (Android)
Go Up to Mobile Tutorials: Mobile Application Development (iOS and Android)
The largest part of the testing process of a FireMonkey application destined for the Android target platform uses the Android Device target platform and requires a test Android device connected by USB cable to your development system. You do not need to use the Platform Assistant in developing apps for the Android target platform. (PAServer is, however, required for developing Mac OS X and iOS apps.)
- Note: If you install the Android development tools during your RAD Studio installation, Installing the USB Driver for Your Android Device is the only setup step described here that you need to perform on your PC.
- After you complete either this tutorial or the one required step, your next steps are to:
Contents
Setting Up Your RAD Studio Environment
The following Android development tools are installed on your development system during RAD Studio installation:
- Java Development Kit (JDK)
- Android Software Development Kit (SDK)
- Android Native Development Kit (NDK)
Android Development Tools Are Installed with RAD Studio

We recommend that you install the Android development tools using our product installer. However, if you already have the Android development tools installed on your system, or if you want to install the tools yourself, you can choose to skip this step in the installer. For specific instructions on installing the Android development tools yourself, see Installing the Android Development Tools.
Default Installed Locations of the Android Development Tools
| Tool | Default Location |
|---|---|
|
Java Development Kit (JDK) |
|
|
Android Software Development Kit (SDK) |
|
|
Android Native Development Kit (NDK) |
|
Adding Your Android SDK in Tools Options > SDK Manager
- Important:
- If the Android SDK and NDK are installed during the RAD Studio installation, your Android SDK should be automatically discovered by the RAD Studio SDK Manager, and you do not need to perform this step. Proceed to the next step: Installing the USB Driver for Your Android Device.
- If you installed the Android SDK and NDK yourself, you need to perform this step so that RAD Studio can build apps that target Android devices.
- Select Tools > Options > Environment Options > SDK Manager.
- Here is the SDK Manager when it is fully populated with the recommended Android SDK:
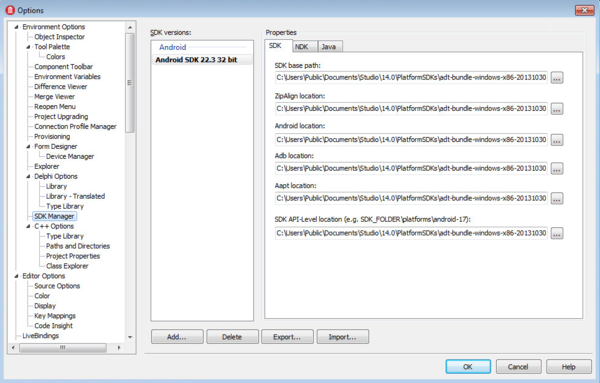
- Note:
- The SDK Manager fields are blank if the SDK Manager cannot detect the default installed Android SDK and you have not yet added an Android SDK to the SDK Manager.
- Fields that are marked with
 do not have the correct path. Click the [...] in that field and browse to the installed location of the library files.
- Click Add.
- On the Add a New SDK dialog box, click the down-arrow in the Select an SDK version field, and select Add New... from the drop-down list:
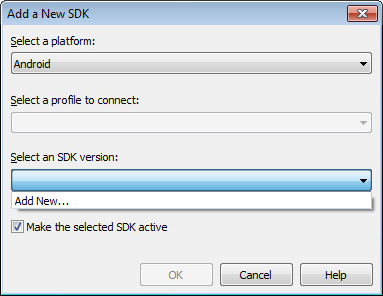
- Note: If your installed Android SDK is listed in the Select an SDK version list, select your Android SDK.
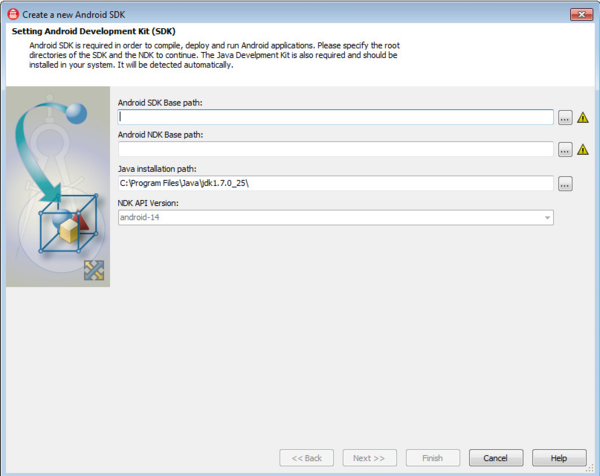
- The Create a new Android SDK wizard is displayed.
- On this wizard, complete the first two fields: Android SDK Base Path and Android NDK Base Path (their installed locations).
- Either enter the paths of the installed locations or click the ellipsis [...] and navigate to the installed locations.
- The symbol indicates that the base paths are missing, and the Next button is enabled only after these fields are filled.
- Here is the wizard when no SDKs have been added and the base path fields are empty:
- This wizard verifies the base paths you specify and then auto-populates the paths to the various other libraries (that is, the tools on page 2 of the wizard).
- Thus, you might need to enter only the base paths for the NDK and SDK, on page 1 of the wizard. Then the second page will auto-populate, if given a little time. Or you might need to verify the auto-populated addresses (if they are present).
- Here is the first page of the wizard after you browse to (or enter) the paths to the Android SDK and NDK.
- There are no icons because the paths have been verified.
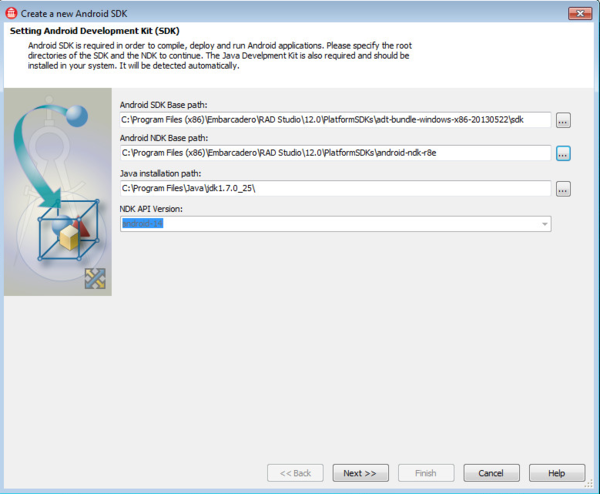
- There are no
- On this wizard, complete the first two fields: Android SDK Base Path and Android NDK Base Path (their installed locations).
- Click Next to go to the next page of the wizard, where the wizard will attempt to prefill the fields by discovery.
- Here is the second page of the wizard with all its fields prefilled:
- For any fields that do not prefill, click the ellipsis [...] button and browse to the installed location.
- Here is the second page of the wizard with all its fields prefilled:
- Click Finish to close the wizard.


You can view and manage your installed Android SDKs by opening the SDK Manager.
Installing the USB Driver for Your Android Device (Required)
Instructions and download sites are available for various Android devices here:
- http://developer.android.com/sdk/win-usb.html (Google USB Drivers)
- https://developer.amazon.com/sdk/fire/connect-adb.html (Kindle Fire USB Drivers)
- http://developer.android.com/tools/extras/oem-usb.html (OEM USB Drivers)
For example, for a Nexus 7 or Nexus 10 tablet, you install the Google USB Driver using the Android SDK Manager, as follows:
- Start the SDK Manager.exe by selecting Start | Programs | Embarcadero RAD Studio | Android SDKs | Android Tools: Start the SDK Manager.exe by selecting Start | Programs | RAD Studio | Android SDKs | Android Tools:

- Tip: If the Android SDK Manager does not start, run android.bat from the \tools directory inside your installed SDK directory.
- In the Android SDK Manager, install the USB driver for your Nexus 7 or Nexus 10 :
- Select Google USB Driver, clear all other checkboxes, and click Install 1 Package:
- Power up your Android device and connect it by USB cable to your development system.
- In the Control Panel Device Manager on your development system, right-click your Nexus 7 or Nexus 10, and select Update Driver Software.
- In the Update Driver Software dialog box, browse to the \extras folder in your Android SDK directory, and select the folder that matches your Nexus 7 or Nexus 10. (Select google for the Nexus 7 or Nexus 10.)
- Click OK.
- Select Google USB Driver, clear all other checkboxes, and click Install 1 Package:


See Also
- Installing the USB Driver for Your Android Device
- Enabling USB Debugging on an Android Device
- Configuring Your System to Detect Your Android Device
- Mobile Tutorial: Creating an Application for Mobile Platforms (iOS and Android)
- Installing the Android Development Tools
- Android Mobile Application Development