InterBase Quick Start: Part III - Inserting Data
Go Up to InterBase Quick Start: Part III - Populating the Database
You can use the INSERT statement to store one or more rows of data into an existing table. In its simplest form, the syntax is:
INSERT INTO table_name [(column_name)]
VALUES      (value)
If you do not specify column names, InterBase inserts the specified values into columns in the order in which the columns were defined, and there must be as many values as there are columns in the table. When you specify columns, you supply the values in the order you name the columns. The columns that you do not specify, are assigned default values or NULL values (depending on the column definition).
You can specifyvalues as constants or the values can be calculated. In embedded SQL, values can also be variables.
An important variation of this syntax is one that allows you to add rows to a table by selecting rows from another table. The two tables must have columns occurring in the same order for this to work. The syntax for this form is:
INSERT INTO table_name
            (columns)
SELECT columns
FROM   table_name
WHERE  conditions
For more information about INSERT, see INSERT.
Contents
 Inserting Data Using Column Values
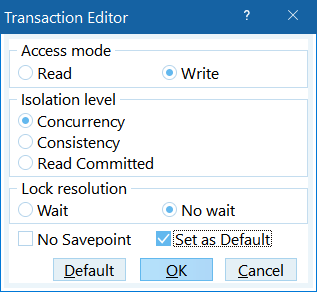
Before you insert data, make sure that you have writing permissions. To set writing permissions, follow these steps:
- Open the Interactive SQL window
- Select Transactions > Options.
- In the Access mode panel, select Write.
- In the Isolation level panel, select Concurrency.
- Check Set as Default and click OK.
The following steps guide you to insert some data into the database:
- Enter and execute the following code to add a row to the
Countrytable:INSERT INTO Country (country, currency) VALUES ('USA', 'Dollar')
Note:
Anything you type inside the quotation marks is case sensitive. - Enter and execute the following line to add a row to the
Departmenttable:INSERT INTO Department (dept_no, department, head_dept, budget, location, phone_no) VALUES ('000', 'Corporate Headquarters', NULL, 1000000, 'Monterey', '(408) 555-1234')
Note:
Strings are enclosed in single quotes, numeric values are not. The department number and the default phone number, for example, are strings (not numeric values). - The next row of data for the
Departmenttable is similar to the previous one. To simplify the entry, click the Previous Script button ( ). This displays the previous query in the SQL Statement area.
 - Substitute the values from the previous query with the values below:
 INSERT INTO Department
            (dept_no,
             department,
             head_dept,
             budget,
             location,
             phone_no)
VALUES      ('100',
             'Sales and Marketing',
             '000',
             200000,
             'San Francisco',
             '(415) 555-1234')
Note:
The new value forhead_deptis a string, not a numeric value. - To confirm that you successfully inserted the data, you can verify the contents of the tables. Enter and execute the following two statements (one after another). You should get a list of results for each statement:
SELECT * from Country
SELECT * from Department
If you close the Interactive SQL window without committing the statements, the following message dialog appears:
You have to select Yes, otherwise your changes (in this case the insterted data) are undone.
 Inserting Data With a Script
To insert the remaining data into the Country, Job, Department, and Employee tables, use an SQL script:
- Load the
INSERTS.SQLscript. - Execute the query.
- To confirm that the data is present in the database, execute each of the following statements.
SELECT * FROM Country
SELECT * FROM Job
SELECT * FROM Employee
SELECT * FROM Department
You should see 14 entries in the
Countrytable. The image below shows what you should see.
Time to Back up
If you have successfully executed the INSERTS.SQL script, it is a good time to back up your database.


