InterBase Quick Start: Part II - Creating Tables with a Script
Go Up to InterBase Quick Start: Part II - Data Definition
You should now understand how to create tables. You create the rest of the tables using an SQL script.
If you wish to examine the syntax regarding tables further, take a look at the TABLES.SQL script. For example, the definition of the Employee table contains a complex CHECK constraint for the salary column:
CHECK ( salary >=
(
       SELECT min_salary
       FROM   job
       WHERE  job.job_code = employee.job_code
       AND    job.job_grade = employee.job_grade
       AND    job.job_country = employee.job_country)
AND
salary <=
(
       SELECT max_salary
       FROM   job
       WHERE  job.job_code = employee.job_code
       AND    job.job_grade = employee.job_grade
       AND    job.job_country = employee.job_country))
This constraint ensures that the salary of an employee is greater than the minimum salary for the job of that employee (specified by job_code, job_grade, and job_country) and lesser than a corresponding maximum salary.
Contents
 Run the TABLES.SQL Script
- Load the
TABLES.SQLscript. - Execute the query.
- Note:
If you see any errors, refer to the Troubleshooting section for help.
Time to Back up
If you have successfully executed the TABLES.SQL script, it is a good time to back up your database.
Troubleshooting
If you make a mistake when entering domain definitions, you get an error message when you run the TABLES.SQL script or when you define the tables manually.
To identify an error:
- When you run a script: Take a look at the log file. You can find the log file in the same directory as your script file.
- When you execute a query: The SQL output area displays any errors that occur.
In any case, if there is a problem with a particular table, an error message like this appears:
Statement failed, SQLCODE = -607
Dynamic SQL Error
-SQL error code = -607
-Invalid command
-Specified domain or source column does not exist
Follow these steps to resolve the problem:
- Read the error text. In this case it says that the specified domain does not exist. That means you probably made an error when typing the domain name.
- Select Domains in the left pane of IBConsole.
- You should see four domains that you manually defined:
FIRSTNAME,LASTNAME,EMPNO, andDEPTNO. Confirm that the names of the domains are correct. It is likely that you misspelled a name. - Drop the incorrect domain by entering and executing the following command:
DROP DOMAIN domain_name
- Recreate the domain using the appropriate
CREATE DOMAINstatement. - Run the
TABLES.SQLscript again.
If you still see an error:
- Identify the table related to the error.
- Make sure that any domains that the definition for this table contains, exist in your database. If they do, the problem may be in the definition of a domain. To examine the definition of a specific domain, do the following:
- Select Domains in the left pane of IBConsole.
- Right-click on a domain name in the right pane and select Properties.
- Switch to the Metadata tab.
- Confirm that the domain definition is correct. Do this for any domains or tables that the error refers to.
As an example, this is the Metadata tab for the COUNTRYNAME domain:
Altering Tables
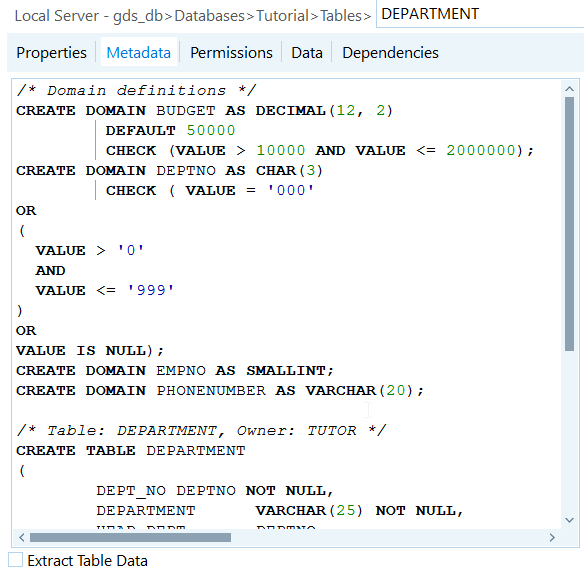
Take a look at the definition of the Department table.
- Select Tables in the left pane of IBConsole.
- Right-click on the
Departmenttable in the right pane and select Properties. - Switch to the Metadata tab. The image below shows what you should see:
You can change the structure of existing tables with the ALTER TABLE statement. A simplified syntax for altering a table is:
ALTER TABLE table_name
  <operation1> [,
  <operation2>, …]
operation = ADD column
| ADD table_constraint
| ALTER [column] col_name <alt_col_clause>
| DROP column
| DROP CONSTRAINT constraint_name
Notice how you can only drop a constraint if you assign it a name upon creation. For more detailed definition of the ALTER TABLE statement, see ALTER TABLE.
 Altering the Department Table
This section guides you to add five new columns and two foreign key constraints to the Department table.
- Open the Interactive SQL window and enter the following statement:
ALTER TABLE Department
  ADD head_dept DEPTNO,
  ADD mngr_no EMPNO,
  ADD budget BUDGET,
  ADD location VARCHAR(15),
  ADD phone_no PHONENUMBER DEFAULT '555-1234',
  ADD FOREIGN KEY (mngr_no) REFERENCES employee (emp_no) ON DELETE CASCADE ON
  UPDATE CASCADE,
  ADD CONSTRAINT fkdept FOREIGN KEY (head_dept) REFERENCES department (dept_no)
  ON DELETE CASCADE ON UPDATE CASCADE
- Open the Metadata for the
Departmenttable again (see steps in Altering Tables section) and see the differences in the definition:
More Troubleshooting
If you receive error messages when you are alter tables or insert data, use the Metadata tab to investigate.
- Examine the definition of each table that you enter by hand and compare it to the code snippets that this tutorial provides.
- When you find a problem you can either drop the table and recreate it or use the
ALTER TABLEstatement to drop a column (ALTER TABLE table_name DROP column_name) and then add the column again using the correct definition (ALTER TABLE table_name ADD column_name column_def). If you misspell the name of the table itself, you must drop the table(DROP TABLE table_name) and recreate it.


