InterBase Quick Start: Part V - Access Privileges
Go Up to InterBase Quick Start: Part V - Advanced Topics
This section is a brief introduction to an important topic: security. For more information about security, see the Planning Security section of the Data Definition Guide.
Initially only the creator of a table, the owner of a table, and the SYSDBA user have access to a table. On UNIX servers that have a superuser or a user with root privileges, those users also have access to all database objects.
You can grant other users the right to see or modify tables by assigning access privileges using the GRANT statement. The GRANT statement assigns access privileges for a table or view to specified users, roles, or procedures. The REVOKE statement removes previously granted access privileges.
The table below lists the available access privileges:
| Privilege | Access |
|---|---|
|
|
|
|
|
Read data. |
|
|
Delete data. |
|
|
Insert data. |
|
|
Modify data. |
|
|
Execute or call a stored procedure. |
|
|
Reference a primary key with a foreign key. |
|
|
All privileges assigned to that role. |
Contents
Assigning Privileges with GRANT
The GRANT statement can grant one or more privileges to one or more users. Those privileges can be to one or more complete tables or they can be restricted to certain columns. Only UPDATE and REFERENCES privileges can be assigned at the column level.
Granting Access to Whole Tables
The following statement grants one privilege on the department table to one user:
GRANT SELECT ON department TO emil
The following statement assigns two privileges on the department table to three users:
GRANT INSERT, UPDATE ON department TO emil, ravi, helga
To grant privileges to everyone, use the PUBLIC keyword. The following statement grants all privileges (except EXECUTE) on the department table to anyone who connects to the database:
GRANT ALL ON department TO PUBLIC
Granting Access to Columns
Instead of granting access to entire tables, you may want to grant access only to certain columns of a table. The following statement assigns UPDATE privilege to all users for the contact and phone columns in the customer table:
GRANT UPDATE ON (contact, phone) ON customer TO PUBLIC
Revoking Privileges
The REVOKE statement removes access privileges for a table or view to specified users, roles, or procedures. The following statement removes the insert and update privileges on the department table that were granted to Emil, Ravi, and Helga in an earlier example.
REVOKE INSERT, UPDATE ON department FROM emil, ravi, helga
Using Roles to Control Security
A role is a named group of privileges.
For example, a company might want to grant a particular set of privileges to the sales people and a different set of privileges to the accounting staff. The set of privileges in each case can be quite complex. Without roles, you have to use a long and complex GRANT statement each time a new sales or accounting person joins the company. You can avoid that using roles.
Implementing a role is a four-step process:
- Define the role.
CREATE ROLE role_name
- Grant privileges to the role.
GRANT privilege_list ON table_name TO role_name
privilege_list = one OR more OF INSERT, UPDATE, DELETE, SELECT, REFERENCES, EXECUTE
Note:
You must always grantEXECUTEin a separate statement.or
GRANT [UPDATE],[REFERENCES] (col_name, [col_name 2, ...]) ON table_name TO role_name
- Grant the role to users.
The users now have all the privileges that correspond to the
GRANT role_name TO user_name1, [user_name2, ...]
role_namerole. But there is an additional step before those privileges are available to them. They have to specify the role when they connect to a database. - Specify the role when you connect to a database.
 Using a Role to Control Access
Before you proceed, we recommend that you commit your work. That will allow you to rollback to this point in case anything goes wrong.
This exercise takes you through all four steps of implementing a role and asigning a role to a user.
- Logout from the server.
- Disconnect from the
Tutorialdatabase. - Login to the server as user
SYSDBA. - Create a new user:
- Set the user name as
CHRIS. - Set the password as
chris4ib.
- Set the user name as
- Connect to the
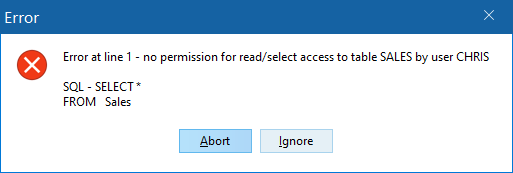
Tutorialdatabase as userCHRIS(use Database > Connect As ...). - Execute the following statement:
SELECT *
FROM   Sales
InterBase displays an error prompt because all the table that you refer to in the above statement belongs to the user
TUTOR. UserCHRISdoes not have permission to do anything with any of the tables that you create during this tutorial. - Disconnect from the
Tutorialdatabase and reconnect asTUTOR. - Create a role called
salespeople.CREATE ROLE salespeople
- Execute the following
GRANTstatements to assign privileges to thesalespeoplerole.GRANT SELECT, UPDATE, INSERT ON sales TO salespeople
GRANT UPDATE (contact_first, contact_last, phone_no) ON customer TO salespeople
GRANT salespeople TO chris
- Disconnect from the
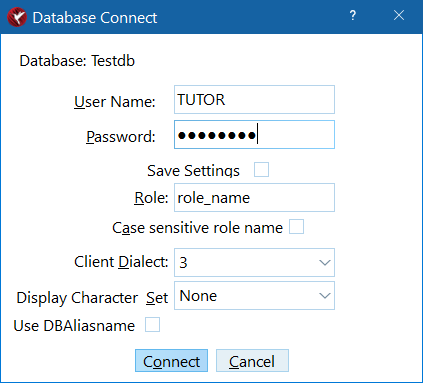
Tutorialdatabase and reconnect asCHRIS. You have to specifysalespeopleas the Role in the Database Connect dialog. - Enter the query from step 5. This time, InterBase InterBase retrieves all the rows from the
Salestable because userCHRIShas the required permissions.CREATE ROLE salespeople
- Disconnect from the
Tutorialdatabase and reconnect asTUTOR.

