Tutorial: DataSnap Application Using an ISAPI DLL Server
Go Up to Database and LiveBindings Tutorials
Contents
This tutorial describes the basics steps to create a simple Client-Server application. The server is implemented as an ISAPI DLL application, and the client is written in Delphi. After you create the server and activate the connection between the client and server with DataSnap, the client can call methods defined and implemented on the server.
The main steps are:
- Configuring your environment. These settings are required in order to enable ISAPI development
- Creating the server
- Creating the client
Configuring your development environment
- Go to Start , type "Turn Windows" in the search field. Then select Turn Windows features on or off from the matching entries.
-
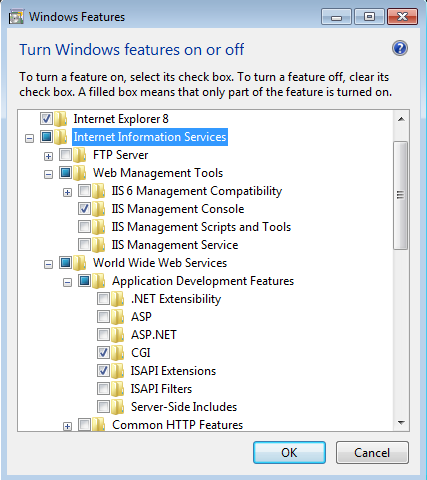
Expand the Internet Information Services node of the Windows Features dialog box and then:
- In Web Management Tools, check IIS Management Console.
- In World Wide Web Services, expand the Application Development Features and then check CGI and ISAPI Extensions:
- After the Windows features are enabled, go to Start, type "IIS" in the search field, and open Internet Information Services (IIS) Manager. Expand the Connections nodes, click Application Pools and then select DefaultAppPool:
- In the Actions panel, click Advanced Settings and set Enable 32-Bit Applications to True:
- If Enable 32-Bit Applications is set to True, then only 32-bit applications will be supported, and for 64-bit applications, an internal server error message is returned.
- If Enable 32-Bit Applications is set to False, then only 64-bit applications will be supported, and for 32-bit applications, an internal server error message is returned.
- Expand the Sites node from the Connections panel, right-click Default Web Site and select Add Virtual Directory. Enter an alias and a physical path:
- Go to the root node from the Connections panel and double-click ISAPI and CGI Restrictions. Select Edit Features Settings from the Actions panel and check the two options:
- Return to the root node and double-click Handler Mappings. Go to the Actions panel, select Edit Feature Permissions and check Execute.
- Select the root node, and from the Actions panel click Start to start the server.


Note:


Creating the server
-
Select File > New > Other > Delphi Projects > DataSnap Server and choose DataSnap WebBroker Application.
- Set the project type to ISAPI dynamic link library. Click Next.
- In Server Features, make sure that Sever Methods Class is selected. Click Next.
- Select TComponent as the ancestor type. Click Finish.
- ServerMethodsUnit1 implements the server methods for this DataSnap server. It contains the implementation of two simple methods called EchoString and ReverseString, which return the Value given as a parameter in normal respective reversed states.
- WebModuleUnit1 contains the components that make this ISAPI dll function as a DataSnap server. DSHTTPWebDispatcher is responsible for managing ISAPI/WebBroker HTTP requests and responses on behalf of the DataSnap Server.
- Both DSHTTPWebDispatcher1 and DSServerClass1 components have their Server property set to DSServer1.
-
Set the output directory to the virtual directory physical path 'C:\myExample':
- Right-click Project1.dll in Project Manager.
- Navigate to Options.
- Change the 'Output directory' to the physical path from Step 4 in How to configure your development environment
- Build the project.
- Make sure that the server is running.
- Browse to "localhost/myExample/Project1.dll". You should see a page like this:
-
In this example, we add a new method named SayHello to ServerMethodsUnit1. The method returns a concatenated string like "Hello, FirstName LastName !", where FirstName and LastName are two string parameters.
Delphiunit ServerMethodsUnit1; interface uses System.SysUtils, System.Classes, Datasnap.DSServer, Datasnap.DSAuth; type {$METHODINFO ON} TServerMethods1 = class(TComponent) private { Private declarations } public { Public declarations } ... function SayHello(FirstName: string; LastName: string): string; end; {$METHODINFO OFF} implementation uses System.StrUtils; ... function TServerMethods1.SayHello(FirstName, LastName: string): string; begin Result := 'Hello, ' + FirstName + ' ' + LastName + ' !'; end; end.
- Build Project1.dll. If any error occurs, stop the server in the IIS Manager, build the project, then start the server.
-
Call the method from the browser. The default pattern for a DataSnap/REST call is:
where:http:// servername[:port]/datasnap/rest/classname/method/arg1/arg2/...argN- servername is the name of the server or domain (a standard part of the HTTP request).
- port is required if a non-standard port is assigned for either http or https.
- /datasnap/rest is the pattern for special dispatch handling by the DataSnap server. (Both the "datasnap" and "rest" values can be overridden by identifiers of your choice.)
- /classname is the name of the class
- /method is the name of the class method (function or procedure)
- /arg1 … /argn are the parameters passed to the method. If the arguments contain special characters, they must be URL-encoded
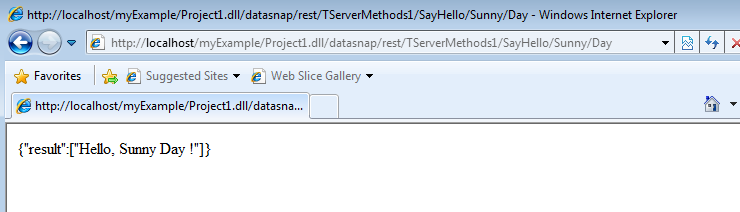
The content is displayed in JSON format.


Creating the client
- Add a new Multi-Device Application project in ProjectGroup1.
-
Drop a TDSRestConnection component on the form.
- From the Object Inspector set Host to localhost.
- Change LoginPrompt to False.
- Set UrlPath to myExample/Project1.dll.
- Right-click the DSRestConnection1 component on Form1 and select Generate dataSnap client classes. A new unit called ClientClassesUnit1.pas was added to your project.
- Return to Form1 in Unit1 and drop two TLabel components. Change their Text property to FirstName for Label1 and LastName for Label2.
- Add two TEdit components on the form. Change their Name property to First and Last.
- Drop a TButton and set the Text property to SayHello.
-
In the Object Inspector, switch to Events and implement the OnClick event for the SayHello TButton:
procedure TForm1.SayHelloClick(Sender: TObject);
var
  Temp: TServerMethods1Client;
begin
  Temp := TServerMethods1Client.Create(DSRestConnection1);
  ShowMessage(Temp.SayHello(First.Text, Last.Text));
end;
- Save your project, and press Run

