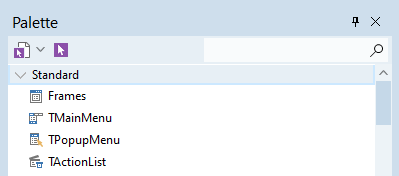
Tool Palette
Go Up to Tool Windows Index
View > Tool Windows > Tool Palette
Assists with a new project, adds components to a form, or adds code snippets to the Code Editor.
Ctrl+Alt+P is the shortcut key for View > Tool Palette.
| Item | Description |
|---|---|
|
<categories> |
Displays a list of the categories of available items, allowing you to position the Tool Palette to a category. |
|
|
Displays the categories of tools in the Tool Palette. Press Esc to reset the display. |
|
|
Deselects the currently selected item in the Tool Palette (click |
|
|
Enter a search string: the name of a component that you want to locate in the Tool Palette. The Tool Palette automatically displays only those items that match the string you type. Click X to clear the search string. |
- Select the component and press Return.
- Double-click the component.
Shift+Clickthe component; then the component is selected, and every time you click on the form, you add the component. This shortcut key is useful for adding multiples of a component.
Tool Palette hints display when you hover the mouse pointer over a component on the palette. The hints include basic information such as component name, unit name, and design-time package name.
When you switch away from the Form Designer and then return to the Tool Palette, the Tool Palette remains open to the same area you were using before you switched away. When the Diagram View has the focus, then the Tool Palette shows icons helping to create UML model elements available for the UML diagram opened in the Diagram View. See Tool Palette in Modeling.
Unsupported Components Are Grayed Out
When you have a form on the Form Designer, the Tool Palette shows all the components that your form supports. However, some of those components may not support all the target platforms that your project supports.
When a component does not support the active target platform of your project, the Tool Palette shows that component grayed out.

Context Menu
Right-click the Tool Palette to display the following commands:
| Item | Description |
|---|---|
|
Add New Category... |
Displays the Create a New Category dialog box, allowing you to create an empty category. You can then drag-and-drop components from other categories into the new category to create a customized category. |
|
Delete <name> Category |
Deletes the selected category from the Tool Palette. To restore the category, right-click the Tool Palette and select Unhide Button | <deleted_category> Show All Buttons. |
|
Rename <name> Category |
Allows you to rename the selected category by typing over the category name on the Tool Palette. To restore the category's original name, right-click the category, select Rename Category again, and type in the original name. |
|
Delete <name> Button |
Deletes the selected item from the Tool Palette. |
|
Hide Button |
Removes the selected item from the Tool Palette, but does not delete it. |
|
Unhide Button |
Redisplays items previously hidden by using the Hide Button or the Delete Category command. |
|
Auto Collapse Categories |
Allows only one category to be expanded at a time. |
|
Collapse All |
Displays only the categories of items. |
|
Expand All |
Displays the items in each category. |
|
Lock Reordering |
Disables drag and drop reordering of categories and items on the Tool Palette. |
|
Reset Palette |
Removes all Tool Palette customizations. |
|
Properties... |
Displays the Tool Palette page of the Options dialog box, allowing you to change the appearance of the Tool Palette. |
|
Stay on Top |
Displays the Tool Palette on top of the desktop even if other windows are displayed. |
|
Dockable |
Enables drag-and-dock for the Tool Palette. |