Synchronizing Data through LiveBindings
Go Up to LiveBindings Designer
Using the LiveBindings Designer, you can synchronize various controls that support LiveBindings by using the following exposed properties:
Synch*
These properties are visible in the LiveBindings diagrams for certain controls. This topic describes how to synchronize a list box with a string grid and a binding navigator by means of the Synch and * properties.
Prerequisites
First you need to create a new FireMonkey Application (see Multi-Device Application or Wizards for Creating FireMonkey Multi-Device Applications and Components).
On the main form, drop these components:
- TPrototypeBindSource -- will provide the sample data.
- TBindNavigator -- will provide navigation functionality for the sample data.
- TListBox -- will display some information (for instance names of alpha colors).
- TStringGrid -- will display all information about the sample data.
Click the string grid component (StringGrid1) and from the Object Inspector set the Options.goEditing property to True. This allows for editing of the items directly into the string grid.
Connecting via LiveBindings
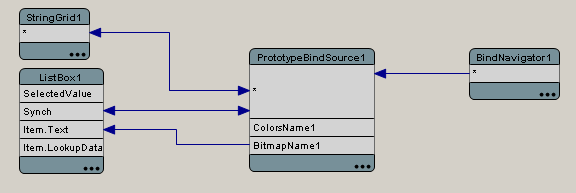
Start the LiveBindings Designer and connect:
- the
*property of PrototypeBindSource1 to*property of BindNavigator1. - the
*property of PrototypeBindSource1 to*property of StringGrid1. - the
*property of PrototypeBindSource1 toSynchproperty of ListBox1.
At this point the list box is in synch with the string grid and the binding navigator controls the cycling of your sample data.
Now you have to add some sample data to the prototype binding source component. Refer to the Tutorial: Using TPrototypeBindSource and the LiveBindings Designer topic in order to learn how to add sample data. For the purpose of this topic you need to add ColorsNames and BitmapNames.
In the LiveBindings Designer:
- bind
BitmapName1property from PrototypeBindSource1 toItem.Textproperty of ListBox1 component.
Your bindings diagram should look as pictured:
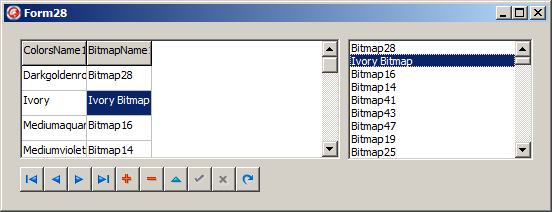
And you can see that the data on the string grid and the list box automatically updated on the form:
Running the Application
Run the application by pressing F9 or selecting Run > Run from the main menu.
You can cycle through the sample data via the binding navigator or by selecting a particular item in the list box or the string grid. You can also update an item's name in the string grid and it also automatically updates in the list box.


