User:Loredanac/iOS Tutorial Interbase ToGo
Go Up to Mobile Tutorials: Mobile Application Development (iOS and Android)
Contents
Before starting this tutorial, you should read and perform the following tutorial session:
Tip: Following this tutorial requires a license for IBToGo or IBLite. If you have purchased RAD Studio XE5 Professional and up, or Delphi XE5 Professional with Mobile and up, you have received a key for an unlimited development and deployment license for IBLite. If you are a trial user, and would like to test InterBase on iOS and Android, you can get access to an IBToGo test deployment license during your trial. To activate your deployment trial license, please follow this link: InterBase ToGo Deployment.
- Note: On Android devices, InterBase ToGo apps might require specific Uses Permissions to be set, specifically:
- Read external storage
- Write external storage
- Internet
This tutorial describes the basic steps to browse data managed by InterBase ToGo on your iOS and Android devices through the dbExpress framework.
| iOS | Android |
|---|---|
|
|
|


Using dbExpress to Connect to the Database
dbExpress is a very fast database access framework, written in Delphi. RAD Studio provides drivers for most major databases, such as InterBase, Oracle, DB2, SQL Server, MySQL, Firebird, SQLite and ODBC. You can access these different databases using procedures similar to the procedure described here.
- For the mobile platforms, dbExpress supports InterBase ToGo as well as SQLite. These database products can run on iOS and Android devices.
- For other databases, such as Oracle, you need to have at least a client library. On Windows platforms, the client library is provided as a DLL to connect to. Therefore, you need to develop applications using middle-tier technologies such as DataSnap to connect to these database products from a mobile device.
Another tutorial discusses how to connect to Enterprise Database without using a client library on a mobile device; see Mobile Tutorial: Connecting to an Enterprise Database from a Mobile Client (iOS and Android).
Design and Set Up the User Interface
This tutorial uses one TListBox component as the UI element.
To set up a ListBox component, use the following steps:
- To create an HD Multi-Device Application, select File > New > FireMonkey Mobile Application - Delphi > Blank Application.
- Drop a TListBox component on the form.
- In the Object Inspector, set the following properties of the ListBox:
- Set the Align property to alClient, so that the ListBox component uses the entire form.
- Set the DefaultItemStyles.ItemStyle property to listboxitembottomdetail.
- Right-click the TListBox component in either the Designer or the Editor, select Add Item, and add the following components:
- TListBoxHeader component.
- TSearchBox component.
- Close the Items Designer.
- Add a TLabel component to the TListBoxHeader, and set the following properties in the Object Inspector:
- Set the Align property for the TLabel component to alClient.
- Set the StyleLookup property to toollabel.
- Set the TextAlign property to taCenter.
- Set the Text property to DB DEMO.

Connecting to the Data
Following are the basic steps to connect to data in a database using dbExpress:
- On the Tool Palette, double-click the TSQLConnection component.
- In the Object Inspector, set the following properties for TSQLConnection:
- This app uses InterBase ToGo, so set the Driver property to IBLite/ToGo.
- Set the LoginPrompt property to False, so that the user is not prompted for a login.
- Click the ellipsis [...] for the Params property, and set the Database value to C:\Users\Public\Documents\RAD Studio\12.0\Samples\Data\dbdemos.gdb (location of the database); then close the dialog box:
- Set the Connected property to True.
- Note: If you get an error ("unavailable database") on development environment, this means you do not have a current license for InterBase. The license of InterBase Developer Edition is included as part of the product for some product editions. For more information, see Troubleshooting.
- This app uses InterBase ToGo, so set the Driver property to IBLite/ToGo.
- Add a TSQLDataSet component to the form, and set the following properties:
- Set the SQLConnection property to SQLConnection1 (the one that you added in a previous step).
- Set the CommandText property to
select COMMON_NAME, SPECIES_NAME from BIOLIFE order by COMMON_NAME. - Set the Active property to True.
- Open the LiveBindings Designer and connect the data and the user interface as follows:
- Click COMMON_NAME in SQLDataSet1, and drag the mouse cursor to Item.Text in ListBox1.
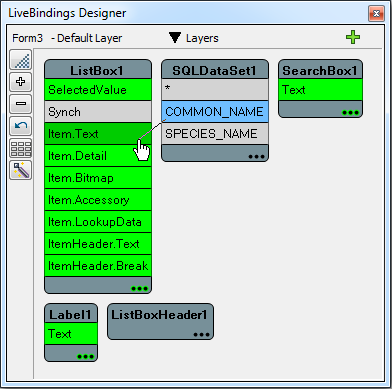
- At this point, TBindSourceDB and TBindingsList components were added to the form.
- Click SPECIES_NAME in BindSourceDB1, and drag the mouse cursor to Item.Detail in ListBox1.
- Click COMMON_NAME in SQLDataSet1, and drag the mouse cursor to Item.Text in ListBox1.


Deploying your Application to mobile
Up to this point, you have used InterBase on your desktop. This means that the actual database is located at your local hard disk drive (for example, C:\Users\Public\Documents\RAD Studio\12.0\Samples\Data\dbdemos.gdb). On the mobile Device, the application is sand-boxed, and typically you can only read and write data that is located in the Documents folder (for iOS device) and internal storage (for Android device) under your application folder.
To connect to a local database on mobile, you need to perform the following actions:
- Deploy the database to the mobile Device.
- Change the configuration (to connect to the database file) to a local file under the Documents folder (for iOS device) or internal storage (for Android device).
Deploy InterBase ToGo, dbExpress Driver, and the Database File to mobile
To execute your application on mobile, you need to deploy the following files:
- Interbase ToGo
- dbExpress Driver to InterBase (for iOS Simulator)
- The database file (dbdemos.gdb)
- Open the Deployment Manager by selecting Project > Deployment.
- Select All-Configurations - iOS Device platform or All-Configurations - Android platform from the drop-down list of target platforms at the top of the Deployment Manager.
- Select Add Featured Files (
 ):
):
- Select the following database modules, and then click OK to close the Featured Files dialog box:
- InterBase ToGo. You need to select the license to be used when deploying the application on the device. The suggested names for the license files available are listed in the Featured Files dialog, under the following name pattern: reg_*.txt. As you can see in the image below, for this tutorial, the reg_ibtogo.txt license file is selected.
- You might have received from Embarcadero a license file for ToGo or IBLite that has a pattern of reg_nnnnnnn.txt, where nnnnnnn is a generated number:
- If you have saved that file over reg_ibtogo.txt or reg_iblite.txt in the location below (for example, C:\Users\Public\Documents\InterBase\redist\InterBaseXE3), you can just select the desired license.
- If you have saved the file with its original name, then select Add Files (shown in the next step) and include the license file in the list of files that need to be deployed with the application.
- You might have received from Embarcadero a license file for ToGo or IBLite that has a pattern of reg_nnnnnnn.txt, where nnnnnnn is a generated number:
- DBExpress InterBase Driver
- Tip: If you plan to test your application on the iOS Simulator, then you also have to select the DBExpress InterBase Driver for iOS Simulator.

- InterBase ToGo. You need to select the license to be used when deploying the application on the device. The suggested names for the license files available are listed in the Featured Files dialog, under the following name pattern: reg_*.txt. As you can see in the image below, for this tutorial, the reg_ibtogo.txt license file is selected.
- Select Add Files and select the database file (for example, C:\Users\Public\Documents\RAD Studio\12.0\Samples\Data\dbdemos.gdb).
- Select dbdemos.gdb and change Remote Path to StartUp\Documents\ (for iOS platform) or assets\internal\ (for Android platform).
- RemotePath on iOS device platform

- RemotePath on Android platform

- Select the Platforms column (double-click the ellipsis [...] in the row for dbdemos.gdb):
- Ensure that iOS Simulator and iOS Device or Android are present for dbdemos.gdb.
- Remove Win32 from the list if it is present (you do not have to copy database files to the Win32 platform).
- Select All-Configurations - iOS Device platform or All-Configurations - Android platform, and make sure dbdemos.gdb is set to be deployed to StartUp\Documents\ or assets\internal.


As you just configured, when you run the app on the mobile device, the database file (dbdemos.gdb) is to be deployed to the Documents folder (for iOS platform) or internal storage (for Android platform) in the sandbox area of your mobile app.
Modify Your Code to Connect to a Local Database File on mobile
As described in the previous step, the TSQLConnection component is connected to a database on your local file system with an absolute path. So you need to replace the location of the file before connecting to the database, as follows:
- In the Form Designer, select the SQLConnection1 component.
- In the Object Inspector, double-click the Value field of the BeforeConnect event.
- Add the following code to this event handler:
procedure TForm1.SQLConnection1BeforeConnect(Sender: TObject);
  var  FString : String;
begin
  {$IF DEFINED(iOS) or DEFINED(ANDROID)}
   SQLConnection1.Params.Params.Values['Database'] :=
      TPath.Combine(TPath.GetDocumentsPath, 'dbdemos.gdb');
  {$ENDIF}
end;
The TPath record is declared in System.IOUtils unit, so you need to add System.IOUtils in the uses clause.
Run Your Application on a Simulator or on a Mobile Device
Now your application is ready to run. You should be able to browse data just as you can in the IDE. You can also narrow down the list using the Search Box as shown in the second image:
| iOS | Android |
|---|---|
|
|
|


Troubleshooting
InterBase License Issues
If you get an error ("unavailabale database") when you connect to the database in the development environment, this means you do not have a current license for InterBase.
- A license for InterBase Developer Edition is included as part of the product for some product editions.
- To activate the license of InterBase Developer Edition for a registered RAD Studio installation, go to the Embarcadero Product License Manager (click Start | All Programs | Embarcadero InterBase XE3).
Exception Handling Issues
If your application raises an exception without having proper exception handling code, your mobile app simply crashes (disappears) at run time.
- If you encounter a crash, you might want to connect manually to the database while you troubleshoot the issue using the following steps:
- Select the SQLConnection1 component, and change the Connected property to False.
- Drop a button on the form, and create the following event handler to manually connect to the database:
procedure TForm1.Button1Click(Sender: TObject);
begin
  try
    SQLConnection1.Connected := True;
    SQLDataSet1.Active := True;
  except
    on e: Exception do
    begin
      ShowMessage(e.Message);
    end;
  end;
end;
Typical Errors and Resolutions
Following are typical errors that you might encounter when you connect to the database, and suggestions for resolving the issues:
| Error on iOS | Suggestion |
|---|---|

|
Check whether the dataBase file (dbdemos.gdb) is delivered to 'StartUp\Documents\'. |

|
Check whether the license file is delivered for InterBase ToGo. |

|
Check whether you pointed to the local file (add an event handler for the OnBeforeConnect event of the SQLConnection1 component). |