Creating LiveBindings
Go Up to LiveBindings in RAD Studio
This topic describes how to create a LiveBinding in RAD Studio. LiveBindings can be seamlessly created using the LiveBindings Designer or the LiveBindings Wizard.
Contents
How to Create a LiveBinding using the LiveBindings Designer
The easiest way to create a LiveBinding is using the LiveBindings Designer. Use the following steps to create such a LiveBinding.
- Locate the object you want to bind to another object, for instance, an arc dial.
- Locate the object you want to be bound to your first object, for instance, a label.
- In the LiveBindings Designer, create a link (represented by a line) between the arc dial component and the label by clicking the arc dial component and dragging a line to the label component (not on a property of the label component but the component itself, represented by a block in the diagram). Select the
RotationAngleproperty from the dialog box that appears when you select the Bind To > See all members... command from the context menu.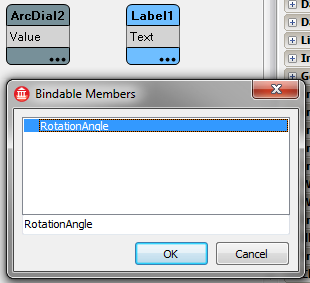
- Click OK and your new binding is created.

How to Create a LiveBinding using the LiveBindings Wizard
The LiveBindings Wizard is another way you can create LiveBindings. Use the following steps to create such a LiveBinding.
- Locate the object you want to bind to another object, for instance, an arc dial.
- Locate the object you want to be bound to your first object, for instance, a label.
- Right-click the arc dial component and select the LiveBindings Wizard... command.
- Now the LiveBindings Wizard offers you a set of possible bindings of your arc dial to the label.
- Choose to link the arc dial with a property of a component.
- Specify the component you want to link to, in this case the label.
- Identify the functionality you want the binding to perform. For instance, to modify the rotation angle of the label according to the rotation of the arc dial, select the
RotationAngleproperty. - Complete the wizard to generate your binding expression.
- Run the application (
F9) and observe the way the label's rotation angle is modified once you rotate the arc dial.
LiveBindings Wizard Tutorials
The following tutorials are specific use case scenarios for the LiveBindings Wizard:
- Tutorial: Linking a Control with a Field
- Tutorial: Linking a Control with a Component Property
- Tutorial: Linking a Property of a Component with a Control
- Tutorial: Linking a Property of a Component with a Field
LiveBindings Tutorials
The following tutorials describe in detail how to create LiveBindings visually and programatically, and also how to connect to various dataset fields using LiveBinding:
- Tutorial: Using LiveBindings to Create an Application Without Code
- Tutorial: Using LiveBinding in VCL Applications
- Tutorial: Using LiveBinding Programatically
- For more, see Database and LiveBindings Tutorials.