Restoring a database using IBConsole
Go Up to Performing backups and restores using IBConsole
Contents
Use the Database Restore dialog to restore databases. To access this dialog, select a server from the list of available servers displayed in the Tree pane and continue with one of these possible methods:
- Select anything under the databases hierarchy and choose Database|Maintenance|Backup/Restore|Restore.
- Double-click any backup alias name under the Backup hierarchy.
- Right-click Backup or any backup alias name under the Backup hierarchy and choose Restore from the context menu.
- Select any backup alias name under Backup and click Restore in the Work pane.
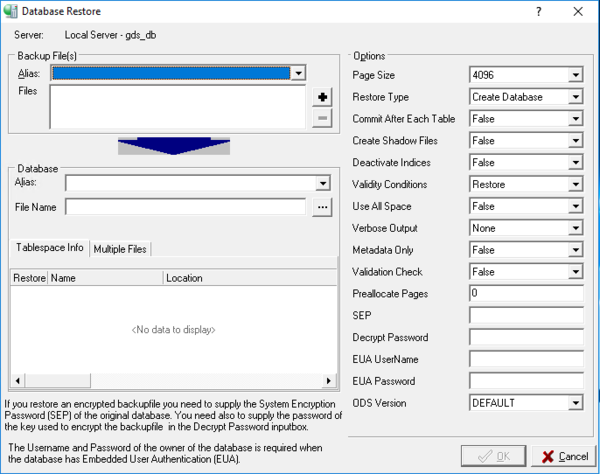
The Database Restore dialog appears:
When restoring a database, do not replace a database that is currently in use.
To restore a database:
- Check the source Backup File(s) Server to make sure the indicated server is correct. If it is not, cancel this dialog and re-initiate the Database Restore dialog under the correct server.
- If you accessed the Database Restore dialog from a backup alias, then the Alias field is automatically assigned.
- If you accessed the Database Restore dialog from Backup, then you must select an alias from the list of backup aliases or click
 to add backup files. It is important that you include all filenames associated with the restore.
 - Once you select your backup file(s) the table on the Tablespace Info tab populates with all the tablespaces present on the backup. On this section you can choose which tablespaces include in the restore process.
- Select a destination server from a list of registered servers in the Database Server drop-down list.
- If you want to restore to an existing database, select its alias from the Database Alias drop-down list. If you want to restore to a new database, type a new alias name in the Database Alias field and click
 to set a filename and destination.
 - To use multiple files, select Use Multiple Files and click
 to add files.
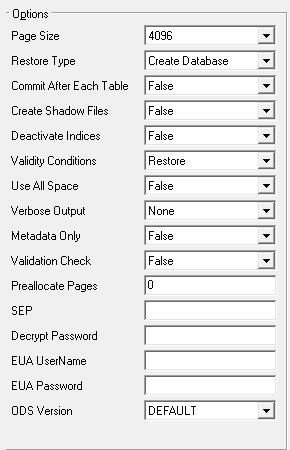
 - You can specify options for the restore by entering a valid value, by clicking the option value and choosing a new value from a drop‑down list of values or by double-clicking the option value to rotate its value to the next in the list of values. See Restore options below for a description of these options.
- Click OK to start the restore.
The backup alias references the associated backup file names, so you need only to specify the alias name, not the actual backup file name, when indicating the backup to restore. If the backup spans multiple files, the server uses the header page of each file to locate additional files, so the entire backup can be restored based on the alias filename.
You cannot restore a database to a network file system (mapped drive).
Typically, a restored database occupies less disk space than it did before being backed up, but disk space requirements could change if the ODS version changes. For information about the ODS, see Restoring the ODS.
The InterBase restore utility allows you to restore a database successfully even if for some reason the restore process could not rebuild indexes for the database. For example, this can occur if there is not enough temporary disk space to perform the sorting necessary to build an index. If this occurs, the database is restored and available, but indexes are inactive. After the restore completes, use
ALTER INDEX to make the indexes active.Restore options
The restore options are shown on the right side of the Database Restore dialog. You can specify options by entering a value, by clicking the option value and choosing a new value from a drop‑down list of values, or by double-clicking the option value to rotate its value to the next in the list of values.
Restoring Page Size Options
InterBase supports database page sizes of 1024, 2048, 4096, 8192, and 16384 bytes. The default is 4096 bytes. To change the page size, back up the database and then restore it, modifying the Page Size option in the Database Restore dialog.
Changing the page size can improve performance for the following reasons:
- Storing and retrieving Blob data is most efficient when the entire Blob fits on a single database page. If an application stores many Blobs exceeding 4KB, using a larger page size reduces the time for accessing Blob data.
- InterBase performs better if rows do not span pages. If a database contains long rows of data, consider increasing the page size.
- If a database has a large index, increasing the database page size reduces the number of levels in the index tree. Indexes work faster if their depth is kept to a minimum. Choose Database|Maintenance|Database Statistics to display index statistics, and consider increasing the page size if index depth is greater than three on any frequently used index.
- If most transactions involve only a few rows of data, a smaller page size may be appropriate, because less data needs to be passed back and forth and less memory is used by the disk cache.
This function corresponds to the -page_size option of gbak.
Overwrite
Option values are True and False.
IBConsole cannot overwrite an existing database file unless the Overwrite option value is set to True. If you attempt to restore to an existing database name and this option is set to False, the restore does not proceed.
To restore a database over an existing database, you must be the owner of the existing database or SYSDBA.
Do not replace an existing database while clients are operating on it. When restoring to an existing file name, a safer approach is to rename the existing database file, restore the database, then drop or archive the old database as needed.
This function corresponds to the -replace option of gbak.
Restore Type
Option values are:
Create Database | Replace Database | Create Tablespace | Replace Tablespace.
Create Database Fully restore to a target database, if it does not exist already.
Replace Database Overwrite a potentially existing target database.
Create Tablespace Truncate table(s) in target tablespace before restoring from backup.
Replace Tablespace Delete target tablespace file(s) and recreate from backup.
To restore a database over an existing database, you must be the owner of the existing database or SYSDBA.
Do not replace an existing database while clients are operating on it. When restoring to an existing file name, a safer approach is to rename the existing database file, restore the database, then drop or archive the old database as needed.
This function corresponds to the -replace option of gbak.
Commit After Each Table
Option values are True and False.
Normally, IBConsole restores all metadata before restoring any data. If you set the Commit After Each Table option value to True, IBConsole restores the metadata and data for each table together, committing one table at a time.
This option is useful when you are having trouble restoring a backup file. This can happen if the data is corrupt or is invalid according to integrity constraints.
If you have a problem backup file, restoring the database one table at a time lets you recover some of the data intact. You can restore only the tables that precede the bad data; restoration fails the moment it encounters bad data.
This function corresponds to the -one_at_a_time option of gbak.
Create Shadow Files
Shadow files are identical, physical copies of database files in a database. To recreate shadow files that were saved during the backup process set the Create Shadow Files option to True. For further information on shadowing see Shadowing.
Deactivate Indexes
Option values are True and False.
Normally, InterBase rebuilds indexes when a database is restored. If the database contained duplicate values in a unique index when it was backed up, restoration fails. Duplicate values can be introduced into a database if indexes were temporarily made inactive (for example, to allow insertion of many records or to rebalance an index).
To enable restoration to succeed in this case, set the Deactivate Indexes option to True. This makes indexes inactive and prevents them from rebuilding. Then eliminate the duplicate index values, and re-activate indexes through ALTER INDEX in isql.
A unique index cannot be activated using the ALTER INDEX statement; a unique index must be dropped and then created again. For more information about activating indexes, see the Language Reference.
The Deactivate Indexes option is also useful for bringing a database online more quickly. Data access is slower until indexes are rebuilt, but the database is available. After the database is restored, users can access it while indexes are reactivated.
This function corresponds to the -inactive option of gbak.
Validity Conditions
Option values are Restore and Ignore.
If you redefine validity constraints in a database where data is already entered, your data might no longer satisfy the validity constraints. You might not discover this until you try to restore the database, at which time an error message about invalid data appears.
Always make a copy of metadata before redefining it; for example, by extracting it using
isql.To restore a database that contains invalid data, set the Validity Conditions option to Ignore. This option deletes validity constraints from the metadata. After the database is restored, change the data to make it valid according to the new integrity constraints. Then add back the constraints that were deleted.
This option is also useful if you plan to redefine the validity conditions after restoring the database. If you do so, thoroughly test the data after redefining any validity constraints.
This function corresponds to the -no_validity option of gbak.
Use All Space
Option values are True and False.
To restore a database with 100% fill ratio on every data page, set the Use All Space option to True. By default, space is reserved for each row on a data page to accommodate a back version of an UPDATE or DELETE. Depending on the size of the compressed rows, that could translate to any percentage.
This function corresponds to the -use_all_space option of gbak.
Restoring a Backup Using Verbose Output
Option values are None, To Screen, and To File.
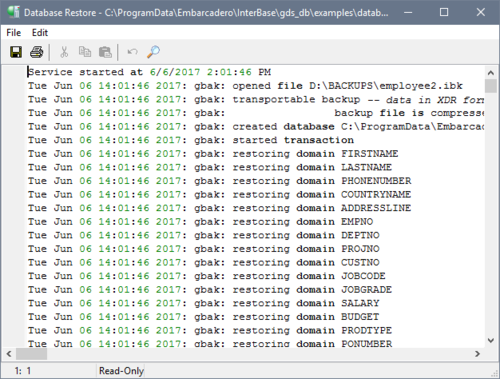
To monitor the restore process as it runs, set the Verbose Output option to To Screen. This option opens a standard text display window to display status messages during the restore. For example:
The standard text display window enables you to search for specific text, save the text to a file, and print the text. For an explanation of how to use the standard text display window, see Text Viewer Window.
This function corresponds to the -verbose option of gbak.


