MultiResBitmap Editor
Contents
Go Up to Property Editors Index
Use the MultiResBitmap Editor at design time to edit the properties of multi-resolution bitmaps. A multi-resolution bitmap is a bitmap collection that contains one bitmap for each scale factor. For example, an iOS app needs to have images of different scales defined for Retina and non-Retina devices. The various bitmap items can have the same or different source image files.
The MultiResBitmap Editor can create and edit TFixedMultiResBitmap multi-resolution bitmaps. TFixedMultiResBitmap multi-resolution bitmaps contain bitmap items having the TFixedBitmapItem type. Notice that TImage controls keep TFixedMultiResBitmap multi-resolution bitmaps in the MultiResBitmap property; therefore, the MultiResBitmap Editor should edit multi-resolution bitmaps associated with this property.
TFixedBitmapItem bitmap items have the Fixed property. Bitmap items with Fixed = True are mandatory. By default, each multi-resolution bitmap contains one mandatory (default) bitmap item having the Scale = 1 and the name Normal.
In the MultiResBitmap Editor you cannot delete mandatory bitmap items or change the Scale of mandatory bitmap items. You can extend the list of mandatory bitmap items (and scales) using the global RegisterScaleName method.
On each run-time device, TImage retrieves the most appropriate bitmap to display from the bitmap collection in the TFixedMultiResBitmap multi-resolution bitmap. The obtained scale of the bitmap should best fit to a screen on which the bitmap is displayed. If the multi-resolution bitmap does not contain a bitmap item having exactly the scale required by this screen, then FireMonkey automatically stretches or zooms out the bitmap item having the most appropriate scale, but this stretching can distort the image. If needed, you can add any number of bitmap items having different scales into a multi-resolution bitmap. However, keep in mind that each bitmap item takes resources of the application executable on all platforms (even if some bitmap items are never used on a particular platform).
You can view the video demonstrating typical usage of the MultiResBitmap Editor.
Opening the MultiResBitmap Editor
- Select the TImage object in either the Form Designer or the Structure View.
- Follow one of the steps below:
- In the Object Inspector, double-click the value field of the MultiResBitmap property.
- In the Structure View, right-click the MultiResBitmap entry.
Click Edit Bitmap Collection on the context menu.
- The MultiResBitmap Editor opens.
Creating a Multi-Resolution Bitmap
- Open the Form Designer. In the Tool Palette, type TImage in Search.
- Click the TImage item and drag it onto the form in the Form Designer.
- In the Form Designer, select this TImage. The Object Inspector shows the published properties of TImage.
- In the Object Inspector, select the MultiResBitmap property.
- Double-click the value field of the MultiResBitmap property or click the ... button in the value field of the MultiResBitmap property. The MultiResBitmap Editor with empty multi-resolution bitmap opens. Notice that, by default, the Bitmap Items Pane shows one entry for the mandatory bitmap item having the
Scale = 1: - If you need to add additional scales for your MultiResBitmap in the MultiResBitmap Editor, click Add
 . You can edit the scale value in the Scale box.
 - To open a bitmap file, click Fill All From File
 .
.
- In the Open dialog box, browse to the source image file containing the image you want to load.
- The image is loaded into the bitmap items pane, one bitmap item for each of the scales present in the editor.
- Click Apply
 to ensure that all parameters and images in the MultiResBitmap Editor are updated.
- Click Preview
 to preview the selected bitmap item. (Click the down-arrow to select the zoom factor to be used in the Preview pane.)
- The Preview pane appears at the right of the MultiResBitmap Editor:
- In the Bitmap Items pane, you can select bitmap items to preview, and you can:
- Use the Transparent color, SizeKind, Width, and Height controls to define properties of bitmap items and of the whole multi-resolution bitmap.
- Click Apply to update images.
- Preview shows the selected image using the specified Size, Scale, and other properties.
- To load a specific (different) image for a bitmap item having a particular scale, click the Open button on the right-hand side of the control showing the file name of the source image:

- The Open dialog box opens. You can browse for a file containing the desired image.
- To edit a particular bitmap item, select the bitmap item in the Bitmap Items pane. The Object Inspector shows properties of this bitmap item. Click the ... button in the value field of the Bitmap property. The Bitmap Editor opens. Here you can edit the selected bitmap.
- When you finish editing properties of the multi-resolution bitmap, click Finish. The Confirm prompt appears:
Clear information used only at design time?
- Click Yes to clear the design-time information. This applies all edits in the .dfm file and closes the dialog box.
- The design-time information Transparent color, SizeKind, Width, Height, and the names of files with source images are only used at design time. After you complete editing of the multi-resolution bitmap, these properties can be removed from the .dfm file.


Toolbar
At the top of the MultiResBitmap Editor there is a toolbar containing the following buttons:
| Button | Description |
|---|---|
|
Add |
Adds a new bitmap item entry to the Bitmap Items pane. |
|
Delete |
Deletes the selected bitmap item entry. By default, the first entry (having the |
|
Fill All From File |
Shows the Open dialog box to select an image file. The selected image is loaded into all bitmap item entries, in the Bitmap Items pane:
|
|
Apply |
Reloads all bitmap item entries in accordance with the specified names of files and new values of other parameters. For example, click Apply if you have changed the Transparent color or Size properties. |
|
Finish |
Applies all changes in the .dfm file and closes the dialog box. |
|
Preview |
When you click the Preview button, the Preview pane appears on the right of the MultiResBitmap Editor. The Preview pane shows the preview of the bitmap item selected in the Bitmap Items pane. Preview shows the image using the corresponding Size and Scale properties. |
|
Help |
Opens the Help System. Clicking Help is like pressing F1. |
Toolbar's Context Menu
Right-click the toolbar to display the toolbar context menu. This menu contains one item:
| Command | Description |
|---|---|
|
Text Labels |
Displays or hides the text labels under the buttons in the toolbar. |
Controls
Directly under the toolbar, the MultiResBitmap Editor provides the following controls:
| Button | Description |
|---|---|
|
Transparent color |
Defines the color used by a mask for drawing images transparently. Transparent color defines such pixel color, that will be changed to transparent. If |
|
SizeKind |
Defines the value of the SizeKind property of the bitmap items. Possible values are:
For detailed descriptions of these Custom size, Default size, and Size by image values see the description of the Fill All From File button. |
|
Width and Height |
Defines the Width and Height properties for the picture having the |
Panes
The Bitmap Items and Preview panes occupy the lower half of the dialog box.
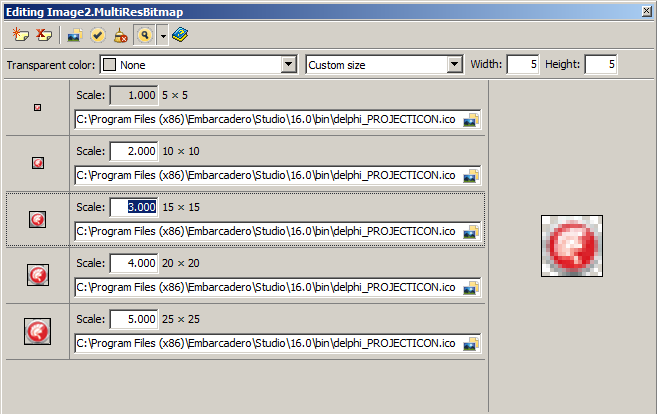
Bitmap Items Pane
The Bitmap Items pane occupies the lower left part of the dialog box.
The Bitmap Items pane shows all defined bitmap item entries. Each entry in this pane describes the properties of the particular bitmap item. Each entry shows:
- The thumbnail view of the bitmap item.
- The value of the Scale property of the bitmap item and the corresponding Width and Height values.
- The filename of a source image file.
Click the Add toolbar button to add a new bitmap item entry.
Click the Delete toolbar button to delete the selected bitmap item entry. By default, the bitmap item entry with the Scale equals to 1 is mandatory (usually it is the first entry) and it cannot be deleted. Therefore, for the mandatory entries, Delete only clears images and filenames of the selected entries.
The edit control in each entry shows the filename of the file containing the image source. Use Fill All From File to set the same source file for all bitmap items. Use the Open button, on the edit control of the particular bitmap item, to set the specific source file for this bitmap item. Notice that you can also drag image files from the Windows Explorer.
When you select a particular bitmap item, the properties of this bitmap appear in the Object Inspector. Double-click the value field of the Bitmap property to open the Bitmap Editor. In the Bitmap Editor you can edit the selected bitmap.
Preview Pane
The Preview pane occupies the right part of the dialog box.
The Preview pane shows the preview of the image of the bitmap item selected in the Bitmap Items pane.
See Also
- Using Multi-Resolution Bitmaps
- Video demonstrating typical usage of the MultiResBitmap Editor
- "Use Custom Multi-Resolution Icons for Your Tabs" in Mobile Tutorial: Using Tab Components to Display Pages (iOS and Android)
- Bitmap Editor
- Image List Editor
- Video demonstrating typical steps required to create a new Image List in your FireMonkey project
- Video demonstrating how to use the Image List Editor to create and edit Image Lists Some advanced and not trivial Image List Editor's features are demonstrated.